AWS Step-by-Step
Getting Started with Amazon Quick, a Cloud Agentic AI Solution
Amazon Quick is Amazon's agentic AI solution. Quick can act as a research assistant, a workflow automation platform, or a data analytics tool. Quick is as powerful as it is flexible, but there are a few things that you will need to know before you can begin using it.
Quick Pricing
Like nearly all of the other AWS services, there is a cost associated with using Amazon Quick. However, the costs might not be what you expect. Generally speaking, AWS costs are tied to resource consumption. Consider EC2, for example -- Amazon's virtual machine instance platform. While an enterprise might spend tens of thousands of dollars per month on running high-end EC2 instances, smaller shops can deploy simple instances that incur extremely minimal costs. As an example, my AWS bill for last month was four cents, although to be fair, I don't run any production workloads in AWS.
The point is that in most cases, Amazon gives smaller organizations plenty of ways to control costs. However, this is not the case with regard to Amazon Quick. Amazon offers two different pricing plans for Amazon Quick. The Professional plan costs $20 per user per month and the Enterprise plan costs $40 per user per month. Besides the base cost, subscribers are billed for agent hours (the amount of time AI agents spend on various tasks) and there are storage fees, although some storage is included. The big fee that you need to be aware of, however, is an infrastructure fee of $250 per month. This fee applies to both Professional and Enterprise subscriptions.
Amazon is currently offering a free trial in which you can use Quick for up to 30 days. This trial allows you to set up as many as 25 user accounts, and Amazon waives the infrastructure fee during the trial period.
Setting Up Amazon Quick
Amazon Quick exists as a service within AWS. However, you do have to jump through a few hoops before you can use it. Normally, if you sign into AWS and select a service, you are taken directly to the dashboard for that service. In the case of Amazon Quick, however, selecting the service takes you to a sign up screen instead. At first glance, this screen almost makes it appear as though you have been logged out. However, the screen does list your AWS account number, thereby confirming that you have not been logged out. To get started, click the Sign Up for Amazon Quick button. Upon doing so, you will be taken to the Sign Up for Amazon Quick screen, which you can see in Figure 1.
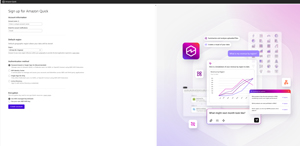 [Click on image for larger view.] Figure 1: This Is the Amazon Quick Sign-Up Screen.
On this screen, start by entering a unique account name. This is different from the name or number associated with your AWS account. Just enter something easy to remember, followed by the email address that you want to use for account notifications.
The next thing that you will need to do is to choose the geographic region where your account data should be stored. Amazon Quick uses the same regions as the larger AWS platform, so it's usually best to match your Amazon Quick region to your default AWS region.
You will also need to choose an authentication method. Amazon recommends that you use password-based or single sign-on authentication, but you can opt to use the IAM Identity Center, Single Sign-On, or Active Directory instead.
Finally, you will have to choose how your Amazon Quick data will be encrypted. Amazon recommends that you use an AWS managed key, but you can supply your own key if you prefer. When you are done, click the Create Account button.
Getting Started
Once you have set up an Amazon Quick subscription, you are taken to the Manage Account screen, which you can see in Figure 2. As you can see in the figure, this is where you go to create additional users and assign them the permissions they need to interact with Quick. The user that you defined within the setup process is already treated as an active user.
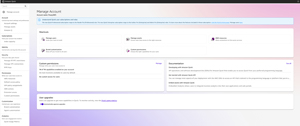 [Click on image for larger view.] Figure 2: This Is the Manage Account Screen.
While this screen is useful for managing Quick, you can't actually build anything from this screen. The easiest way to access the main Quick interface is to go back into the AWS portal and select Amazon Quick from the list of services. This time, you will be taken to the main Quick interface, which you can see in Figure 3.
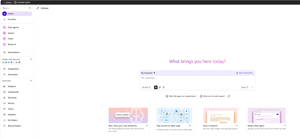 [Click on image for larger view.] Figure 3: This Is the Main Amazon Quick Interface.
About the Author
Brien Posey is a 22-time Microsoft MVP with decades of IT experience. As a freelance writer, Posey has written thousands of articles and contributed to several dozen books on a wide variety of IT topics. Prior to going freelance, Posey was a CIO for a national chain of hospitals and health care facilities. He has also served as a network administrator for some of the country's largest insurance companies and for the Department of Defense at Fort Knox. In addition to his continued work in IT, Posey has spent the last several years actively training as a commercial scientist-astronaut candidate in preparation to fly on a mission to study polar mesospheric clouds from space. You can follow his spaceflight training on his Web site.