AWS Step-by-Step
Meeting Distributed Workload Needs with EC2 Placement Groups
Most modern workloads are distributed, meaning that rather than being confined to a single instance, a workload may rely on multiple instances and various external services. Although such workloads are the norm, they require far more planning than a legacy workload that only consumes a single instance. Admins must consider, for example, the speed with which instances can communicate with one another. Otherwise, the network can become a bottleneck. Similarly, distributed applications must be designed with resiliency in mind so that individual components do not become single points of failure.
While it is possible to manually position instances in a way that fully addresses a workload's performance and redundancy requirements, you may be able to simplify the entire process by taking advantage of placement groups. As the name suggests, a placement group is a collection of AWS EC2 instances. The placement group determines where the instances reside so that you do not have to place instances manually.
Before I show you how to use placement groups, there are a couple of things that you need to know. First, an instance can only be included in a single placement group. Second, when you create a placement group, you will have to choose a strategy for that placement group. Amazon supports 3 different strategies, so it's important to choose the strategy that best aligns with the instances contained within the placement group. It's worth noting that no one single strategy type is going to meet every requirement. As such, you may find that the instances making up a single distributed workload may need to be spread among multiple placement groups. You might for instance, place some instances into a placement group that is designed for performance while other instances reside in a placement group that is geared toward availability.
The first placement group strategy supported by Amazon is called Cluster. The Cluster placement group is performance oriented and intended for use in situations in which you need high performance network connectivity between instances.
The instances within a cluster placement group all reside within a common availability zone, but the instances do not necessarily all reside within the same rack. The actual networking speed that you can attain within a cluster placement group varies based on instance type. Amazon recommends that all of the instances within a cluster placement group are of the same type. However, if you do create various types of instances, then network speeds will match those of the slower instance type. One caveat however, is that Direct Connect connections to resources located on premises is limited to 5 Gbps.
The second type of strategy that you can use is called a Partition Placement Group. Partition placement groups are designed to guard against hardware failure by ensuring that instances are spread across partitions. A partition is a logical structure and you can define the number of partitions that you want to create. The instances within a partition occupy different racks from the instances in other partitions, and each rack has its own network and power.
A partition group can contain up to 7 partitions (per availability zone) and AWS will attempt to evenly distribute instances across the partitions. It is worth noting however, that if a partition placement group will contain dedicated instances, then the group will be limited to 2 partitions.
The third placement group type is called a Spread Placement Group. A Spread Placement Group should be used when instances truly need to be isolated from one another. Each instance within a Spread Placement Group runs on different hardware. Most Spread Placement Groups use a rack level spread, but you can create a host level spread if you are using AWS Outposts. A rack spread placement group allows up to 7 instances per availability zone and does not allow for the use of dedicated instances.
Creating a placement group is a simple process. Open the EC2 console, select the Placement Groups tab and then click on Create Placement Group. When you do, you will need to provide a name for the placement group and choose a placement strategy. If you opt for a Spread placement group, you will need to choose between a rack or host spread. Similarly, if you decide to create a Partition placement group, you will need to specify the number of partitions that you want to create. You can see an example of this in Figure 1.
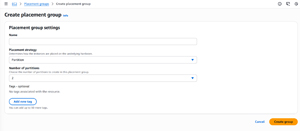 [Click on image for larger view.] Figure 1: Creating a Partition Placement Group Requires You to Specify the Number of Partitions That You Want to Use.
Once you have created a placement group, all that is left is to configure your EC2 instances to use it. You can configure an EC2 instance to use a placement group by making a selection from the Placement Group drop down, located in the instance's Advanced Details section, shown in Figure 2.
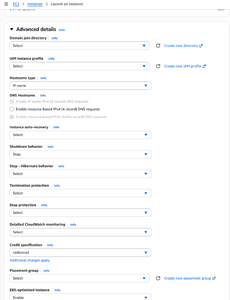 [Click on image for larger view.] Figure 2: An Instance's Advanced Details Section Includes an Option for Selecting a Placement Group.
About the Author
Brien Posey is a 22-time Microsoft MVP with decades of IT experience. As a freelance writer, Posey has written thousands of articles and contributed to several dozen books on a wide variety of IT topics. Prior to going freelance, Posey was a CIO for a national chain of hospitals and health care facilities. He has also served as a network administrator for some of the country's largest insurance companies and for the Department of Defense at Fort Knox. In addition to his continued work in IT, Posey has spent the last several years actively training as a commercial scientist-astronaut candidate in preparation to fly on a mission to study polar mesospheric clouds from space. You can follow his spaceflight training on his Web site.