AWS Step-by-Step
Working With the Next-Generation Resilience Hub, Part 1
Amazon has recently released the next-generation of its Resilience Hub. For those who are not familiar with this tool, it is a service within the AWS portal that you can use to proactively improve your application's resiliency. As you can see in Figure 1, the console gives you a choice between accessing the previous version of the Resilience Hub and the next-generation version.
 [Click on image for larger view.] Figure 1: You Can Choose The Resilience Hub Generation That You Want To Work With. (source: AWS).
The AWS Resilience Hub is divided into three main functions, starting with Manage. The management tools allow you to create a resiliency policy that aligns with your own business requirements. The Manage function also allows you to define services corresponding to your workloads.
The second function within the Resilience Hub is Assess. Amazon gives you two main assessment options. First, you can run a failure mode assessment. This allows you to use AI to detect things like single points of failure, potential latency issues, and misconfigurations.
The other tool that Amazon gives you is the Automatic Dependency Assessment tool. As its name suggests, this tool automatically discovers service dependencies such as AWS services and internal and external endpoints.
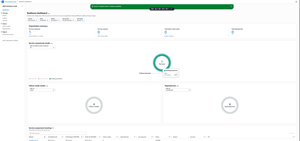
The third Resilience Hub function is Report. Amazon provides a centralized dashboard through which you can monitor your organization's resiliency posture. You can also generate compliance-related reports.
Creating a Resilience Policy
One of the best ways to get started with the Resilience Hub is by creating a policy. A policy allows you to specify your resiliency requirements. Keep in mind that in the real world, the resiliency requirements will likely vary by workload, so you will probably need to create multiple policies.
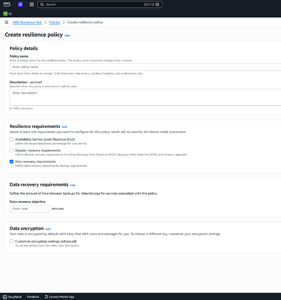
As you can see in Figure 2, creating a policy involves providing a name and a description for the policy that you are creating and then choosing your resiliency requirements. In doing so, you can define availability service level objectives (the target availability percentage for services to which the policy applies).
 [Click on image for larger view.] Figure 2: This Is The Interface Used For Creating A Policy. (source: AWS).
You can also define disaster recovery requirements including recovery point target, recovery time objective, and the disaster recovery boundary (multiple availability zones or multiple regions). You can also define your recovery approach (active/active, hot standby, warm standby, pilot light, or backup and restore). You can see the availability service level objectives and disaster recovery requirements options shown in Figure 3.
 [Click on image for larger view.] Figure 3: The Options That Are Shown Vary Depending On The Checkboxes That You Select. (source: AWS).
When you create a resilience policy, you also have the option of defining your data recovery requirements. As you can see in Figure 4, doing so simply involves specifying your data recovery objective, which is roughly the same thing as the recovery point objective, or the amount of time between backups.
 [Click on image for larger view.] Figure 4: You Can Specify Your Data Recovery Requirements. (source: AWS).
The last option on the Create Resilience Policy page is the data encryption option. This option gives you the ability to use a different key and to customize your encryption settings, but it is usually easier to allow Amazon to handle data encryption for you, so I would recommend that you avoid selecting the Customize Encryption checkbox unless you have a compelling reason to do so. When you are done, you can create the policy by clicking on the Create Policy button.
Defining a Service
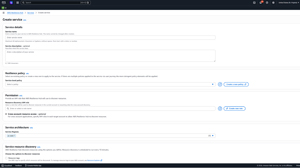
Once you have created one or more policies, you can begin defining services. Remember, the services that you are defining now will eventually be grouped into systems. To get started, select the console's Services tab and then click on the Create Service button. This will take you to the Create Service screen, shown in Figure 5.
[Click on image for larger view.] Figure 5: This Is The Interface Used To Define A Service. (source: AWS).
When defining a service, you will need to provide a name and an optional description for the service that you are creating. From there, you must select one of the resilience policies that you created earlier. This will associate the policy with the service.
The next thing that you will need to do is to provide the console with an IAM role that it can use to discover the resources associated with the service. You can use an existing IAM role or you can create a new one by clicking on the Create New Role button. You can find the role requirements listed at: AWS documentation. While you are at it, you will also need to choose the service region within which the service will reside.
Now, scroll down to the Service Resource Discovery section. Here, you will need to choose how you want to discover resources. There are checkboxes that you can select in order to discover resources based on resource tags, CloudFormation stacks, Terraform state files, and EKS cluster and namespaces.
Finally, there is a checkbox that you can select in order to enable dependency discovery. When selected, AWS will continuously attempt to identify any new dependencies for the service. It is worth noting, however, that continuous dependency discovery comes at an additional cost.
When you are done, click the Create Service button to create the service.
About the Author
Brien Posey is a 22-time Microsoft MVP with decades of IT experience. As a freelance writer, Posey has written thousands of articles and contributed to several dozen books on a wide variety of IT topics. Prior to going freelance, Posey was a CIO for a national chain of hospitals and health care facilities. He has also served as a network administrator for some of the country's largest insurance companies and for the Department of Defense at Fort Knox. In addition to his continued work in IT, Posey has spent the last several years actively training as a commercial scientist-astronaut candidate in preparation to fly on a mission to study polar mesospheric clouds from space. You can follow his spaceflight training on his Web site.