AWS Step-by-Step
AWS Blurs the Lines Between File, Block and Object Storage
When deploying new workloads, organizations have long been forced to choose between file, object, and block storage. File storage is a system that organizes data into a familiar folder/path structure, like what is used on laptops. Block storage organizes data into fixed-size blocks and is commonly used by databases and virtual machine instances. Object storage stores data as individual self-contained objects, each with a unique ID. Object storage systems, such as AWS S3, are commonly used for things like cloud backup, video storage, and large-scale Web applications.
Up until now, file, block, and object storage each served a distinct use case and could not easily be used interchangeably. However, Amazon has recently blurred the lines between file and object storage with its introduction of S3 Files. S3 Files allows you to access the contents of an S3 bucket through a high-performance file system. In fact, EC2 instances normally use block storage, but you can configure an EC2 instance to attach to a file system residing within an S3 bucket.
Enabling S3 Files is easy. If you take a look at Figure 1, you can see that the Amazon S3 page now contains a Files section and a File Systems option. Clicking on the File Systems option takes you to the Getting Started page, shown in Figure 2.
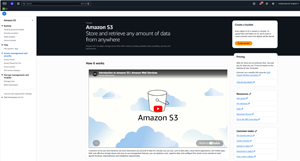 [Click on image for larger view.] Figure 1: Click on the File Systems Option. (source: AWS).
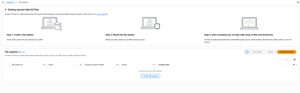 [Click on image for larger view.] Figure 2: This Is the Page Used for Setting Up S3 Files. (source: AWS).
As you can see in the figures, setting up S3 Files is a three-step process. The first step involves creating a file system. To do so, click the Create File System button. This will take you to a page similar to the one shown in Figure 3. Initially, this page will be configured to create a new S3 bucket for use with S3 Files, but you can opt to use an existing bucket instead. The caveat is that you are going to need to have versioning enabled for the bucket that you choose. If versioning is not enabled for the bucket, then the console will give you an opportunity to enable it (you do not have to worry about manually enabling versioning, you can do it directly from the Create File System screen).
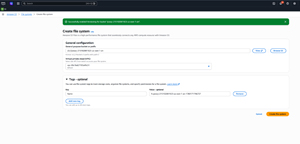 [Click on image for larger view.] Figure 3: This Is the Screen Used to Create a File System. (source: AWS).
Once you choose the bucket within which you wish to create a file system, the next thing that you will have to do is choose a Virtual Private Cloud (VPC). You should create the file system within the same VPC as the resources that will be accessing it. When you are done, apply any tags that you might want to use and then click the Create File System button. The file system creation process takes a few minutes to complete.
The second step is to mount the file system. Amazon gives you some shortcuts for attaching the file system to an EC2 instance, a Lambda function, or an ECS task, as shown in Figure 4.
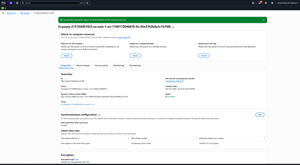 [Click on image for larger view.] Figure 4: You Can Attach the File System to an EC2 Instance, a Lambda Function, or an ECS Task. (source: AWS).
For the purposes of this article, let's attach the file system to an EC2 instance. It is worth noting that, at least for the time being, only Linux instances seem to be supported.
To connect your Linux instance to the file system that you have created, click the Attach button found in the Attach to an EC2 Instance section in the figure above. Now, select your instance from the dropdown, as shown in Figure 5.
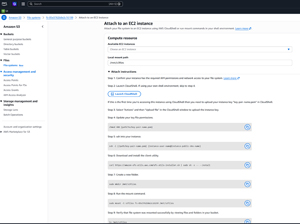 [Click on image for larger view.] Figure 5: Select the Instance That You Want to Attach the Storage To. (source: AWS).
The last step in the process is to use the Launch CloudShell button, shown in the figure above, to open CloudShell. From there, you will need to upload your .PEM file and then enter a series of commands in order to attach and mount the file system. Unfortunately, I can't give you the exact commands to use, because they are going to vary based on your .PEM file and based on the identifier associated with your file system. Even so, the figure above provides a sample of what the commands look like.
About the Author
Brien Posey is a 22-time Microsoft MVP with decades of IT experience. As a freelance writer, Posey has written thousands of articles and contributed to several dozen books on a wide variety of IT topics. Prior to going freelance, Posey was a CIO for a national chain of hospitals and health care facilities. He has also served as a network administrator for some of the country's largest insurance companies and for the Department of Defense at Fort Knox. In addition to his continued work in IT, Posey has spent the last several years actively training as a commercial scientist-astronaut candidate in preparation to fly on a mission to study polar mesospheric clouds from space. You can follow his spaceflight training on his Web site.