AWS Step-by-Step
Enabling Outbound Forwarding with Route 53 Resolver, Part 1
DNS name resolution has always been one of the bigger challenges associated with operating a hybrid environment. Even if you create a VPN between your private network and an AWS VPC, you may find that resources within the VPC are unable to resolve the names of resources on your private network.
One of the best ways to fix this problem is to configure the Route 53 Resolver to forward certain DNS queries to an authoritative DNS server located on your private network. That way, if there are resources associated with your domains that cannot be resolved from within the VPC, DNS queries pertaining to those resources can be forwarded to a DNS server that knows what to do with the queries. So let's take a look at how to set up the Route 53 Resolver to enable outbound DNS query forwarding.
Start the Endpoint Configuration
To get started, open the Route 53 Resolver service and click the Configure Endpoints button. This opens a wizard that walks you through the configuration process, as shown in Figure 1
.
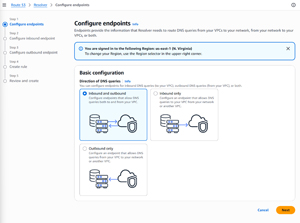 [Click on image for larger view.] Figure 1: Choose the basic type of endpoint configuration that you want to configure.
Since the goal is to allow resources created within a VPC to locate endpoints on your private network, select the Outbound only option. You would choose the Inbound and outbound option if you wanted endpoints on your private network to be able to resolve resources within the VPC as well. There is also an Inbound only option that you can use if you want to help endpoints on your private network resolve resources within your VPC.
Once you have made your selection, click Next. You will be taken to the Configure Outbound Endpoint screen, shown in Figure 2
.
 [Click on image for larger view.] Figure 2: This screen is used to configure the outbound endpoint.
Name the Endpoint and Pick the VPC
The first thing that you need to do on this screen is provide an endpoint name. This is a friendly name that you can use to identify your endpoint on the dashboard.
The next decision is choosing which VPC should be used to handle outbound queries. The important thing to understand is that the Route 53 Resolver is region-specific. As a result, the interface allows you to select from a list of VPCs that reside within your current region. All outbound DNS queries are routed through the region that you select. What's more, you cannot switch to a different VPC without starting over.
Choose Security, Endpoint Type and Protocol
Once you have selected a VPC to handle outbound DNS queries, you need to choose a security group to be used by the endpoint. The security group must contain at least one outbound traffic rule. While you can make changes to the security group later (such as creating or deleting rules), you will not be able to switch to a different security group. As such, it is important to carefully consider which security group you want to use.
The next choice is the type of endpoint that you want to create. You can create an IPv4 endpoint, an IPv6 endpoint, or a dual-stack endpoint.
Now that you have chosen the endpoint type, you need to choose the endpoint protocol that you want to use. The available choices include Do53 and DoH. For those who might not be familiar with these terms, Do53 refers to traditional, unencrypted DNS traffic flowing across port 53. Conversely, DoH stands for DNS over HTTPS and is an encrypted alternative to conventional DNS traffic.
Finish with Monitoring and IP Redundancy
Before you move on, choose whether you want to enable CloudWatch metrics for resolver network interfaces and target name servers.
The last thing that you need to do within this step of the configuration process is configure IP address usage. AWS requires you to specify two different IP addresses for redundancy. Additionally, these two IP addresses must be associated with two different Availability Zones.
The IP address selection process is relatively straightforward. For both IP addresses, choose an Availability Zone and then select a subnet within that Availability Zone. The subnet that you select must have IP addresses available for use. You can choose automatically assigned IP addresses or opt to enter IP addresses manually.
About the Author
Brien Posey is a 22-time Microsoft MVP with decades of IT experience. As a freelance writer, Posey has written thousands of articles and contributed to several dozen books on a wide variety of IT topics. Prior to going freelance, Posey was a CIO for a national chain of hospitals and health care facilities. He has also served as a network administrator for some of the country's largest insurance companies and for the Department of Defense at Fort Knox. In addition to his continued work in IT, Posey has spent the last several years actively training as a commercial scientist-astronaut candidate in preparation to fly on a mission to study polar mesospheric clouds from space. You can follow his spaceflight training on his Web site.