AWS Step-by-Step
Using Tags to Control Access to S3 Buckets
- Amazon S3 Attribute Based Access Control (ABAC) allows permissions to be assigned using bucket tags instead of traditional IAM-only policies.
- Enabling S3 ABAC requires activating the feature at the bucket level and applying carefully planned key/value tags.
- IAM policies can reference S3 bucket tags using aws:ResourceTag conditions to control access based on attributes such as department.
Identity and Access Management (IAM) has always been the go-to mechanism for controlling access to S3 buckets. Occasionally however, you may find the standard approach to be inefficient. As an alternative, Amazon has made it so that you can apply tags to your buckets and assign permissions based on those tags. This is all thanks to a new feature called Attribute Based Access Control, or ABAC.
To get started, you will need to enable ABAC for your bucket. To do so, open the S3 console and click on the bucket for which you wish to enable tag based authorization. When you do, you will be taken to a screen showing various details associated with your bucket. Now, select the Properties tab and then locate the Bucket ABAC section, as shown in Figure 1.
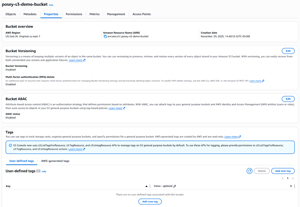 [Click on image for larger view.] Figure 1: Go to the bucket's Properties tab and locate the Bucket ABAC section.
As you can see in the figure, the ABAC status is listed as Disabled by default. To configure ABAC, click the Edit button located within the Bucket ABAC section. This will cause the console to take you to the screen shown in Figure 2.
Here you simply need to select the Enable option and then acknowledge that enabling ABAC will allow tag-based access control. Click the Save Changes button complete the process. When you do, you will be returned to the bucket's properties screen.
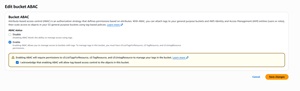 [Click on image for larger view.] Figure 2: Enable Bucket ABAC and then save your changes.
Now that you have enabled ABAC, the next thing that you need to do is to add one or more tags to the bucket. These tags will function similarly to access control entries, so it's important to carefully consider the tag structure that you will be using.
For those who might not be familiar with tagging, a tag is really nothing more than a text-based key / value pair. The key is essentially the name of the tag and the value is just that; it's a value that is assigned to the key.
As an example, let's suppose that you wanted to control access to a particular S3 bucket by department. You might create a tag called Department. You could then assign a value such as Sales, Marketing, IT, or Accounting.
To create a new tag, locate the Tags section of the properties tab, which you can see in Figure 1. Click the Add New Tag button and you will be taken to the Add User-Defined Tags screen. Enter the key and value that you want to use and then either click on Add New Tag, if you want to create some additional tags, or click the Save Changes button, if you are done. You can see what this looks like in Figure 3.
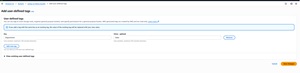 [Click on image for larger view.] Figure 3: This is an example of a tag that has been applied to an S3 bucket.
Now that I have created a tag, the next step in the process is build an IAM policy that is based on the tag. To do so, open the IAM console and click on Policies, followed by Create Policy. This will bring you to the Specify Permissions screen.
The first thing that you will need to do on this screen is to select S3 from the list of services. You will also need to specify the actions that you want to allow, as shown in Figure 4.
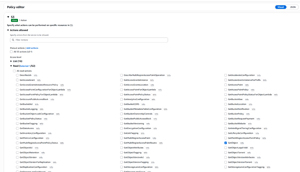 [Click on image for larger view.] Figure 4: Specify the actions that you want to allow.
Now, expand the Resources section and then choose the Specific option and specify the S3 bucket for which you want to grant permission. Next, expand the Request Conditions section and click the Add Another Condition button. When you do, you will be prompted to select a condition key. The condition key should be set to aws:ResourceTag. You can use the search box to make it easier to locate this condition key.
At this point, you will be prompted to enter a tag key. The tag key should match the key portion of the tag that you created. Leave the qualifier set to Default and then set the Operator to StringEquals. Finally, enter the value portion of your tag, as shown in Figure 5, and then click the Add Condition button. Incidentally, you can use a JSON document instead of navigating the GUI. You can consult instructions for doing so.
 [Click on image for larger view.] Figure 5: Enter your key / value information as shown here.
Click Next, and you will be prompted to enter a name and an optional description for your policy. When you are done, click the Create Policy button to complete the process.
About the Author
Brien Posey is a 22-time Microsoft MVP with decades of IT experience. As a freelance writer, Posey has written thousands of articles and contributed to several dozen books on a wide variety of IT topics. Prior to going freelance, Posey was a CIO for a national chain of hospitals and health care facilities. He has also served as a network administrator for some of the country's largest insurance companies and for the Department of Defense at Fort Knox. In addition to his continued work in IT, Posey has spent the last several years actively training as a commercial scientist-astronaut candidate in preparation to fly on a mission to study polar mesospheric clouds from space. You can follow his spaceflight training on his Web site.