AWS Step-by-Step
Cloning AWS EBS Volumes the Easy Way
For those working in dev / test environments, one of the big challenges has always been that of setting up a lab environment that mimics the production environment. Recently however, Amazon has introduced a new capability that may make building these types of lab environments easier. The new capability allows for instant cloning of EBS volumes, which are the volumed typically used by EC2 instances.
Before I show you how to clone an EBS volume, there is an important caveat that you need to know about. According to Amazon guidance, only encrypted volumes can be cloned. Fortunately, Amazon makes it really easy to encrypt a volume. As you can see in Figure 1, the Create Volume screen contains a simple checkbox that you can select if you want your newly created volume to be encrypted. Unfortunately, there does not seem to be a GUI option for encrypting an existing EBS volume.
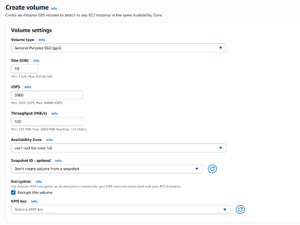 [Click on image for larger view.] Figure 1: You can choose to create an encrypted EBS volume by selecting the Encrypt This Volume checkbox.
So with that said, let's go ahead and clone a volume. To do so, sign into the AWS portal and open the EC2 dashboard. Now, expand the Elastic Block Store section and select the Volumes container. Here, you will see a list of all of your volumes, as shown in Figure 2.
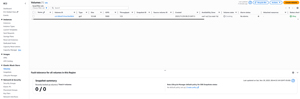 [Click on image for larger view.] Figure 2: This is the volume that I am going to clone.
Incidentally, if you look at the figure above, you will notice that the Volume State column indicates that the volume is being created. You can only clone a volume for which the volume state is listed as being available or in use. Occasionally you may find that you need to refresh the console in order to see a volume's true state.
To clone a volume, locate the volume and then select the volume's checkbox. Now, select the Copy Volume option, found on the Actions menu. This will take you to the Copy Volume screen, shown in Figure 3.
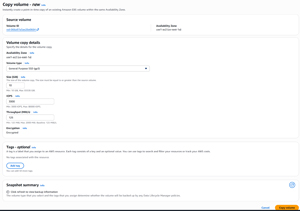 [Click on image for larger view.] Figure 3: This is the screen used to initiate the volume cloning process.
As you can see in the figure, the Copy Volume screen looks a lot like the Create Volume screen. The reason for this is that when you clone a volume, you are essentially creating a new volume. More importantly, the clone that you are creating does not necessarily have to be an exact duplicate of the volume that is being cloned. Amazon allows you to modify the volume type, the volume size, the number of supported IOPS and the volume's throughput. You can also apply tags to the volume as a way of indicating that the new volume is a clone, as opposed to being the original volume.
While it may be tempting to think of the options shown in the previous figure as being useful for volume upgrades, that really isn't what volume cloning is all about. If you want to change a volume's type, size, IOPS, or throughput, you can easily do that without having to clone the volume. Instead, you can just select the volume (from the screen shown in Figure 2) and then choose the Modify Volume option from the Actions menu. This will take you to the Modify Volume screen page, where you can change the volume's type, throughput, size, or IOPS to meet your needs.
When you have finished selecting the volume's configuration options, click the Copy Volume to initiate the cloning process.
If you look at Figure 4, you can see that I now have two volumes. The real question now, is how can you tell them apart from one another? There are actually a few different ways to tell the volumes apart. If you applied tags to the clone, then using those tags is certainly an option. There are however, other things that you can look at. For starters, the Volumes screen lists the creation date and time for each volume. In this case, the newer volume is the clone. The other thing that you can look at is the Source Volume ID column. When this column is populated, it generally means that the volume is a clone. The Source Volume ID points back to the ID of the original volume. As a best practice, I would recommend editing the Name column so as to make it easier to identify the various volumes.
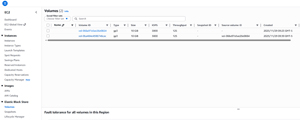 [Click on image for larger view.] Figure 4: My volume has been cloned.
About the Author
Brien Posey is a 22-time Microsoft MVP with decades of IT experience. As a freelance writer, Posey has written thousands of articles and contributed to several dozen books on a wide variety of IT topics. Prior to going freelance, Posey was a CIO for a national chain of hospitals and health care facilities. He has also served as a network administrator for some of the country's largest insurance companies and for the Department of Defense at Fort Knox. In addition to his continued work in IT, Posey has spent the last several years actively training as a commercial scientist-astronaut candidate in preparation to fly on a mission to study polar mesospheric clouds from space. You can follow his spaceflight training on his Web site.