AWS Step-by-Step
A Last Resort AWS Repair Option for Extracting Data from Failed Windows Instances
When someone makes an accidental configuration change that causes an EC2 instance to stop working (or to become inaccessible) there are usually at least a couple of options for getting it working again.
Every once in a while though, you might find yourself in a situation where you can't use RDP, the remote shell won't work, SSM isn't an option, and the serial console won't help either. In situations like these, it often seems as though your only option is to recreate the instance and restore a backup. If that proves to be impossible however, there may be a last resort option for extracting your data from the instance.
Before I show you how this technique works, I need to explain that what I am about to show you is an absolute last resort option. Like any other last resort option, it can be a little bit messy and there is a potential for things to go wrong. That being the case, I strongly recommend creating a snapshot (and a regular backup too, if you can) before moving forward. Remember, the trick that I am about to show you is intended to give you a way to extract data from the failed instance, not to get the instance working again. In fact, this technique will likely render the failed instance unbootable, unless you restore a snapshot or a backup.
Once you have finished creating a snapshot, shut down the failed instance if it is still running. The next thing that you will need to do is to create a brand new Windows instance. This new instance is not going to act as a replacement for your failed instance, but rather is going to help to facilitate the data recovery process. The instance that you create should be in the same availability zone as the failed instance. When you have finished creating the new instance, shut it down.
The next thing that you will need to do is to detach the EBS volume from your failed instance. To do so, click on your failed instance to select it. Now, select the Storage tab at the bottom of the screen. When you do, you will see the volume ID for the volume that is attached to the failed instance, as shown in Figure 1. Be sure to make note of this volume ID. It can also be helpful to label the volume so that you can keep track of it more easily.
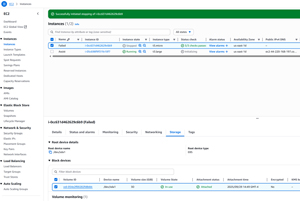 [Click on image for larger view.] Figure 1: Make note of the volume ID.
At this point, you will need to select the Volumes tab, select the volume that you made note of a moment ago, and then select the Detach Volume option from the Actions menu, as shown in Figure 2.
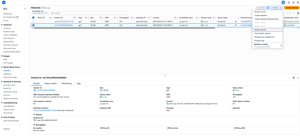 [Click on image for larger view.] Figure 2: Detach the EBS volume from the failed instance.
Now that the volume has been detached, the next step in the process is to attach the volume to the new instance that you created. Remember, the goal is not to replace this instance's healthy volume with the volume from the failed instance. Instead, you need to attach the volume as a secondary disk.
To complete this task, go to the Volumes tab (if you're not already there), click on the volume associated with the failed instance, and then choose the Attach Volume command from the Actions menu. When prompted, select your newly created instance from the list and select one of the available device names, as shown in Figure 3. Be careful not to select a device name that is reserved for use with the root volume. Click on the Attach Volume button to complete the process.
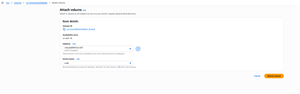 [Click on image for larger view.] Figure 3: Select the newly created instance and an available device name.
Now that the volume from the failed instance has been attached to a healthy instance, it's time to boot the healthy instance and log in.
Even though you have attached the volume from the failed machine to the healthy instance, there is a good chance that the volume is not going to show up if you look for it in File Explorer. If that happens, then enter the DiskMgmt.msc command at the Windows Run prompt. This will cause Windows to open the Disk Management Console. You should see that the attached disk is offline, as shown in Figure 4.
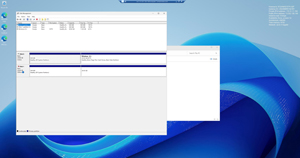 [Click on image for larger view.] Figure 4: The unhealthy disk is attached, but offline.
Right-click on the disk and choose the Online command from the shortcut menu. When you do, the disk will be brought online and a drive letter should be automatically assigned to the Windows volume. In Figure 5 for instance, the disk has been assigned to D:.
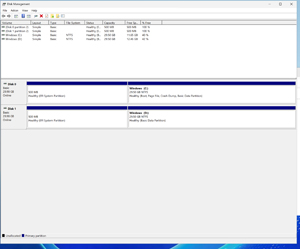 [Click on image for larger view.] Figure 5: A drive letter has been assigned to the disk.
At this point, you can browse the failed instance's contents through File Explorer. You can also copy data from the failed instance to the healthy instance or to a networked resource. When you are done, you can terminate the temporary instance, the failed instance, and you can delete the volume from the failed instance.
About the Author
Brien Posey is a 22-time Microsoft MVP with decades of IT experience. As a freelance writer, Posey has written thousands of articles and contributed to several dozen books on a wide variety of IT topics. Prior to going freelance, Posey was a CIO for a national chain of hospitals and health care facilities. He has also served as a network administrator for some of the country's largest insurance companies and for the Department of Defense at Fort Knox. In addition to his continued work in IT, Posey has spent the last several years actively training as a commercial scientist-astronaut candidate in preparation to fly on a mission to study polar mesospheric clouds from space. You can follow his spaceflight training on his Web site.