AWS Step-by-Step
Using EC2 Image Builder to Simplify the Gold AMI Creation Process, Part 2
In the first part of this series, I explained that Amazon's EC2 Image Builder can simplify, and even automate the process of building gold AMIs. Now, I want to walk you through the process of setting up the imaging pipeline.
To get started, open the EC2 Image Builder and then click on the Create Image Pipeline button. This causes the Specify Pipeline Details screen to be displayed. You can see what this screen looks like in Figure 1.
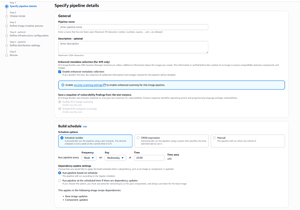 [Click on image for larger view.] Figure 1: The image creation process begins with specifying the pipeline details.
Although there are quite a few options on this screen, the main thing that you will need to do is to enter a pipeline name and to provide an optional description. The pipeline does allow you to automatically generate new images according to a schedule, but if you are just getting started with the EC2 Image Builder, it may be better to generate images manually until you get used to the process.
Another thing that you might have noticed in the figure above is that there is a checkbox that when enabled, causes the tool to use enhanced metadata collection. This metadata is used by Systems Manager to help ensure compatibility. It's best to leave the checkbox selected unless you have a compelling reason to deselect it.
Click Next, and you will be taken to the Choose Recipe screen, which you can see in Figure 2. When you create an AMI file, the process starts with a base image, which is kind of like an ISO file. As previously mentioned however, there are almost always going to be customizations that need to be applied to the base image. This is where the recipe comes into play. A recipe is just a document that lists the components that need to be added to the base image. It also describes the way that virtual machine instances generated from the AMI should be configured.
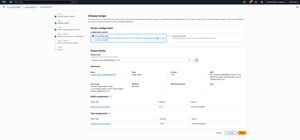 [Click on image for larger view.] Figure 2: You can use an existing recipe or you can create a new one.
The Choose Recipe screen gives you a choice between using an existing recipe or creating your own. If you choose the existing recipe option, there are a couple of sample recipes that you can pick from. If on the other hand, you choose to create your own recipe, you will need to enter a name for the recipe that you are creating and you will need to pick a base image.
The interface used for creating a new recipe contains a lot of options, but if you are familiar with the process of creating an EC2 instance, you will likely find these options to be relatively straightforward. As an example, the recipe creation process gives you the opportunity to define the working directory path, attach additional EBS volumes, and you can even build components. Perhaps more importantly, you have the ability to attach prebuilt components supplied by AWS. Some of the more popular components include AWS-ApplyWindowsUpdates, AWS-ConfigureCloudWatchAgent, and AWS-RunPowerShellScript.
When you are done configuring the recipe, click Next, and you will be taken to the Define Image Creation Process screen. Here you will be asked if you want to use a default workflow, or if you would prefer to use a custom workflow. A workflow consists of the steps that EC2 Image Builder performs when it builds an image. There are build workflows and test workflows. The Custom Workflows option allows you to configure both.
Click Next and you will be taken to the Define Infrastructure Configuration screen, which you can see in Figure 3, this is one of the more useful screens within the Create Pipeline wizard. This screen allows you to use an existing infrastructure configuration or to create a new configuration.
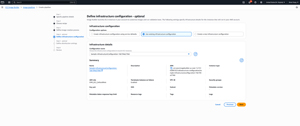 [Click on image for larger view.] Figure 3: You can include various infrastructure details in the imaging pipeline.
The infrastructure configuration is one of the more useful steps in the image building process, because it allows you to specify the instance type, as well as the VPC, subnet, and security group that will be used by the instance. You can even specify the key pair that you want to use and you can even choose the instance's security group.
The next step in the process is to define distribution settings. This step is optional, but it gives you the option od specifying a KMS key, specifying a licensing configuration, and implementing a faster launch configuration (for Windows instances). You can also use this screen to apply any tags that you want to associate with the AMI.
Click Next and you will ne taken to the Review screen. Here you will want to take a moment and verify that all of the settings that you have chosen are correct. Assuming that everything looks good, click the Create Pipeline button. This will cause AWS to create the image pipeline, as shown in Figure 4.
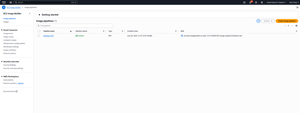 [Click on image for larger view.] Figure 4: An image pipeline has been created.
It's worth remembering that the image pipeline is not the same as an AMI. The pipeline is what generates the AMI. If you want to create an AMI from the pipeline that you have just created, click on the pipeline and then choose the Run Pipeline command from the Actions menu. This causes the EC2 Image Builder to create a temporary EC2 instance. This temporary instance includes all of the components that you have selected, such as patches and CloudWatch agents. If you have included any test components, the Image Builder will also test the image to make sure that it passes all of the tests. Once all of that has been done, the EC2 Image Builder generates an AMI for your use and it deprovisions the temporary infrastructure used within the AMI creation process.
About the Author
Brien Posey is a 22-time Microsoft MVP with decades of IT experience. As a freelance writer, Posey has written thousands of articles and contributed to several dozen books on a wide variety of IT topics. Prior to going freelance, Posey was a CIO for a national chain of hospitals and health care facilities. He has also served as a network administrator for some of the country's largest insurance companies and for the Department of Defense at Fort Knox. In addition to his continued work in IT, Posey has spent the last several years actively training as a commercial scientist-astronaut candidate in preparation to fly on a mission to study polar mesospheric clouds from space. You can follow his spaceflight training on his Web site.