AWS Step-by-Step
Dynamically Configuring Windows Instances in AWS EC2, Part 2: Using Metadata
In my previous article in this series, I explained how to retrieve a Windows instance's metadata through PowerShell. Now, I want to show you some ways to dynamically configure the instance based on its metadata.
For the purposes of this article, I am going to be demonstrating some PowerShell scripting techniques. In order to obtain true dynamic configuration, you will need to make the script run automatically on your Windows instances.
It is also worth noting that because every organization configures its instances in a different way, the techniques that I am discussing in this article are primarily meant to serve as a proof of concept. It will be up to you to adapt these techniques to meet your own needs.
One way that you can dynamically configure a Windows instance is by setting its computer name based on metadata attributes. Normally, Amazon names Windows instances EC2AMAZ-<random string>. You can see the current computer name by entering this command into PowerShell: (Get-ComputerInfo).CsName
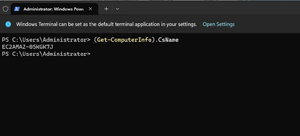 [Click on image for larger view.] Figure 1: This Is How You Retrieve the Current Computer Name.
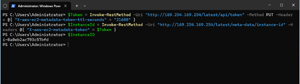
You could easily write a script that changes the computer name based on its region, availability zone, instance ID, or any number of other metadata attributes. To show you how this works, let's configure the computer name to match the instance ID. To do so, use these commands (assuming that you already have a session token):
$IdentityDoc = Invoke-RestMethod -Uri "http://169.254.169.254/latest/dynamic/instance-identity/document" -Headers @{ "X-aws-ec2-metadata-token" = $Token }

$InstanceID = $IdentityDoc.InstanceID
Rename-Computer -NewName $InstanceID -Force -Restart
It is worth noting that this command sequence will cause your computer to reboot.
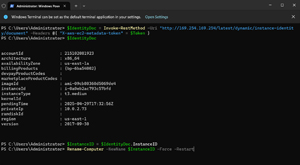 [Click on image for larger view.] Figure 2: These Are the Commands Used to Rename the Instance Based on its Instance ID.
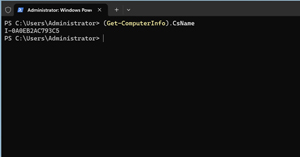 [Click on image for larger view.] Figure 3: The Instance Has Been Renamed.
Another thing that you can do is to write a script that causes an instance to be configured based on its tags. In order to do this however, you are going to have to modify the instance's IAM permissions in order to give it the ability to read tags. Specifically, you will need to select the instance and then choose the Security > Modify IAM Role commands from the EC2 Dashboard's Actions menu. This will cause AWS to show you which IAM role has been assigned to the instance. Once you know which role is being used, you will need to open the IAM console and add two permissions to the role. These permissions include: DescribeInstances and DescribeTags. It is worth noting that this gives the instance the ability to read tags from other resources, not just its own tags.
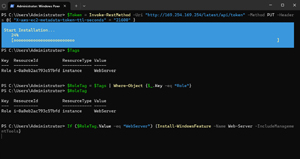
Once the necessary security modifications have been made, log into the instance, open a PowerShell session, and enter the Get-EC2Tag cmdlet. This command will likely return a long list of tags. You can narrow down the list so that only EC2 instance tags are shown by using this command:
Get-EC2Tag | Where-Object {$_.ResourceType -eq "instance"}
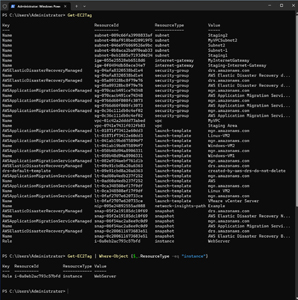 [Click on image for larger view.] Figure 4: This Is How You Narrow Down the List of Tags.
OK, so let's get back to the task at hand, namely configuring a Windows instance based on its tags. In order to do so, we have to perform these distinct steps:
- Retrieve the instance's instance ID
- Read the tag for which you want to perform the configuration
- Perform the configuration based on the tag's value
With that said, I am going to assume that you have already acquired a session token and instance ID in the manner described in Part 1 of this series. You can see those commands in Figure 5.
 [Click on image for larger view.] Figure 5: I Have Retrieved the Instance ID.
Now, we need to find the tags that apply to the instance ID that we have retrieved. You can do so by using this command:
$Tags = Get-EC2Tag | Where-Object {$_.ResourceID -eq $InstanceID}
At this point, all of the tags associated with the instance are stored in a variable called $Tags. For the purposes of this article, I have created a tag called Role and assigned a value of WebServer. We will assume that IIS needs to be installed onto any instance where the Role tag is set to WebServer.
Since it's possible (and even likely) for an instance to have more than one tag, we have to filter the list of tags so that only the Role tag is exposed. I am going to do so by using this command:
$RoleTag = $Tags | Where-Object {$_.Key -eq "Role"}
Now, we can complete the process by installing IIS if the Role tag contains a value of WebServer. The command used for doing so is:
If ($RoleTag.Value -eq "WebServer") {Install-WindowsFeature -Name Web-Server -IncludeManagementTools}
 [Click on image for larger view.] Figure 6: I Have Installed IIS Based on the Tags Assigned to the Instance.
Although I have entered each of the commands discussed in this article manually, these and other commands could easily be grouped together into a comprehensive configuration script. The script could even be designed to test for a variety of different tags and to configure the server accordingly.
About the Author
Brien Posey is a 22-time Microsoft MVP with decades of IT experience. As a freelance writer, Posey has written thousands of articles and contributed to several dozen books on a wide variety of IT topics. Prior to going freelance, Posey was a CIO for a national chain of hospitals and health care facilities. He has also served as a network administrator for some of the country's largest insurance companies and for the Department of Defense at Fort Knox. In addition to his continued work in IT, Posey has spent the last several years actively training as a commercial scientist-astronaut candidate in preparation to fly on a mission to study polar mesospheric clouds from space. You can follow his spaceflight training on his Web site.