AWS Step-by-Step
Dynamically Configuring Windows Instances in AWS EC2, Part 1
Deploying a new Windows Server instance involves a lot more than just launching the instance. There are typically numerous post deployment configuration tasks that must be completed prior to hosting a production workload. Recently, it occurred to me that many such configuration tasks could potentially be automated based on an instance's metadata. In this article series, I want to show you some techniques for accessing instance metadata and for performing automated configuration changes based on that metadata.
Accessing Instance Metadata
Before you can configure an instance based on its metadata, you need a way of accessing the metadata. Amazon actually exposes the metadata through an HTTP endpoint that exists inside of an instance.
The URL that is associated with the metadata is http://169.254.169.254. When you research this endpoint address online, there are articles that incorrectly suggest that you can simply enter http://169.254.169.254/latest/meta-data into your browser as a way of gaining access to the metadata. However, this technique does not work and even if it did work, exposing the metadata in a Web browser is hardly a recipe for configuration automation.
The reason why you can't just expose the metadata in a browser session in spite of it being exposed through the HTTP protocol is because of the security that Amazon puts into place. Anazib protects the metadata through the use of the Instance Metadata Service Version 2 protocol, which is commonly referred to as IMDSv2. Without it, a simple HTTP GET request could reveal an instance's metadata, which would constitute a huge security vulnerability.
That being the case, IMDSV2 protects the metadata by requiring a session token. This token is temporary in nature and is only valid for a period of time, which you can specify. To obtain the required token, establish an RDP session with your virtual machine instance, open Windows PowerShell, and then enter the following command:
$Token = Invoke-RestMethod -Uri "http://169.254.169.254/latest/api/token" -Method PUT -Headers @{ "X-aws-ec2-metadata-token-ttl-seconds" = "21600" }
You will notice in the command that I have set the token's TTL to 21600. This causes the token to be valid for 21,600 seconds, or six hours. If you are curious about what the token looks like, just enter $Token. You can see this command and the resulting token shown in Figure 1.
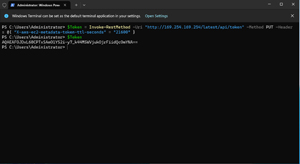 [Click on image for larger view.] Figure 1: I Have Acquired a Session Token
Now that we have acquired a session token, we can validate the token by retrieving the instance's instance ID. To do so, just enter this command:
$InstanceId = Invoke-RestMethod -Uri "http://169.254.169.254/latest/meta-data/instance-id" -Headers @{ "X-aws-ec2-metadata-token" = $Token }
The instance ID is stored in a variable called $InstanceID. You can see the instance ID by typing $InstanceID, as shown in Figure 2.
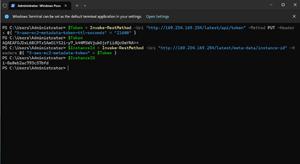 [Click on image for larger view.] Figure 2: I Have Retrieved the Instance ID Through PowerShell
The fact that we were able to retrieve the instance ID proves that the session token is good and that the instance metadata is accessible through PowerShell. The next step in the process is therefore to retrieve all of the available metadata for the virtual machine instance. To do so, enter the following command:
$IdentityDoc = Invoke-RestMethod -Uri "http://169.254.169.254/latest/dynamic/instance-identity/document" -Headers @{ "X-aws-ec2-metadata-token" = $Token }
You can see the full set of metadata by entering $IdentityDoc, as shown in Figure 3.
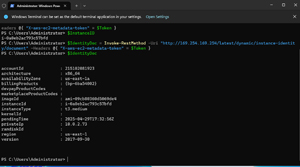 [Click on image for larger view.] Figure 3: The Instance's Metadata Is Exposed Through PowerShell
Now that we have access to the instance metadata, it can be helpful to be able to associate one specific piece of metadata with a variable. The way that you do this is to set the variable equal to $IdentityDoc, followed by a period and the name of the metadata field that you want to reference. For example, if you wanted to store an instance's availability zone within a variable, you would use this command:
$AZ = $IdentityDoc.AvailabilityZone
Typing $AZ would expose the availability zone, as shown in Figure 4.
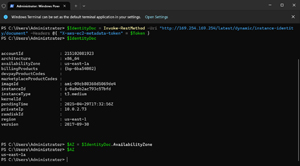 [Click on image for larger view.] Figure 4: You Can Isolate Individual Pieces of Metadatal
Now that I have shown you how to retrieve instance metadata, I want to show you how to dynamically configure a virtual machine based on that metadata. I will cover this technique in Part 2. For right now, I recommend taking a look at your instance's configuration in the EC2 dashboard and making sure that the Allow Tags in Instance Metadata option is set to Enabled.
About the Author
Brien Posey is a 22-time Microsoft MVP with decades of IT experience. As a freelance writer, Posey has written thousands of articles and contributed to several dozen books on a wide variety of IT topics. Prior to going freelance, Posey was a CIO for a national chain of hospitals and health care facilities. He has also served as a network administrator for some of the country's largest insurance companies and for the Department of Defense at Fort Knox. In addition to his continued work in IT, Posey has spent the last several years actively training as a commercial scientist-astronaut candidate in preparation to fly on a mission to study polar mesospheric clouds from space. You can follow his spaceflight training on his Web site.