AWS Step-by-Step
AWS Improves Backup Restorations with Custom Volume Support
Amazon recently enhanced its AWS Backup service by making it possible for you to customize volume configurations when restoring an EC2 virtual machine (VM) instance. These custom settings include the volume type, size, the supported number of IOPS, the KMS encryption keys used, and more. These settings are exposed directly through both the CLI and the SDK. However, you can also configure the volume settings when restoring an EC2 VM using the AWS Web portal.
To restore a backup using the portal, open AWS Backup and then click on the Vaults tab. Next, click on your backup vault The resulting screen should list all of the available recovery points, as shown in Figure 1. Now, click on the recovery point that you want to restore and then click on the Restore button, shown in Figure 2.
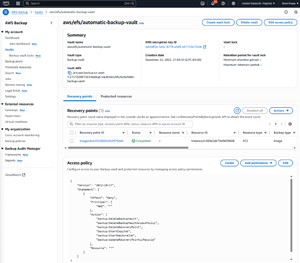 [Click on image for larger view.] Figure 1: This Backup Vault Contains a Single Recovery Point.
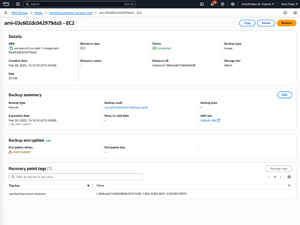 [Click on image for larger view.] Figure 2: After Clicking on the Recovery Point, Click on the Restore Button.
At this point, you should be taken to the Restore Backup screen, which you can see in Figure 3. As you can see in the figure, you will need to begin the restoration process by selecting the instance type that you want to use. Remember, when you restore an EC2 backup, you are effectively creating a new instance of the type specified. Interestingly, the Instance Type dropdown grays out any instance types that are too small to accommodate the restored instance.
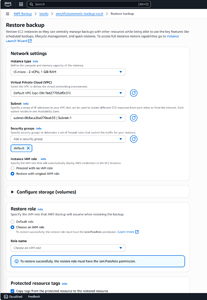 [Click on image for larger view.] Figure 3: This Is the Restore Backup Screen.
You will also need to associate the restored backup with a virtual private cloud (VPC) and a subnet within that VPC. In most cases, you will want to use the same VPC and subnet as the VM instance that you backed up had originally been using. However, you can restore to a different VPC and subnet if you prefer.
Once you have made your selections, you will have to choose the security group and IAM role that you want to associate with your newly restored VM.
Now it's time to configure the storage volumes that will be used for the newly restored VM. You might have noticed in the previous figure that the Configure Storage (Volumes) portion of the interface is minimized by default. However, you can expand this section to reveal the volume related options that I mentioned at the beginning of this blog post. You can see the storage related options shown in Figure 4.
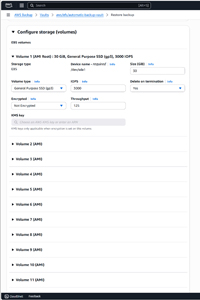 [Click on image for larger view.] Figure 4: These Are The Storage Volume Options.
As you look at the screen capture above, the first thing that you will probably notice is that there are options shown for 11 different volumes. I assure you that the VM instance that I backed up only had a single storage volume. AWS Backup is designed so that you can attach additional volumes to the instance as a part of the restoration process, but you don't have to. In fact, the GUI interface supports up to 27 different volumes!
The main things that I wanted to show you are the volume options shown at the top of Figure 4. As you can see, you have the ability to modify the volume type, the number of supported IOPS, the volume throughput, the volume size, and the encryption and delete on termination settings.
In most cases, you probably won't have to change any of these settings if your only goal is to restore a VM instance. Even so, these settings can be handy if your instance has outgrown the hardware that has been allocated to it. For example, if your instance has been performing sluggishly, then this might be a good time to pick a different instance type and to increase the volume IOPS and throughput levels. Similarly, if your instance has been running low on disk space, then you can use the restoration process as an opportunity to increase the amount of disk space that is available to the instance.
When you finish configuring the volume settings, scroll down to the bottom of the screen. Here, you will have an opportunity to choose the IAM role that AWS Backup will use when restoring the instance. You can also opt to copy tags from the original instance to the restored instance and there are some advanced settings that you can use to configure things like shutdown behavior or termination protection. When you are done, click the Restore Backup button to launch the restoration job.
About the Author
Brien Posey is a 22-time Microsoft MVP with decades of IT experience. As a freelance writer, Posey has written thousands of articles and contributed to several dozen books on a wide variety of IT topics. Prior to going freelance, Posey was a CIO for a national chain of hospitals and health care facilities. He has also served as a network administrator for some of the country's largest insurance companies and for the Department of Defense at Fort Knox. In addition to his continued work in IT, Posey has spent the last several years actively training as a commercial scientist-astronaut candidate in preparation to fly on a mission to study polar mesospheric clouds from space. You can follow his spaceflight training on his Web site.