AWS Step-by-Step
Getting Started With VPC Firewalls, Part 2: Creating a Network Policy
In my first article in this series, I explained that the first step in creating a VPC network firewall is to create a rule group. Now let's continue the walkthrough by creating a network firewall policy.
To create a firewall policy, open the VPC dashboard and click on the Firewall Policies tab, found in the Network Firewall section, and then click the Create Firewall Policy button.
The first screen that you will see as a part of the policy creation process asks you to enter a name and an optional description for your firewall policy. You can also choose how the firewall should behave if the network connection happens to break midstream. As you can see in Figure 1, you can drop the subsequent traffic, continue processing traffic, or send a TCP reset packet.
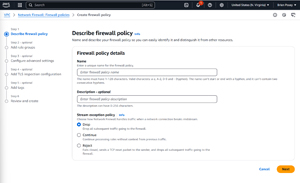 [Click on image for larger view.] Figure 1: Enter a Name for The Firewall Policy and Choose a Stream Exception Policy.
Click Next, and you will be taken to the Add Rule Groups screen. The first thing that you will usually want to do on this screen is to define a set of default actions for packets that match a rule's criteria. You can pass, drop, or forward a packet. You can also opt to use the same action for all packets or you can treat fragmented and full packets differently from one another. Next, click the Add Stateless Rule Groups button and then add the rule group that you created earlier. You can see what this looks like in Figure 2. Further down on the page, there are options for processing stateful rules should you decide to do so.
 [Click on image for larger view.] Figure 2: Add the Rule Group that You Created Earlier.
Click Next and you will once again be asked if you want to perform encryption using an AWS managed key or if you would prefer to use your own key. Again, it's best to use an AWS managed key unless you have a good reason for using your own key.
This screen also contains options for performing a CIDR override or changing the idle timeout should you have the need, though most organizations probably won't need to use these settings.
Click Next and you will be taken to a screen that lets you configure an optional TLS inspection. When you are done, click Next. You can now apply any optional tags that you might want to apply to the firewall policy. When you are done, click Next followed by Create Firewall Policy to complete the process.
The last step in the overall configuration process is to create the firewall itself. To do so, click on the Firewalls tab, found in the Network Firewall section, and then click the Create Firewall button.
The first step in creating a new firewall is to enter a name and an optional description for the firewall. Even though the description is optional, I recommend creating a description since there is a good chance that you will be creating additional firewalls as time goes on.
Click Next and you will be taken to the Configure VPC and Subnets screen. Here, you will need to tell AWS which VPC the firewall should be a part of. Next, you will need to choose an availability zone within the VPC and then select a subnet that is associated with your chosen availability zone, You will also need to specify the IP Address type, as shown in Figure 3.
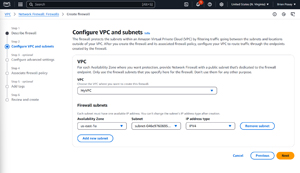 [Click on image for larger view.] Figure 3: Choose Your VPC, Availability Zone and Subnet.
As you look at the figure above, you will notice that there is an option to add a new subnet. You can link multiple subnets, and even multiple availability zones to a single firewall. When you are done, click Next.
Click Next, and you will be taken to the screen shown in Figure 4. This screen contains two checkboxes that are selected by default. If left selected, one checkbox will protect the firewall against accidental deletion and the other checkbox will prevent the firewall's subnet from being changed. The screen also contains two more checkboxes that are not selected by default. One enables traffic analysis mode and the other allows you to use your own encryption key in place of the Amazon managed key.
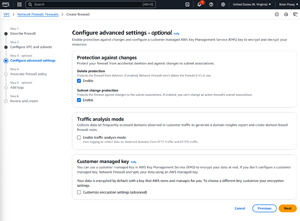 [Click on image for larger view.] Figure 4: You Can Protect your Firewall Against Accidental Deletion and Subnet Modifications.
Click Next, and you will be taken to the Associate Firewall Policy screen. Here, you will need to select the Associate an Existing Firewall Policy option, select the firewall policy that you created earlier, and click Next.
Now, you will have the opportunity to apply any desired tags to the firewall that you are creating. When you are done, click Next, followed by Create Firewall to complete the process.
About the Author
Brien Posey is a 22-time Microsoft MVP with decades of IT experience. As a freelance writer, Posey has written thousands of articles and contributed to several dozen books on a wide variety of IT topics. Prior to going freelance, Posey was a CIO for a national chain of hospitals and health care facilities. He has also served as a network administrator for some of the country's largest insurance companies and for the Department of Defense at Fort Knox. In addition to his continued work in IT, Posey has spent the last several years actively training as a commercial scientist-astronaut candidate in preparation to fly on a mission to study polar mesospheric clouds from space. You can follow his spaceflight training on his Web site.