AWS Step-by-Step
Getting Started with VPC Firewalls on AWS Cloud, Part 1
Brien Posey details how to protect internet-exposed AWS VPCs with firewalls and walks through the setup process.
An AWS VPC is Amazon's version of a virtual network. Like any other virtual network, VPCs that are exposed to the internet need to be protected with a firewall. Even so, setting up a VPC firewall isn't quite as intuitive as you might expect. In this article, I will walk you through the process.
Before you can create a VPC firewall, you are probably going to need to create some subnets inside of your VPC. Normally, one of the first things that most admins will do after creating a VPC is to create one or more subnets. However, a VPC requires a dedicated subnet. Amazon refers to this subnet as a firewall subnet. The reason why you need to use a dedicated subnet for your firewall is because a firewall cannot filter traffic on the network where it resides. As such, the firewall will need to be on a network by itself.
Additionally, you may end up having to create multiple firewall subnets. Remember, in a VPC, each subnet services a specific availability zone. As such, you will need a separate firewall subnet for each availability zone that you want to service.
It's also important to understand that VPC firewalls have a hierarchical structure. A firewall is linked to a firewall policy. As its name suggests, a firewall policy defines the rules and settings that the firewall will use. However, a firewall policy makes use of another structure called a rule group. The rule group is the object that actually defines the rules and actions for the firewall.
When it comes to creating a VPC firewall, my advice is to work backwards by creating a firewall rule group first, followed by a firewall policy, and then create the actual firewall last.
Creating a Rule Group
To create a rule group, log into the AWS console, open the VPC Dashboard, and then select the Network Firewall Rule Groups tab, Click the Create Rule Group button, and you will be taken to a screen that asks you to choose whether you want to create a stateful or a stateless rule group. A stateful rule group inspects packets within the context of the larger traffic flow, whereas a stateless rule group inspects packets individually without any regard for the traffic flow as a whole.
The remaining configuration options differ depending on which type of rule group you decide to create. For the purposes of this article, I will walk you through creating a stateless rule group.
Click Next, and you will be taken to a screen that asks you to describe the rule group that you are creating. You will need to enter a unique name for the rule group and an optional description. Additionally, you are going to need to specify the rule group's desired capacity.
The capacity refers to the maximum number of rules that you expect to create within the rule group over its lifetime. You can never go back and increase the capacity, so it's best to enter a number that is significantly higher than what you realistically expect to ever need. You can see what this screen looks like in Figure 1.
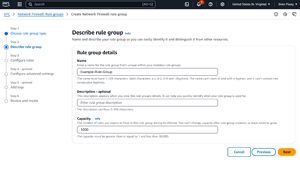 [Click on image for larger view.] Figure 1: Be Sure to Set the Capacity to a High Number
Next, you will arrive at the Create Rules screen. The options found on this screen work similarly to that of other firewalls that you might have configured. For each rule that you create, you are going to need to set a priority, a protocol, a source IP address range, a destination IP address range, and a rule action (Pass, Drop, or Forward). Depending on the rule that you are configuring, you may also wish to specify source and destination port ranges, as shown in Figure 2. Although not shown in the figure, the Configure Rules screen also allows you to choose the TCP flags that you want to mark for inspection.
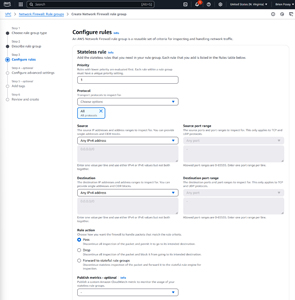 [Click on image for larger view.] Figure 2: This Is the Configure Rules Screen
When you have finished configuring a rule, click the Add Rule button. You can then create any additional rules that you might want to add to the rule group. When you are done, click Next.
At this point, AWS will display the Customer Managed Key option. Normally, Amazon encrypts all of the traffic passing through the firewall, using an encryption key owned and maintained by Amazon. However, this screen lets you opt to use your own key instead. In my opinion, it's best to let Amazon manage the encryption keys unless you have a compelling reason to use your own key.
Click Next and you will be taken to a screen that allows you to add optional tags to the rule group that you are creating. When you are done, click Next, followed by Create Rule Group to complete the process.
Now that I have shown you how to create a rule group, I want to continue the discussion in Part 2 by showing you how to create the firewall policy and the firewall itself.
About the Author
Brien Posey is a 22-time Microsoft MVP with decades of IT experience. As a freelance writer, Posey has written thousands of articles and contributed to several dozen books on a wide variety of IT topics. Prior to going freelance, Posey was a CIO for a national chain of hospitals and health care facilities. He has also served as a network administrator for some of the country's largest insurance companies and for the Department of Defense at Fort Knox. In addition to his continued work in IT, Posey has spent the last several years actively training as a commercial scientist-astronaut candidate in preparation to fly on a mission to study polar mesospheric clouds from space. You can follow his spaceflight training on his Web site.