AWS Step-by-Step
Getting Started with AWS CloudShell, Part 2
Here's how to get your script files (or other files) into and out of the CloudShell environment.
In Part 1, I explained some of the basics associated with using and customizing AWS CloudShell. As I explained in that article, Amazon provides you with persistent storage space that is accessible within CloudShell and CloudShell is natively capable of running Node.js and Python scripts.
That being the case, I want to take this opportunity to talk about how to get your script files (or other files) into and out of the CloudShell environment.
Uploading a file is a nearly effortless process. However, as a best practice, I would recommend creating a subdirectory structure so that each of your scripts and any related support files can be kept separate from any other scripts that you create.
The command used to create a subdirectory will vary depending on which shell environment you are using. If you are using a Bash shell, for instance, you can use the mkdir command, followed by the folder name, to create a subdirectory. In PowerShell, you can do the same thing by using the New-Item cmdlet. However, you will have to append the -ItemType parameter and set the item type to Directory.
If you look at Figure 1, you can see that I have used PowerShell to create a folder called Example.
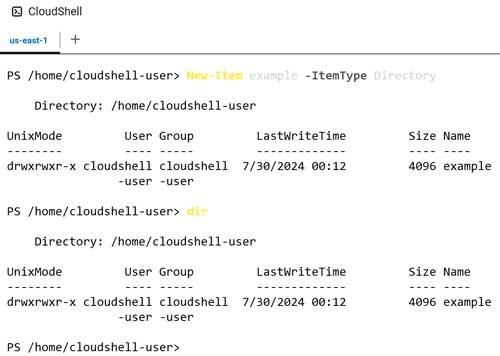 Figure 1. You can create a new folder by using PowerShell's New-Item cmdlet.
The nice thing about how the CloudShell works is that you can work in whatever scripting environment you are the most familiar with. In the figure shown above, I used PowerShell to create a folder. I use PowerShell constantly, so it is definitely my shell of choice. But what if the opposite were true? What if I were a Linux expert (I'm not)?
Well, if you take a look at Figure 2, you can see that I have switched to the Bash shell and entered the ls command. The ls command is the Linux equivalent to DIR or Get-ChildItem. As you can see in the figure, the Bash shell can see the folder, even though I created the folder in PowerShell. In other words, you can work with the various shell resources from any of the shells and you can switch back and forth between the shells on an as-needed basis. The underlying file system does not change just because you switched to a different shell.
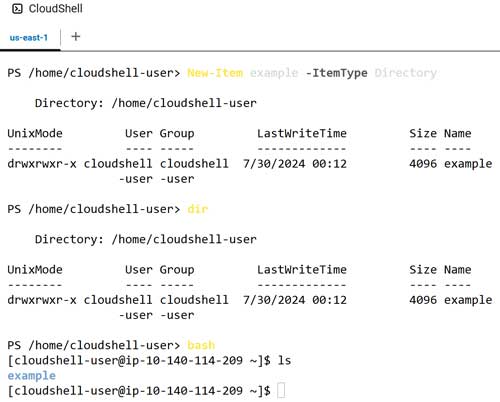 Figure 2. The Bash shell can access the folder that I created through PowerShell.
Now that I have shown you how to create a folder structure within the CloudShell environment, let's take a look at how you would go about uploading a file. All you have to do to is to choose the Upload File option from the CloudShell Actions menu. When prompted, select the file that you want to upload and click OK.
Unfortunately, the Upload File action does not give you the option to choose where you want to upload the file. As such, you will have to manually move the uploaded file to the desired location. Unfortunately, just switching to the desired location before you upload the file does not cause the file to be placed into that location.
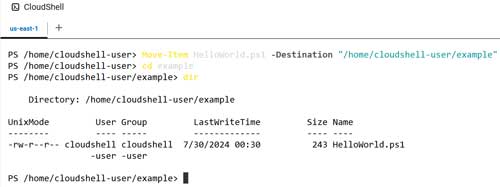
The command to move a file varies by command shell. In PowerShell, you can move a file by using the Move-Item cmdlet. Figure 3 shows an example of how this command works.
 [Click on image for larger view.]
Figure 3. You can use PowerShell's Move-Item cmdlet to move an uploaded file to a subfolder.
[Click on image for larger view.]
Figure 3. You can use PowerShell's Move-Item cmdlet to move an uploaded file to a subfolder.
This brings up yet another important point: The AWS CloudShell runs PowerShell Core, not Windows PowerShell. This means that some of the cmdlets found in Windows PowerShell do not exist. More importantly, it means that the commands that you enter are case-sensitive.
To show you what I mean, take a look back at Figure 3 above. The command that I entered referenced a file called HelloWorld.ps1. If I had entered this filename as helloworld.ps1, PowerShell would have been unable to find the file. Similarly, I entered my destination as /home/cloudshell-user/example. I entered the path in this way, because when I created the Example folder, I used a lowercase "e." If I had entered the path as /home/cloudshell-user/Example (with a capital "E"), then PowerShell would not have been able to find the example folder. The side effect to this is that it would have renamed my HelloWorld.ps1 script to Example.
Downloading a file from CloudShell is just as easy as uploading a file. All you have to do is to choose the Download File option from the Actions menu. When prompted, enter the path and filename of the file that you want to download.
About the Author
Brien Posey is a 22-time Microsoft MVP with decades of IT experience. As a freelance writer, Posey has written thousands of articles and contributed to several dozen books on a wide variety of IT topics. Prior to going freelance, Posey was a CIO for a national chain of hospitals and health care facilities. He has also served as a network administrator for some of the country's largest insurance companies and for the Department of Defense at Fort Knox. In addition to his continued work in IT, Posey has spent the last several years actively training as a commercial scientist-astronaut candidate in preparation to fly on a mission to study polar mesospheric clouds from space. You can follow his spaceflight training on his Web site.