AWS Step-by-Step
Getting Started with AWS CloudShell, Part 1
There's nothing wrong with interacting with AWS via the command line, but CloudShell brings a few extra perks that AWS CLI doesn't.
Although Amazon has long provided a command line environment that you can run directly on your PC, it's also possible to perform command line operations using AWS CloudShell.
CloudShell is a browser-based command line environment that you can use to interact with the AWS cloud. You can, of course, continue using the AWS CLI (the local command line environment) instead. However, there are some advantages to using AWS CloudShell.
One of the things that I like most about CloudShell is that it is readily available for you to use at any time. You don't have to worry about downloading and installing the AWS CLI software.
Another thing that I really like about AWS CloudShell is that it is super flexible. AWS CloudShell supports Bash, PowerShell and Z Shell. You can also run Python and Node.js scripts without installing any software.
Accessing AWS CloudShell is simple. Just log into the AWS console in the same way that you always do, select your preferred region, and then click on the CloudShell icon found on the toolbar. You can see what CloudShell looks like in Figure 1.
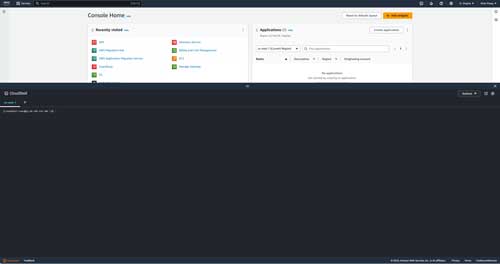 [Click on image for larger view.]
Figure 1. This is what AWS CloudShell looks like.
[Click on image for larger view.]
Figure 1. This is what AWS CloudShell looks like.
As you look at the figure above, you will notice that CloudShell uses Bash by default. Incidentally, if you switch to a different shell type and later want to return to Bash, just type the word "bash" (all lowercase) and press Enter. If you would prefer to work in Z Shell, you can do so by typing "zsh" (again, all lowercase). The command to switch to PowerShell is "pwsh."
This raises an important question: If you aren't super familiar with all of these environments, how do you know which shell is being used at a given moment? The easiest way to tell is by looking at the prompt. The prompt used in the Bash shell always ends with a dollar sign. If you look back at the previous figure, for example, you can see that the last character shown within the prompt is $.
Z Shell looks somewhat similar to Bash, but the key difference is that while the Bash shell prompt ends with a dollar sign, a Z Shell prompt ends with a percent symbol (%). The PowerShell prompt, on the other hand, always starts with PS and ends with a greater-than sign. If you look at Figure 2, you can see that it is possible to switch back and forth between the various shells on an as-needed basis.
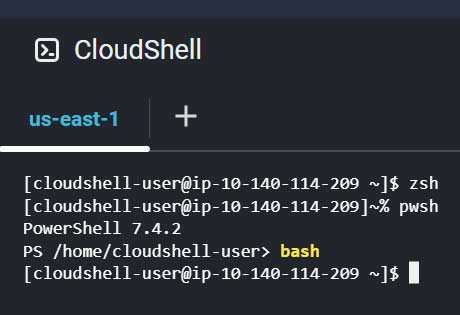 Figure 2. Each shell has its own unique prompt.
As previously mentioned, it is possible to run scripts from within CloudShell. If you look closely at the figure above, you will notice that each one of the prompts is associated with a user profile. This is because AWS provisions a home directory for each CloudShell user. Additionally, Amazon gives each user 1GB of free storage within each region. This storage is persistent, meaning that if you were to upload a script file and then close out the CloudShell, the script will still exist the next time that you open CloudShell. The big exception to this is that if you create a CloudShell VPC environment, it will use non-persistent storage.
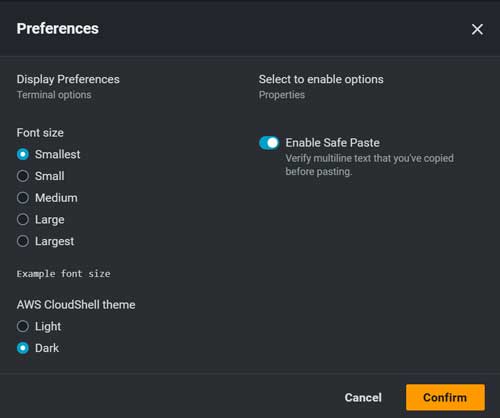
It's also worth noting that because the CloudShell environment is persistent, you can customize it to better fit your needs. If you look back a Figure 1, you will notice that there is a Settings icon in the upper-right corner of the CloudShell window. Clicking on this icon causes CloudShell to display a Preferences window, which you can see in Figure 3.
 [Click on image for larger view.]
Figure 3. You can configure various preferences for the CloudShell environment.
[Click on image for larger view.]
Figure 3. You can configure various preferences for the CloudShell environment.
As you can see in the figure, there are three customization options. The first of these options is for the font size. CloudShell defaults to using the smallest font size, which I would guess is too small for most people. The computer that I am working from right now is equipped with 32-inch monitors and the CloudShell text is a little bit small, even on those screens. Fortunately, you can make the text as large as you like.
The second option allows you to choose between the dark theme and the light theme. CloudShell defaults to dark mode.
The third option, which is also enabled by default, is to enable Safe paste. The idea behind this feature is that if you try to paste code into CloudShell, CloudShell will display a warning message before completing your request. This feature only works if you are pasting multiple lines of code. You can paste single lines of code regardless of whether this feature is turned on or off. This holds true even if you paste a long line of text that wraps into several lines. You can see an example in Figure 4 of what happens if you try to paste multiple lines of text.
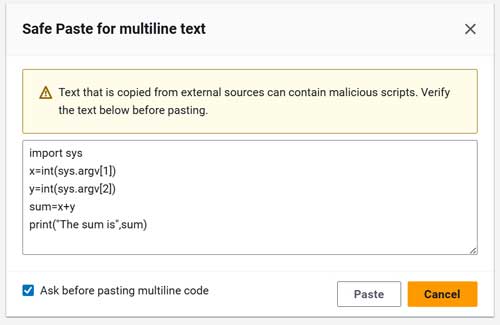 Figure 4. CloudShell intercepts pasted scripts.
Now that I have shown you some of the basics associated with using CloudShell, stay tuned for Part 2, where I'll show you how to get scripts and other files into and out of the CloudShell environment.
About the Author
Brien Posey is a 22-time Microsoft MVP with decades of IT experience. As a freelance writer, Posey has written thousands of articles and contributed to several dozen books on a wide variety of IT topics. Prior to going freelance, Posey was a CIO for a national chain of hospitals and health care facilities. He has also served as a network administrator for some of the country's largest insurance companies and for the Department of Defense at Fort Knox. In addition to his continued work in IT, Posey has spent the last several years actively training as a commercial scientist-astronaut candidate in preparation to fly on a mission to study polar mesospheric clouds from space. You can follow his spaceflight training on his Web site.