AWS Step-by-Step
Enabling Programmatic Command Line Access for AWS, Part 1
It's possible to manage AWS programmatically from the command line, but there are a few things you need to set up first -- starting with credentials.
Although Amazon provides an extensive collection of GUI-based tools for interacting with the AWS cloud, it's also possible to manage AWS programmatically from the command line.
Before you can do that, however, there are a few things that you need to put in place, starting with a set of credentials that can be used for automatic authentication.
When you access the Amazon cloud through the AWS portal, you are required to log into the portal before you can actually do anything. When you access AWS from the command line, however, there is no browser-based authentication process. This means that in the absence of some sort of authentication workaround, any AWS-related commands that you enter would produce an error message because you are not authenticated into the Amazon cloud.
This concept really isn't all that different from that of working with PowerShell. If an administrator is trying to use PowerShell to access a remote system, then they will typically leverage the Get-Credential cmdlet. This cmdlet causes PowerShell to prompt you for a username and password. You can then store those credentials in a variable that can be used to supply credentials to any PowerShell cmdlet that might require authentication. However, Amazon handles the authentication process in a different way.
Rather than the command line environment prompting you for a set of credentials like PowerShell does, Amazon makes it so that you can link the command line environment to an IAM account that you create specifically for the purpose of programmatically interacting with AWS. As such, this account behaves somewhat similarly to a service account.
The very first step in preparing AWS for command line access is to create the account that will provide the required permissions. Before you do, however, it's important to think about what you actually plan to do from the command line. The reason for this is that you are going to have to assign permissions to the account that you will be creating. While you could give this account full-blown administrative permissions, it's best to avoid that approach unless full administrative permissions are actually required. Remember, you never want to grant an account permissions beyond those that are minimally required in order for the account to serve its purpose.
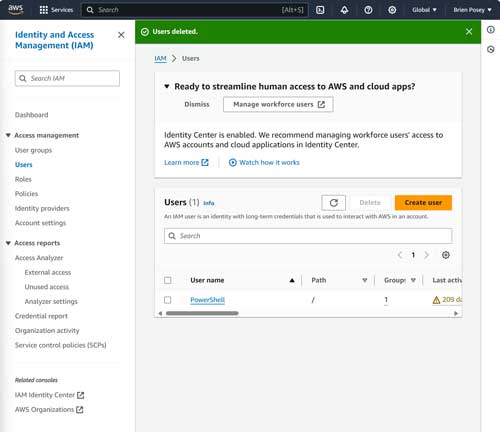
With that said, let's go ahead and create the account that will provide the permissions needed for command line access to AWS. To get started, log into the AWS console and then open the Identity and Access Management (IAM) console. Next, select the Users tab and then click the Create User button, shown in Figure 1.
 [Click on image for larger view.]
Figure 1. Select the Users tab and then click the Create User button.
[Click on image for larger view.]
Figure 1. Select the Users tab and then click the Create User button.
At this point, the console will launch the Create User interface, starting with the Specify User Details screen. As you can see in Figure 2, the main thing that you will have to do on this screen is to provide a name for the user account that you are creating.
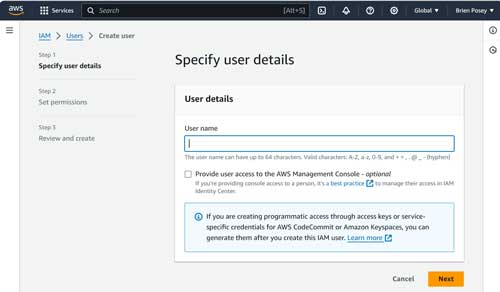 [Click on image for larger view.] Figure 2. Provide a name for the account that you are creating.
Before you move on, consider whether you want to allow the account to be used to sign into the AWS portal. Assuming that the account is being used for the sole purpose of enabling command line access to AWS, there should not be a reason for the account needing to sign into the portal. As such, you should leave the Provide User Access to the AWS Management Console checkbox deselected.
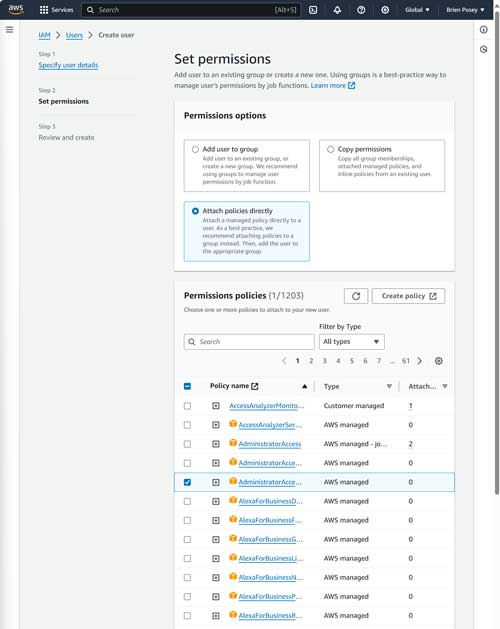
Click Next, and you will be taken to the Set Permissions screen. The steps that you perform on this screen are going to vary based on your use case. In many cases, however, you will find that you can simply assign one of the built-in security policies. To do so, select the Attach Policies Directly option and then select the checkbox corresponding to the permissions policy that you want to use. You can see what this looks like in Figure 3. It's worth noting that you can assign more than one policy.
 [Click on image for larger view.]
Figure 3. Select the Attach Policies Directly option and then select the policies that you want to assign.
[Click on image for larger view.]
Figure 3. Select the Attach Policies Directly option and then select the policies that you want to assign.
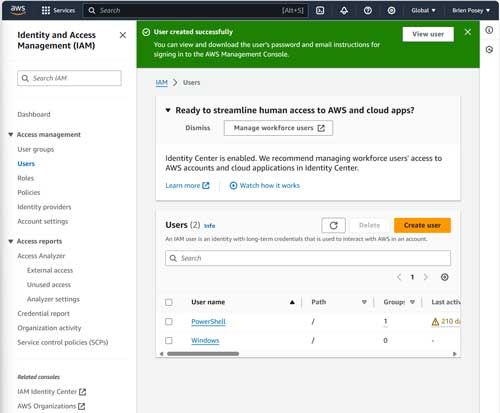
Click Next, and you will be taken to the Review and Create screen. Take a moment to review the configuration information that is shown to make sure that everything is accurate. You can also take this opportunity to assign a tag to the account if you like. When you are satisfied with everything, click the Create User button. When you do, your new account will be created, as shown in Figure 4.
 [Click on image for larger view.]
Figure 4. The new account has been created.
[Click on image for larger view.]
Figure 4. The new account has been created.
Now that I have shown you how to set up an account that can be used to enable PowerShell access to AWS, it's time to configure the command line environment. I will show you how to do that in Part 2 of this series.
About the Author
Brien Posey is a 22-time Microsoft MVP with decades of IT experience. As a freelance writer, Posey has written thousands of articles and contributed to several dozen books on a wide variety of IT topics. Prior to going freelance, Posey was a CIO for a national chain of hospitals and health care facilities. He has also served as a network administrator for some of the country's largest insurance companies and for the Department of Defense at Fort Knox. In addition to his continued work in IT, Posey has spent the last several years actively training as a commercial scientist-astronaut candidate in preparation to fly on a mission to study polar mesospheric clouds from space. You can follow his spaceflight training on his Web site.