AWS Step-by-Step
Enabling Programmatic Command Line Access for AWS, Part 2
Now that you've set up the requisite account, it's time to enable authentication. Here's how.
In Part 1, I showed you how to create an account that can be used to provide command line access to the various AWS services. Now, I want to continue the discussion by showing you how to set up the command line environment and how to enable authentication through the previously created account.
The first thing you need to do is obtain access keys corresponding to the account that you created earlier. To do so, open the Identity and Access Management (IAM) console and select the users tab. Next, click on the previously created account. This will cause the console to open an account summary screen, similar to the one shown in Figure 1.
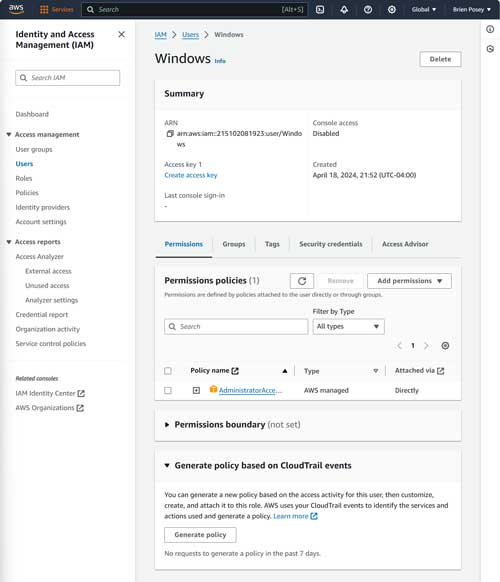 [Click on image for larger view.] Figure 1. Click on the Create Access Key link.
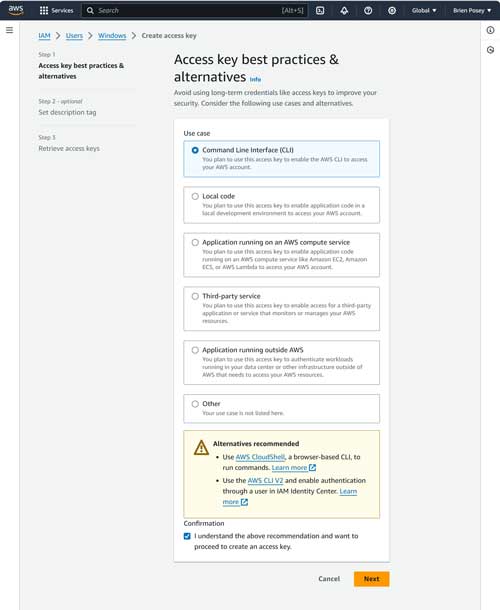
Click on the Create Access Key link shown in the figure above. This will cause the console to display the Access Key Best Practices and Alternatives screen. Here, you will need to select the Command Line Interface (CLI) option, shown in Figure 2.
 [Click on image for larger view.]
Figure 2. Select the Command Line Interface (CLI) option.
[Click on image for larger view.]
Figure 2. Select the Command Line Interface (CLI) option.
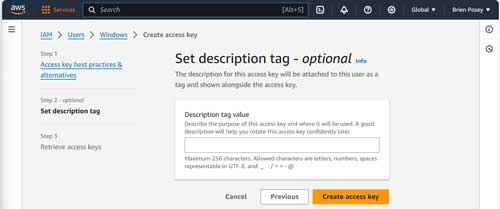
Select the "I Understand the Above Recommendations and Want to Proceed to Create an Access Key" checkbox and click Next. When you do, you will be taken to a screen that gives you the opportunity to set a description tag for the key that you are creating. You aren't required to assign a tag to the key, but tagging your keys can make it much easier to stay organized. When you are done, click the Create Access Key button, shown in Figure 3.
 [Click on image for larger view.]
Figure 3. Enter any required tag and then click the Create Access Key button.
[Click on image for larger view.]
Figure 3. Enter any required tag and then click the Create Access Key button.
At this point, the console will display your access key for the account, along with the secret key. You will need to make a copy of both of these keys. You must do this right away, because AWS makes it impossible to retrieve the secret key at a later time.
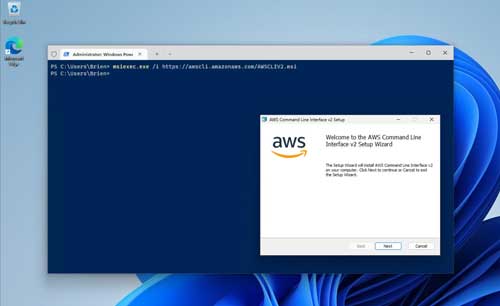
Now that you have acquired the necessary access keys, it's time to install the AWS CLI. There are several different methods that you can use to download and install the CLI, but I prefer to use PowerShell.
To get started, open an elevated PowerShell session and enter the following command:
msiexec.exe /i https://awscli.amazonaws.com/AWSCLIV2.msi
 [Click on image for larger view.]
Figure 4. You can use PowerShell to download the command line interface and to start the installation process.
[Click on image for larger view.]
Figure 4. You can use PowerShell to download the command line interface and to start the installation process.
The command line interface installation process is extremely simple and straightforward. It involves accepting a license agreement and clicking Next a few times.
When the installation process completes, it is a good idea to verify that the necessary components are in place before moving on to the authentication process. To verify that the command line interface is working properly, open a Windows Command Prompt window (not PowerShell) and enter the following command:
aws --version
As simple as this command may be, there are two important things you need to know about using it. First, there are two dashes (not just one) behind the word "version." While this syntax is somewhat uncommon in the world of Windows, double dashes are often used in Linux environments.
Second, If the command fails, then close and reopen the Command Prompt window. In my case, I set up the AWS CLI on a Windows 11 system as I wrote this article. I had to completely close the Terminal (including all open tabs) and reopen it before the AWS command would work.
The last step in the process is to configure the command line interface to use your access key and secret key. To do so, enter the following command into a Windows Command Prompt window:
aws configure
Upon doing so, the client will prompt you for several pieces of information. You will need to enter your access key, secret key, region and default output format. The region should be entered in Amazon's usual format. In my case, for example, the region is us-east-1. The output format is simply the way that you want command line output to be formatted. Most people probably use JSON as the output format. You can see what this process looks like in Figure 5.
 Figure 5. This is how you perform the final configuration for the command line environment.
About the Author
Brien Posey is a 22-time Microsoft MVP with decades of IT experience. As a freelance writer, Posey has written thousands of articles and contributed to several dozen books on a wide variety of IT topics. Prior to going freelance, Posey was a CIO for a national chain of hospitals and health care facilities. He has also served as a network administrator for some of the country's largest insurance companies and for the Department of Defense at Fort Knox. In addition to his continued work in IT, Posey has spent the last several years actively training as a commercial scientist-astronaut candidate in preparation to fly on a mission to study polar mesospheric clouds from space. You can follow his spaceflight training on his Web site.