In-Depth
Step-by-Step: Configuring Amazon EC2 for Business-Critical Applications, Part 1
Here's what you need to do to prepare the EC2 infrastructure to support business-critical applications clustered with Windows Server Failover Clustering (WSFC).
- By Dave Bermingham
- 05/26/2021
If you are deploying business-critical applications in Amazon Elastic Compute Cloud (EC2), you will want to take advantage of the 99.99 percent availability service-level agreement (SLA) offered by Amazon Web Services (AWS). The SLA states the following regarding determining availability:
For Amazon EC2 (other than Single EC2 Instances), Amazon ECS, or Amazon Fargate, when all of your running instances or running tasks, as applicable, deployed in two or more AZs in the same AWS region (or, if there is only one AZ in the AWS region, that AZ and an AZ in another AWS region) concurrently have no external connectivity.
What this means is that AWS guarantees that if you deploy two or more instances in different availability zones (AZs), at least one of those instances will have external connectivity. Take note: The SLA does not guarantee that the application or service running inside the instance will be available. It only guarantees the availability of the instance itself.
To address availability of the application, you will need to take additional steps to monitor the application and recover it should a failure occur. In the case of transactional replications like SQL Server and other relational database management systems (RDMS), you also have to ensure the data is replicated and available across each AZ. Depending on the application, this additional layer of application monitoring and replication will be accomplished by a combination of one or more of the following: load balancing, clustering and/or data replication.
In this post, I will describe in great detail what you need to do to prepare the EC2 infrastructure to support business-critical applications clustered with Windows Server Failover Clustering (WSFC). As we learned in the SLA, in order to qualify for the 99.99 percent availability, you must deploy your instances across multiple AZs. This post will describe how to design your EC2 infrastructure to support cross-AZ failover clustering.
Create the Virtual Private Cloud and Subnets
For this article, I'll assume you have at least some experience with EC2 and a basic understanding of networking. Common configuration tasks will be illustrated here with screenshots and, where warranted, additional annotation will be provided to help guide you over some of the common hurdles I've seen people encounter.
It is imperative to start with a network plan in place. It is beyond the scope of this document to help you plan your cloud network, so please use this plan as just one example. Your networks are likely to look very different. One important point to make, though, is that you should plan to use at least three AZs, one for each cluster node and one for the file share witness.
In our example, we have three subnets in three different AZs in a single region/virtual private cloud (VPC):
VPC: 10.0.0.0/16
AZ1: 10.0.1.0/24
AZ2: 10.0.2.0/24
AZ3: 10.0.3.0/24
It is possible to stretch the cluster across regions or even different cloud providers using asynchronous replication. However, that is beyond the scope of this document.
EC2 portal user experiences can change pretty rapidly, but as of this writing, the experience of creating a new VPC and three subnets is captured in the screenshots below:
 [Click on image for larger view.] Figure 1: Create the VPC.
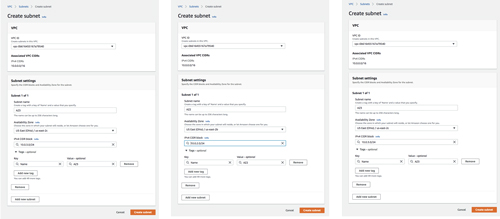
[Click on image for larger view.] Figure 2: Create three subnets in the VPC
On each of the new subnets you just created, enable auto-assign public IPv4 address. Optionally, you could create elastic IPs and assign them to instances as needed.
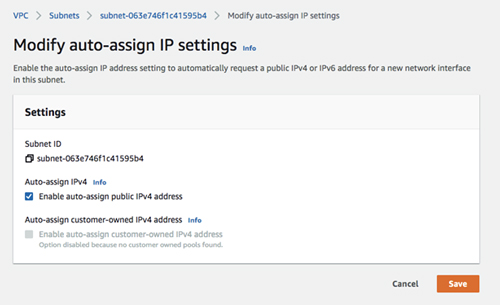 [Click on image for larger view.] Figure 3: Enable auto-assign public IPv4 address.
The Internet gateway is how our instances will gain access to the Internet. In your network, you may not want your instances to be able to access the Internet, but for this example we will enable it and attach it to our VPC.
 [Click on image for larger view.] Figure 4: Create the Internet gateway.
And finally, you have to edit the route table so that all traffic destined for outside the VPC is routed through the Internet gateway.
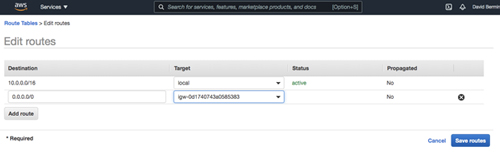 [Click on image for larger view.] Figure 5: Edit the route table.
Provision the Virtual Machines
Now that the VPC is configured, it is time to start provisioning the virtual machines (VMs). In this example, we are going to use Windows Server 2019 and SQL Server 2019. However, the steps described in this article are almost identical across all versions of Windows Server and SQL Server, so you shouldn't have any issues regardless of which version of Windows or SQL Server you plan to use.
Before you begin, it is once again important to start with a plan. In this case, you will want to plan your server names, IP addresses and their AZ placement. As mentioned earlier, each cluster node and the file share witness must each reside in a different AZ.
In the example configuration, we will deploy Active Directory in an instance (DC1) that will also act as a file share witness. Keep in mind that you can also use AWS Managed Microsoft AD if you have that implemented in your infrastructure.
AZ1 - DC1 (10.0.1.100)
AZ2 - SQL1 - (10.0.2.100, 10.0.2.101, 10.0.2.102)
AZ3 - SQL2 - (10.0.3.100, 10.0.3.101, 10.0.3.102)
You may have noticed that each of the cluster nodes (SQL1, SQL2) have three IP addresses. The first address is the private IP address of the instance. The other two IP addresses will be added as secondary addresses on each instance. These IP addresses account for the core cluster IP address and the virtual IP address associated with the SQL Server FCI network name resource.
When we provision the cluster nodes, we will use the base Windows Server 2019 images with no SQL Server software included. Instead, we will download the SQL Server installation media and use a perpetual SQL Server license instead of the "pay-as-you-go" licensing available on the Marketplace.
While it is possible to use the SQL Server Marketplace image, keep in mind that the SQL Server AMI comes with SQL Server installed as a standalone instance of SQL Server, not a clustered instance. To turn that into a SQL Server FCI, the existing standalone instance of SQL Server will have to be uninstalled before you continue with the rest of these instructions. You will have to contact AWS support to get access to SQL Server installation media to reinstall it as a clustered instance if you want to go this route.
My company, SIOS, offers the SIOS DataKeeper on the AWS Marketplace, but it is also possible to bring your own license. In this example, we will bring our own SIOS DataKeeper license and download the software onto the image instead of using the one on the AWS Marketplace.
The following sections illustrate the process of provisioning the three VMs used in this example.
Provision DC1 in AZ1
When choosing an instance type, you must size it properly for the workload. This is similar to what you would do if you were sizing a physical server to use on-premises, but the difference is that you can adjust the size easily if you over-provision or under-provision the first time, or if your workload increases or decreases over time.
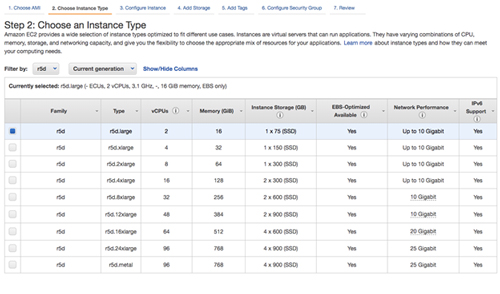 [Click on image for larger view.] Figure 6
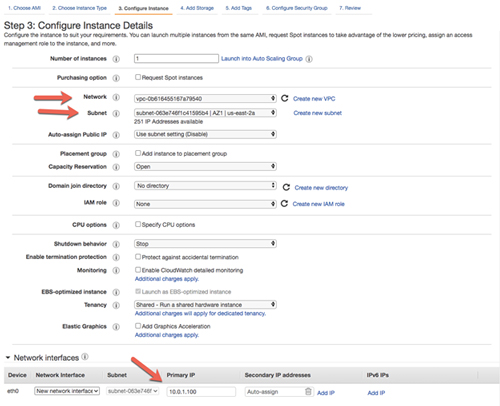
When specifying the instance details, make sure you choose the right VPC and the subnet for proper placement. On this first screen, you also specify the primary IP you want to associate with this instance.
 [Click on image for larger view.] Figure 7
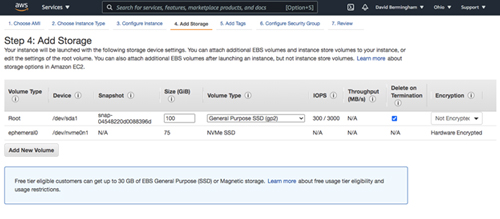
When specifying storage, the 30GB default for the root volume tends to be too small in most cases. In this example, we will use 100GB for the root directory on DC1.
 [Click on image for larger view.] Figure 8
Use tags as you see fit. In this example, we are not making use of tags.
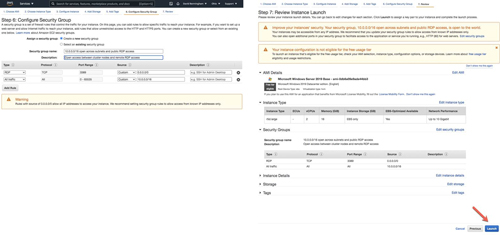
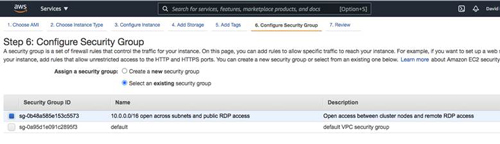
In the next screen, we will create a new security group. We will use the security group for all three of the VMs. It is certainly not best practice to open up RDP access to the world, and you may want to tighten up security within your VPC, but for the purpose of this article these settings will enable us to do what we need to do. Please do not go into production with RDP open to the world! Best security practices would be to use a bastion server as described in this AWS Security blog.
Follow the steps below to create a new security group. Each of the three instances we provision will use this security group. The security group allows open communication between all three instances and allows RDP connections to the instances over the public Internet.
 [Click on image for larger view.] Figure 9
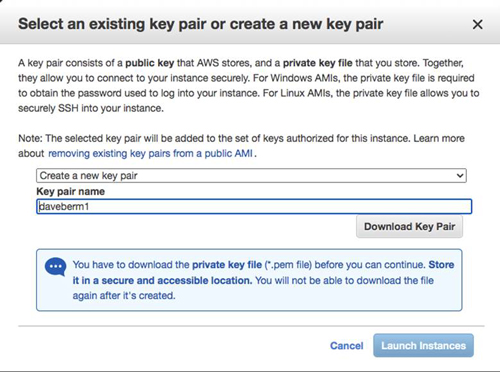
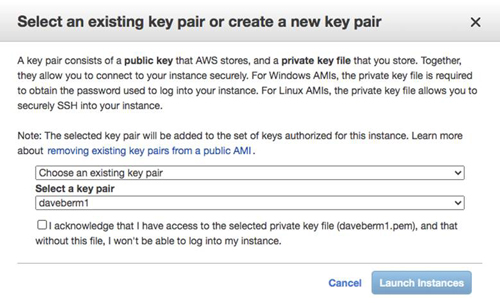
After you launch the instance, you will be prompted for a key pair. Create a new key pair that you will use to retrieve your Windows password later, or use an existing key pair if you have previously created one.
 [Click on image for larger view.] Figure 10
Click on Launch Instance to continue.
Once the image is launched, edit the name of the instance to make it easier to identify.
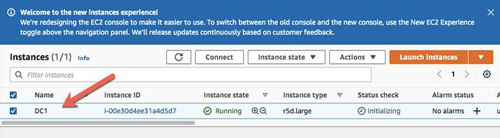 [Click on image for larger view.] Figure 11
Provision SQL1 in AZ2
As discussed earlier, this example uses the base install of Windows Server 2019. SQL Server 2019 will be downloaded later and used for the SQL Server FCI installation.
DataKeeper requires an AMI that has access to Instance Storage. A complete list of SIOS-recommended instance sizes is located here. DataKeeper does not incur any significant memory or CPU overhead, so size the instance based on the SQL Server workload you anticipate it will need to support. To save money, you might want to start small and increase the instance size before you start any performance testing or moving to production.
Specify the proper Network and Subnet. Also, this is where you will add the primary IP address and the two secondary IP addresses that will be used by the cluster.
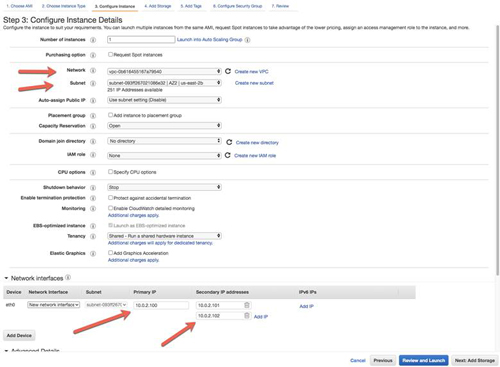 [Click on image for larger view.] Figure 12
For each cluster node (SQL1, SQL2), attach at least one additional Elastic Block Store (EBS) volume to it. This volume will be replicated by DataKeeper and will be used by the cluster as a storage location for the SQL Server log and data files. You can add multiple volumes if you like, but for this example we will keep it simple and only use a single volume. Choose the EBS volume type that supports the number of IOPS and throughput that meet your anticipated needs.
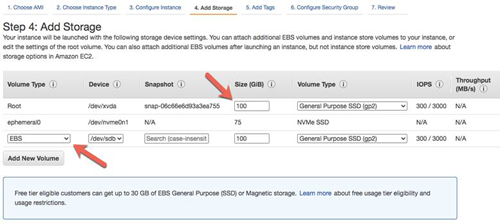 [Click on image for larger view.] Figure 13
In the next screen, select the security group that we previously configured.
 [Click on image for larger view.] Figure 14
When you launch the instance, you can use the key pair that you previously created.
 [Click on image for larger view.] Figure 15
Once again, add the name to the instance to make it easier to identify.
 [Click on image for larger view.] Figure 16
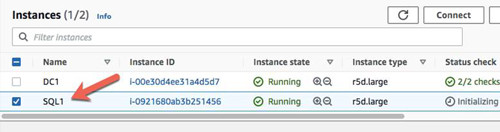
Repeat the steps above to add SQL2 to AZ3. Be sure to choose the right subnet and to add the primary (10.0.2.100) and secondary (10.0.2.101, 10.0.2.102) addresses to the instance. Once all three instances are provisioned, it should look something like this.
 [Click on image for larger view.] Figure 17
Create the Domain
Although some Windows Server failover cluster workloads can work in a workgroup environment, SQL Server FCI still requires an AD domain. As discussed earlier, it is possible to use the AWS Managed Microsoft AD Domain service, but if you aren't using that, then you will need to configure your own Microsoft AD.
For resilience, you should provision multiple AD controllers across different AZs, but for the purposes of this guide, we are just going to provision one AD controller. Follow the screenshots below to configure AD on DC1.
First, you will have to decrypt your Windows password using the key pair you created.
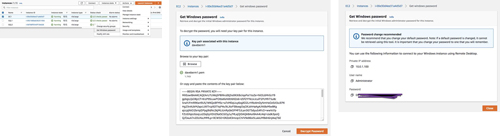 [Click on image for larger view.] Figure 18
Using your favorite RDP program, connect to DC1 using the public IP address associated with the instance. Once you have connected to DC1, you will need to change the name of the instance and reboot.
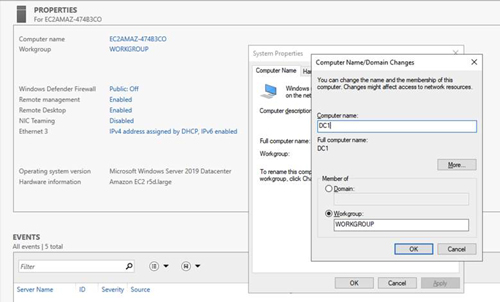 [Click on image for larger view.] Figure 19
Once DC1 has come back online add the AD domain services role.
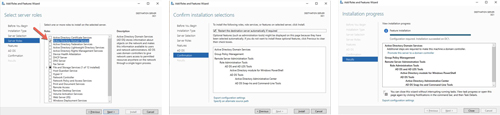 [Click on image for larger view.] Figure 20
After the installation completes, promote this server to a domain controller.
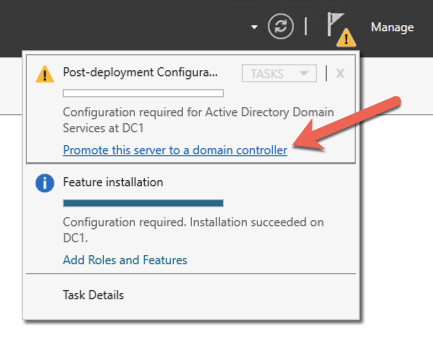 Figure 21
For our purposes, we are going to create a new domain.
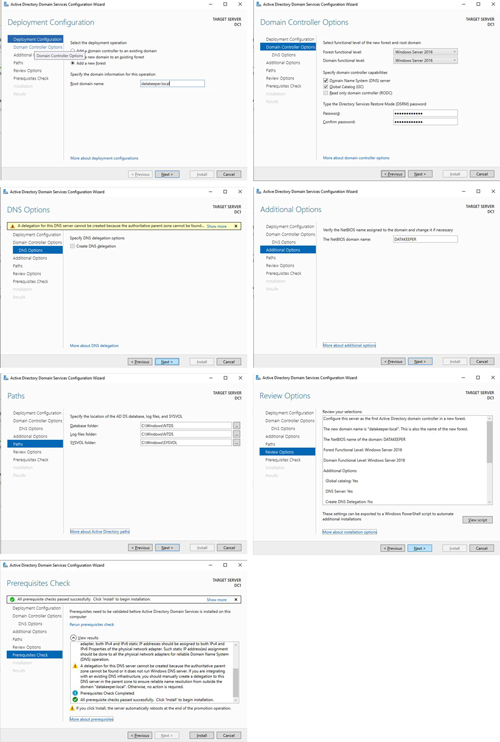 [Click on image for larger view.] Figure 22
After DC1 reboots, connect to it and add the domain user account you eventually plan to use to log on to SQL1 and SQL2. Also add this account into the Domain Admins Group and Remote Desktop Users Group.
Join SQL1 and SQL2 to the Domain
Before we join SQL1 and SQL2 to the domain, we will need to create a new DHCP option set that specifies the new domain name we just created and make DC1 the primary DNS server, NTP and WINS server.
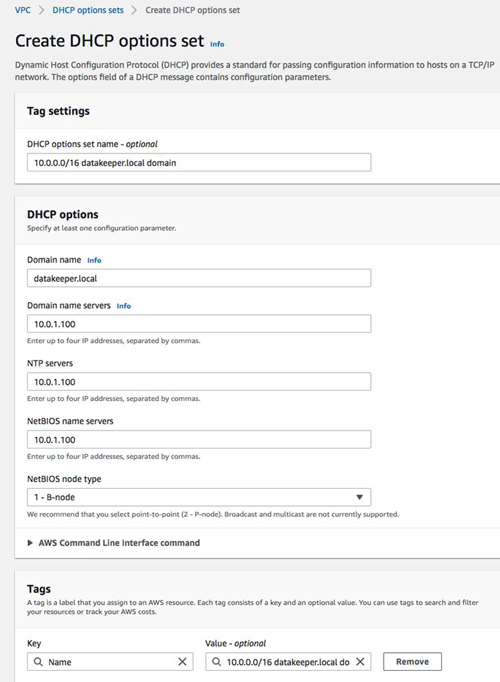 Figure 23
Once the DHCP option set is created, assign it to your VPC.
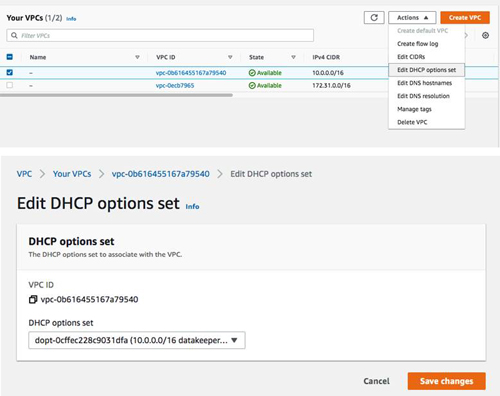 [Click on image for larger view.] Figure 24
After these changes are made, reboot SQL1 and SQL2 so they will be assigned the proper settings from DHCP. Once SQL1 and SQL2 have rebooted, retrieve their local Windows passwords and connect to them via RDP. Once you are connected, change the name of each instance and join them to the datakeeper.local domain as shown in the screenshot below.
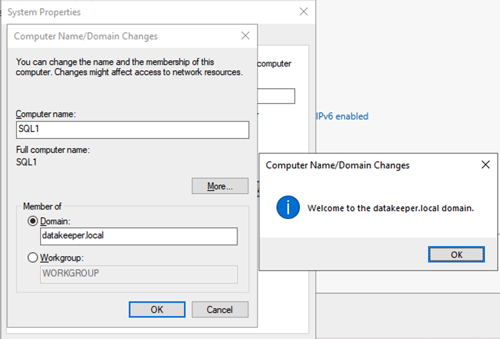 [Click on image for larger view.] Figure 25
Prepare the Storage
Once SQL1 and SQL2 are added to the domain, connect to the instances with the Domain Admin account you created to complete the rest of the configuration steps. The first thing you need to do is attach and format the EBS volumes that we added to SQL1 and SQL2 as shown below.
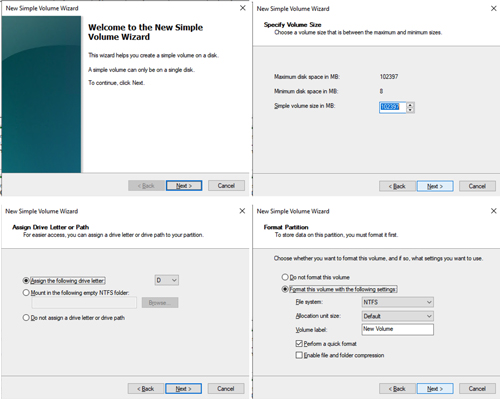 [Click on image for larger view.] Figure 26.
When you are finished, you should have at least two additional volumes on SQL1 and SQL2. In our example, the D drive is the 100GB EBS volume we attached for use in the cluster, and the E drive is the local instance storage that we will use later to store the DataKeeper Intent Log.
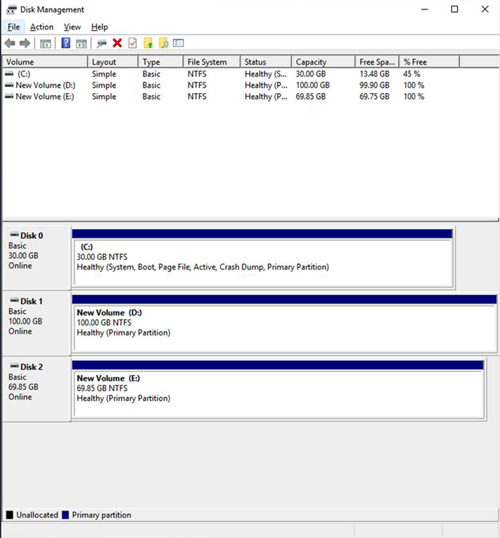 [Click on image for larger view.] Figure 27
Note that if you shut down this instance via the AWS console, the local instance storage will be disconnected. To ensure that your ephemeral storage gets reattached in these circumstances, you will need to use the AWS EC2Launch tool. While EC2Launch version 2 is preferable, EC2Launch version 1 is more reliable. EC2Launch version 2 shows an error message when launching the configuration GUI, after which I am unable to select any volumes to auto-initialize. I will update this column when the EC2Launch version 2 issue is resolved.
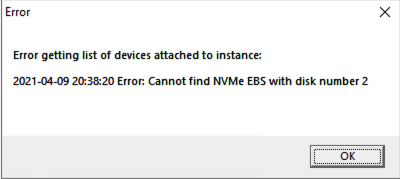 Figure 28
Edit the Advanced TCP/IP Setting
I'm not exactly sure why this next step is necessary, but in my experience if you don't do this, you will not be able to create the cluster. Run IPCONFIG and your connection-specific DNS should be the same as your domain name as shown below.
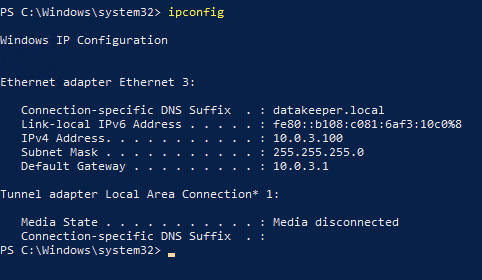 Figure 29
However, you still have to add your domain name to the top of the "Append these DNS suffixes."
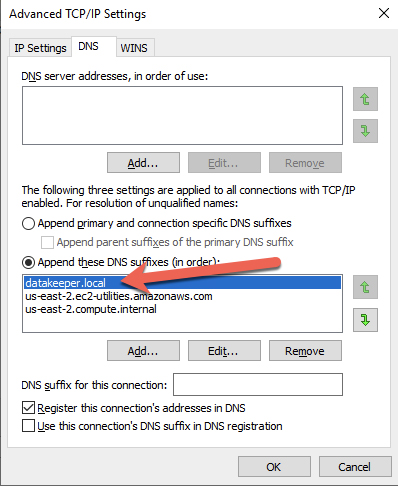 Figure 30
I'm not sure why that is necessary, or whether it is necessary in every environment or every flavor of Windows Server, but I've had experience troubleshooting enough clusters in AWS to know that this is often the reason why Failover Cluster Manager fails to connect to the remote node in a cluster during validation and cluster creation.
Install Failover Clustering Feature
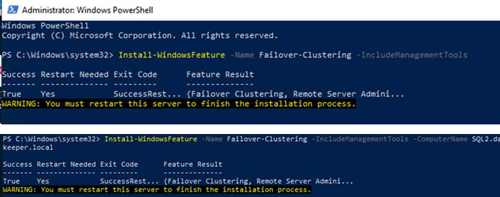
The first step in configuring the cluster is to enable the Failover Clustering feature on both SQL1 and SQL2. You can do that through Server Manager - Add Roles and Features, or through PowerShell as shown here.
 [Click on image for larger view.] Figure 31
SQL Server FCI installation will not be possible unless you first run a successful cluster validation.
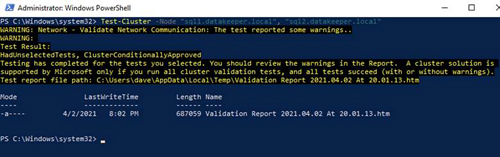 [Click on image for larger view.] Figure 32
Depending on the version of Windows Server you are using, you will see some warnings about network and possibly storage. The network warning will likely tell you that each cluster node is accessible via a single interface. Earlier versions of Windows will warn you about the lack of shared storage.
You can ignore both of those errors as they are expected in a cluster hosted on EC2. As long as you have received no errors, you can proceed on the next section. If you receive any errors, fix them, then run validation again and continue on to the next section.
Configure the Core Cluster
Next, you will configure the core cluster. In the example below you will notice I use the two IP addresses we planned to use, 10.0.2.101 and 10.0.3.101. You can run this PowerShell from either cluster node.
 [Click on image for larger view.] Figure 33
Please note: Do not try to create the cluster via the WSFC GUI. You will find that because the instances are using DHCP, the GUI will not give you the option to assign IP addresses for the cluster and instead will hand out duplicate IP addresses.
Add the File Share Witness
In order to maintain the cluster quorum, you need to add a witness. In AWS, the type of witness you will want to use is a file share witness. The file share witness must reside on a server that resides in a different AZ than the two cluster nodes. In the example below, the file share witness will be created on DC1, which resides in AZ1.
On DC1, create a file share and assign the cluster name object (CNO) read-write permissions on the folder. Add permissions for the CNO on both the Share and Security tab of a folder that you created, In the example below I created a folder called "Witness."
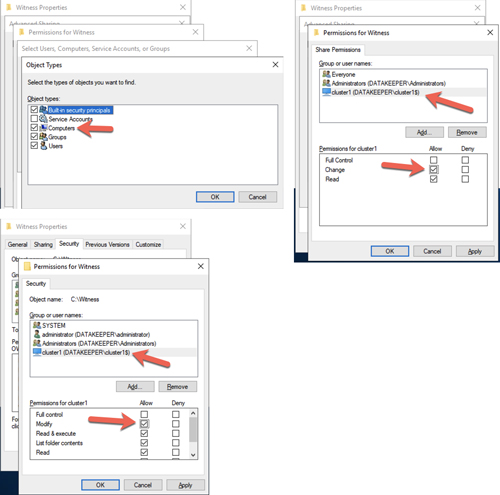 [Click on image for larger view.] Figure 34
Once the folder has been created and the appropriate permissions have been assigned so the CNO has read-write access, run the following PowerShell command on either SQL1 or SQL2.
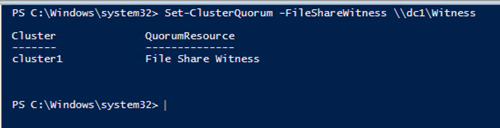 Figure 35
Your cluster should now look like the following.
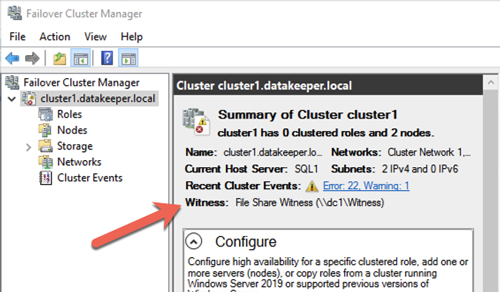 Figure 36
Conclusion
You now have a basic two-node Windows Server failover cluster. From here you can go on to deploy a SQL Server FCI or a SQL Server Always On AG. Please be sure to stay tuned for Part 2, where we will walk through the details of configuring a SQL Server FCI.