AWS Step-by-Step
Enabling Outbound Forwarding with Route 53 Resolver, Part 2
In the previous article in this series, I began walking you through the process of setting up the Route 53 Resolver to enable outbound DNS name resolutions for resources on your private network. So far, most of the effort involved has been tied to the second step in the process, which involves configuring an outbound endpoint. Now, it's time to continue the configuration process by completing Step 3, which involves creating a rule for outbound traffic. You can see what the rule creation screen looks like in Figure 1.
 [Click on image for larger view.] Figure 1: This Is the Screen Used to Create Rules for Outbound Traffic.
Create and Classify the Rule
As was the case with Step 2, the first thing that you are going to need to do is enter a friendly name. This will help you uniquely identify the rule later on.
Once you have picked a rule name, the next thing that you will need to do is choose the type of rule that you want to create. There are three different types of rule available to you, and you can simply choose your preferred rule type from the dropdown.
The first type of rule that you can create is a Forward Rule. Assuming that you are configuring the Route 53 Resolver to handle outbound name resolution, the Forward Rule option is usually going to be the best option. A Forward Rule allows you to forward external DNS queries to a DNS server on your private network. This DNS server should be able to resolve queries pertaining to resources residing on your private network.
The second option is to create a System Rule. You will only create a System Rule if you are trying to override a particular aspect of a Forward Rule.
The third option is to create a Delegation Rule. A Delegation Rule can be useful if you have one or more subdomains, since the Delegation Rule can be used to point the resolver toward the DNS servers that are authoritative for those domains.
It is worth noting that the remaining configuration options vary depending on which type of rule you choose to create. For the purposes of this article, I am going to discuss the configuration options associated with creating a Forward Rule.
Choose Domain and Scope Carefully
So with that said, the next step in the configuration process is to specify a domain name that will be associated with the Forward Rule that you are creating. While this process sounds simple (and it is), it does warrant just a bit of caution. The thing to keep in mind is that if you have a domain and one or more subdomains, then it is entirely possible that multiple rules may apply to a particular domain. Yes, we are creating a single rule to get started with, but you can create additional rules later on. The reason why this is important is because if multiple Forward Rules can apply to a particular domain, then the most specific rule will take precedence.
Let me give you an example. Suppose for a moment that I were to create a rule for my BrienPosey.com domain name. Now, let's pretend that I had a subdomain called apps.brienposey.com. If I created a rule pertaining to the BrienPosey.com domain, that rule would also be valid for subdomains, including apps.brienposey.com. Hence, if I were to create a rule specifically for the apps.brienposey.com domain, then that rule would obviously apply, but the BrienPosey.com rule would also apply. In these types of situations, AWS applies the most specific rule. In this example, it would mean that the rule for apps.brienposey.com would be the rule that applies.
Once you have entered a domain name, you will have the option of selecting VPCs that will use the rule. While this step is optional, it's usually a good idea to select at least one VPC that will forward outbound traffic to the domain that you are specifying.
The next thing that you will need to do before you move on is choose the outbound endpoint through which queries will be passed. You may also need to specify the type of IP address (IPv4 or IPv6) that the rule will pertain to. Depending on how your AWS environment is configured, these values may be automatically populated and grayed out, preventing you from changing them.
The last step in this process is to enter a target IP address to which DNS queries should be forwarded. When you are done, click Next and you will be taken to the Review and Create screen, which you can see in Figure 2. Take a moment to make sure that everything shown on this screen appears to be correct. When you are satisfied with the information shown, click Submit.
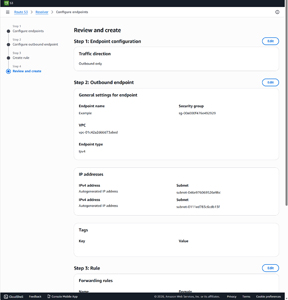 [Click on image for larger view.] Figure 2: Review the Settings on This Screen Before Clicking Submit.
The resource creation process can take several minutes to complete. When the process eventually finishes, you should see the new resources displayed on your dashboard, as shown in Figure 3.
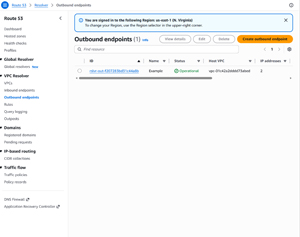 [Click on image for larger view.] Figure 3: The New Resources Have Been Created.
About the Author
Brien Posey is a 22-time Microsoft MVP with decades of IT experience. As a freelance writer, Posey has written thousands of articles and contributed to several dozen books on a wide variety of IT topics. Prior to going freelance, Posey was a CIO for a national chain of hospitals and health care facilities. He has also served as a network administrator for some of the country's largest insurance companies and for the Department of Defense at Fort Knox. In addition to his continued work in IT, Posey has spent the last several years actively training as a commercial scientist-astronaut candidate in preparation to fly on a mission to study polar mesospheric clouds from space. You can follow his spaceflight training on his Web site.