AWS Step-by-Step
Strategies for Windows Guest Clustering in AWS, Part 1
Although Windows Failover Clusters tend to be used primarily in on-premises environments, they do have their place in the cloud. Building a failover cluster within EC2 allows you to keep workloads running, even in the event that one of the instances goes offline. Perhaps more importantly, Windows failover clustering makes it possible to keep mission critical workloads running, even when individual nodes must be rebooted as a part of the patch management process.
Windows failover clusters typically leverage shared storage in the form of a cluster shared volume. In other words, all of the nodes that make up the cluster have access to the same storage volume. That way, if a failover were to occur, the node that the workload fails over to is able to access the same storage as the failed node had been using.
There are various ways that you can go about building a Windows Failover Cluster within AWS EC2. One of the more commonly used method involves building a special purpose EC2 instance whose only job is to act as an iSCSI target. Specifically, this node is attached to two or more EBS volumes. One EBS volume is used by the instance's operating system. The other volume acts as cluster storage. The instance is then configured to host an iSCSI target, allowing the cluster nodes to attach to the shared storage by way of the iSCSI protocol.
It's tempting to assume that the technique that I just described is the only realistic option for building a Windows failover cluster using AWS EC2. After all, there is no native AWS functionality that can turn an EBS volume into an iSCSI target. However, using iSCSI is not your only option. AWS offers a multi-attach feature that allows you to connect an EBS volume to multiple EC2 instances without using iSCSI. There are however, various limitations that you need to be aware of. I am going to spend the remainder of Part 1 discussing these limitations and showing you how to create a volume that can be attached to multiple instances. In Part 2, I will walk you through the process of creating the necessary instances and configuring Windows to use the volumes. I am going to stop short of building an entire Windows failover cluster, but there are plenty of online resources that discuss the cluster creation process in detail.
So with that said, the first thing that you need to know about multi-attached volumes is that not all EBS volumes support multiple attachments. The only volume types that are supported for multiple attachments are provisioned IOPS SSD volumes of types io1 and io2. Additionally, io1 volumes only support multiple attachments in specific regions US East (N. Virginia), US West (Oregon), and Asia Pacific (Seoul).
Another important thing that you need to know is that io1 volumes only support multiple attachments for Linux instances. If you are going to be building a Windows failover cluster based on multi-attached volumes then you must use io2 volumes.
It's also important to note that not all EC2 instance types support multi-attached volumes. If you plan to use multi-attached volumes, your Windows instances must run on Nitro system. Additionally, the volume and all of the instances that will attach to the volume must reside within the same availability zone. Unfortunately, you cannot spread your cluster nodes across multiple availability zones if you plan to use multiple attached volumes.
To create a volume that supports multiple attachments, sign into AWS, open the EC2 console, and click on the Volumes container within the Elastic Block Store section. Now, click on the Create Volume button. This will take you to the Create Volume page.
The first thing that you will need to do on this page is to select the volume type. Remember, if you are going to be working with Windows instances, you must set the volume type to Provisioned IOPS (io2). Next, specify your desired volume size and the number of IOPS that you require. While you are at it, be sure to make note of the volume's availability zone, and change it if necessary. Finally, select the Enable Multi-Attach and then click the Create Volume button, shown in Figure 1. The Enable Multi-Attach option will only appear on the page when you have selected a volume type that supports multiple attachments.
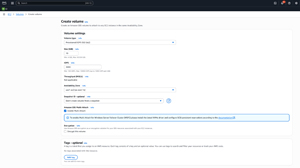 [Click on image for larger view.] Figure 1: Make sure that the Volume Type is set to Provisioned IOPS SSD (io2) and that you have selected the Enable Multi-Attach checkbox.
At this point, the newly created volume should appear on the Volumes page, as shown in Figure 2. Notice in the figure that the Volumes page displays the name of the availability zone where the volume resides. Remember, when you create the EC2 instances, those instances will need to exist in the same availability zone as the volume that you just created.
 [Click on image for larger view.] Figure 2: The newly created volume is displayed on the Volumes page.
Now that we have created a volume that can be attached to multiple instances, it's time to move forward with the instance creation process. I will guide you through this process in Part 2.
About the Author
Brien Posey is a 22-time Microsoft MVP with decades of IT experience. As a freelance writer, Posey has written thousands of articles and contributed to several dozen books on a wide variety of IT topics. Prior to going freelance, Posey was a CIO for a national chain of hospitals and health care facilities. He has also served as a network administrator for some of the country's largest insurance companies and for the Department of Defense at Fort Knox. In addition to his continued work in IT, Posey has spent the last several years actively training as a commercial scientist-astronaut candidate in preparation to fly on a mission to study polar mesospheric clouds from space. You can follow his spaceflight training on his Web site.