AWS Step-by-Step
Creating AI Guardrails for Amazon Bedrock, Part 2: Configuration
Brien Posey details how administrators can configure robust AI guardrails in Amazon Bedrock to filter harmful content, block sensitive topics, and enforce response accuracy
In the first part of this article series, I talked about AI guardrails and how you might want to use them to protect both your users and your AI workloads. Now, I want to continue the discussion by picking up where I left off in my discussion of the configuration process.
The second step in the guardrail creation process allows you to define some optional content filters. There are two different types of content that you can filter -- harmful categories and prompt attacks.
You can see what the Harmful Categories filter looks like in the figure below. As you can see, you can filter content from several categories including hate, insults, sexual, violence, and misconduct. For each of these categories, you can filter text and or images. You can also adjust the filter strength based on how aggressively you want the filter to behave. These filters apply to the prompts that users enter. There is a checkbox that you can select if you want to apply these same filters to the responses that AI generates. Otherwise, you can deselect the checkbox and create an entirely different set of filters that are applied to responses.
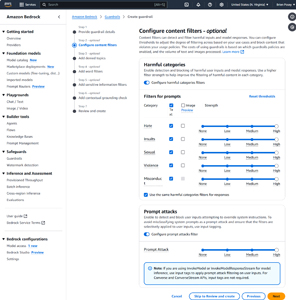 [Click on image for larger view.] Figure 1: Step Two Allows You to Filter Harmful Categories and Prompt Attacks.
If you have a need for these filters, my advice would be to start out using the Low setting and then gradually increase the filter strength based on the results of your testing. The reason why I say this is because the filters are somewhat ambiguous and the filter's idea of hate speech or misconduct, as an example, may differ from your own.
The other thing that you can configure on this screen is the detection of prompt attacks. Prompt attacks are essentially user prompts that are designed to trick the AI into giving up information that it would not ordinarily provide or that are meant to trick AI into breaking the filtering rules that you have set up. Like the Harmful Categories filter, you can adjust the strength of the prompt attack filter.
The third step in the guardrail creation process allows you to optionally create a list of up to 30 denied topics. These topics will not be allowed within user prompts or AI responses.
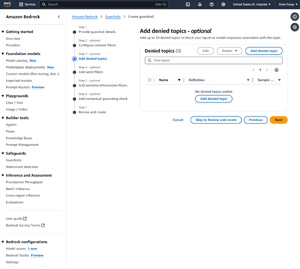 [Click on image for larger view.] Figure 2: You Can Specify a Series of Denied Topics.
To create a denied topic, just click the Add Denied Topic button and enter a name for the denied topic. You will also have to enter a definition of what constitutes content that falls within that denied topic. You can even add some example phrases if you like. The example that Amazon gives is content related to investment advice, as shown in the figure below.
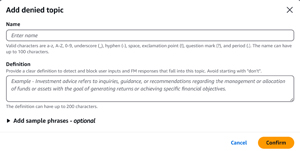 [Click on image for larger view.] Figure 3: You Can Provide Details Related to the Topic that Should Be Treated as Being Off Limits.
The fourth step in the process involves adding an optional list of words or phrases that you want to block. You can add these words or phrases manually, or you can import them from a file or from an S3 object.
There is also a checkbox that you can select if you want to block profanity. Unfortunately, the profanity filter is not customizable, which means that you do not have the option of blocking some words but not others (unless you rely solely on the word filer rather than the profanity filter). The reason why I wish Amazon allowed for granular control over the profanity filtering process is because of regional differences in language. As an example, I can think of words that are offensive in American English, but mean something completely different and non-offensive in British English. The opposite is also true.
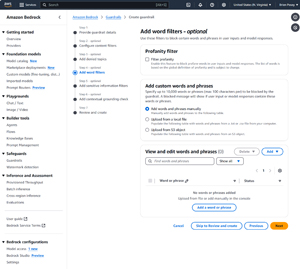 [Click on image for larger view.] Figure 4: You Can Filter Specific Words or Phrases, along with Profanity.
Step five in the guardrail creation process involves optionally filtering personally identifiable information and regex patterns. A personally identifiable information filter works similarly to a Data Loss Protection filter in that it allows you to specify the types of information that you want to filter, and then blocks data matching that pattern. As an example, if you were to block social security numbers then the filter would presumably block any numerical value matching the pattern used by social security numbers.
The regex pattern filter allows you to identify and block data based on regular expressions. If for example, some of your proprietary business data adheres to a specific format (such as an account number) then you could create a regular expression filter to block anything matching that pattern.
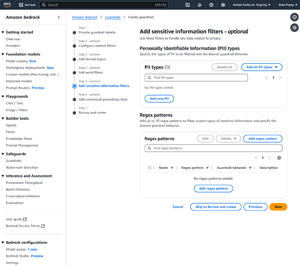 [Click on image for larger view.] Figure 5: You Can Filter Content Based on Personally Identifiable Information or Regular Expressions.
Step six in the configuration process involves a contextual grounding check. When enabled, the grounding check forces the AI to take a second look at the response that it is about to provide and evaluate whether the response is likely to be factual based on available information.
Another setting found on this screen allows you to filter responses based on relevance. When enabled, this filter causes the AI to reevaluate its intended response to make sure that it is relevant to the prompt that the user submitted.
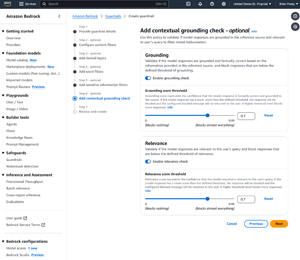 [Click on image for larger view.] Figure 6: You Can Force the AI to Perform Grounding and Relevance Checks on its Intended Responses.
Step seven in the guardrail creation process is just a review of the information that you have entered thus far. Take a moment to review the various settings and then click on the Create Guardrail button to complete the guardrail creation process.
As previously noted, it's important to extensively test a guardrail before putting it to work in your organization. When you have finished creating a guardrail, AWS provides you with an interface that allows you to test the guardrail against models of your choosing in an effort to validate the guardrail's behavior. You can see what the testing interface looks like in Figure 7.
 [Click on image for larger view.] Figure 7: You Can Test a Guardrail to Validate its Behavior.
About the Author
Brien Posey is a 22-time Microsoft MVP with decades of IT experience. As a freelance writer, Posey has written thousands of articles and contributed to several dozen books on a wide variety of IT topics. Prior to going freelance, Posey was a CIO for a national chain of hospitals and health care facilities. He has also served as a network administrator for some of the country's largest insurance companies and for the Department of Defense at Fort Knox. In addition to his continued work in IT, Posey has spent the last several years actively training as a commercial scientist-astronaut candidate in preparation to fly on a mission to study polar mesospheric clouds from space. You can follow his spaceflight training on his Web site.