AWS Step-by-Step
Creating a Windows Server Lightsail Instance in AWS
Amazon's virtual private server solution is no longer for Linux only.
A couple of months ago, I described how Amazon Lightsail makes it possible to achieve more predictable Amazon Web Services (AWS) billing by creating instances that are billed at a flat rate (see "Making Cloud Costs More Predictable with Amazon Lightsail").
At the time that I wrote that column, Lightsail only supported Linux instances. Earlier this month, however, AWS added Lightsail support for Windows Server instances. That being the case, I wanted to revisit the topic and take a look at how to create a Windows Server instance within Lightsail.
To create a Lightsail instance, log in to the AWS console, and then choose Lightsail from the list of available services (it's located in the Compute section). Upon doing so, you will be taken to the main Lightsail screen, which you can see in Figure 1. As you can see in the figure below, you need only to click the Create Instance button to get started.
 [Click on image for larger view.] Figure 1: Click the Create Instance button to get started.
At this point, you will be taken to the Create an Instance screen, which you can see in Figure 2. As you can see in this figure, AWS has made the process of creating an instance as easy as possible.
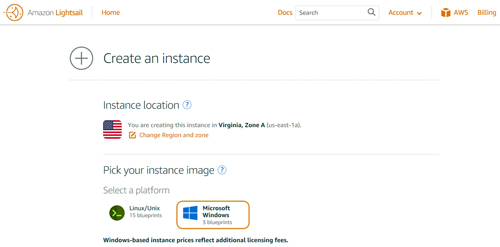 [Click on image for larger view.] Figure 2: This is the Create an Instance screen.
The first thing that you will need to do on this screen is to pick an instance location. The nice thing about this step is that AWS detects your location automatically, so you will only need to set a location if you need to use a non-default region.
The next step in the process is to choose the instance type. As you can see in Figure 2 above, this is a matter of choosing either Linux/Unix or Windows as a platform. The pricing and the remaining options can vary depending on which platform you select, so this article is based on the assumption that a Windows platform has been selected.
When you scroll farther down the screen, you will see a prompt to select a blueprint for the instance. Selecting a blueprint is AWS-speak for choosing the virtual machine template that you want to deploy. In Figure 3, for example, you can see that AWS gives you a choice between installing Windows Server 2016 and Windows Server 2012 R2.
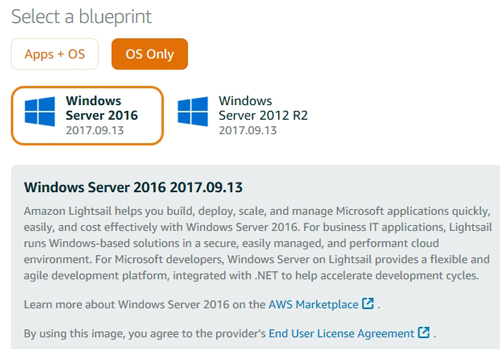 Figure 3: Choose the desired blueprint for your instance.
As you look at Figure 3 above, you will notice that when selecting a blueprint, you can opt to deploy an OS only, or you can deploy an OS plus an application. In the case of Windows Server, the only application that is available right now is SQL Server 2016 Express, but there are a variety of applications available for Linux instances.
If you scroll down a little farther, you can see that there are three remaining configuration options, as shown in Figure 4. The first of these options is an option to automatically run a Windows PowerShell script the first time that the instance launches.
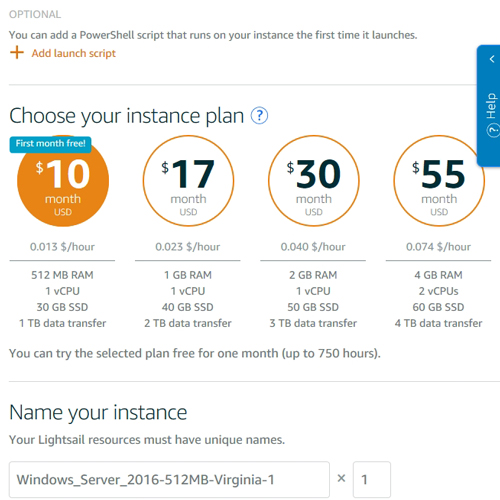 Figure 4: These are the remaining configuration options.
Running a PowerShell script is optional, but if you do want to run a script, just click the Add Launch Script link and then type or paste the contents of your PowerShell script into the space provided, as shown in Figure 5 below.
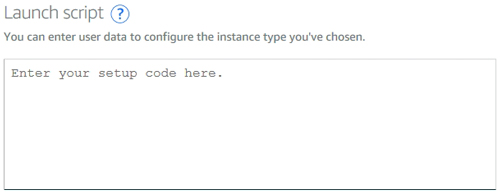 Figure 5: You can enter your PowerShell code here.
The next step in the process, which you can see back in Figure 4, is to specify the instance plan. The instance plan determines the cost of the instance, as well as the instance's hardware allocation. Monthly billing is done at a flat rate based on the instance type, but you may be charged extra for overages on transfer limits.
The last step in the process is to enter a unique name for your instance. If you are only creating a few instances, then the names should be descriptive. If I were creating a lab domain controller, for instance, I might call it PoseyLabDC. If you have a lot of instances to create, however, then it may be more efficient to use the default instance name provided by AWS.
Once you have finished providing all of the required details, click the Create button and your instance will be created.
About the Author
Brien Posey is a 22-time Microsoft MVP with decades of IT experience. As a freelance writer, Posey has written thousands of articles and contributed to several dozen books on a wide variety of IT topics. Prior to going freelance, Posey was a CIO for a national chain of hospitals and health care facilities. He has also served as a network administrator for some of the country's largest insurance companies and for the Department of Defense at Fort Knox. In addition to his continued work in IT, Posey has spent the last several years actively training as a commercial scientist-astronaut candidate in preparation to fly on a mission to study polar mesospheric clouds from space. You can follow his spaceflight training on his Web site.