AWS Step-by-Step
Virtual Private Cloud Peering with AWS, Part 2: The Setup
Now that you know the limits of what you can and can't do with VPC peering, here's how to actually set it up in AWS.
In my previous column, I talked about some of the considerations and limitations associated with virtual private cloud (VPC) peering in Amazon Web Services (AWS). In this article, I want to continue the discussion by showing you how to actually set up VPC peering.
As you may recall from the previous installment, peering refers to establishing logical connectivity between two AWS VPCs, thereby allowing the instances in one VPC to communicate with the instances in another. These VPCs can exist within a common AWS account, or can exist within two separate AWS accounts.
To set up a peered connection between two VPCs, log in to the AWS console and then click on the link to the VPC service. The VPC option is located in the Networking & Content Delivery section. When the VPC dashboard appears, click on the Peering Connections link. The resulting screen contains a big blue button labeled Create VPC Peering Connection, as shown in Figure 1. Go ahead and click on this button.
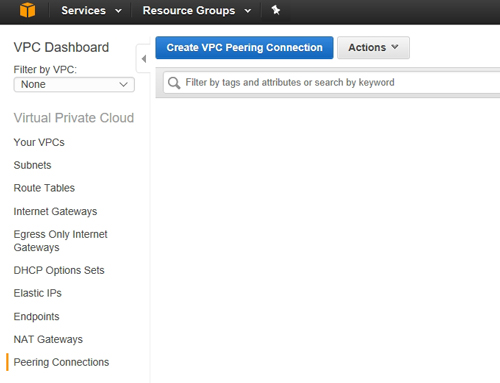 Figure 1: Click the Create VPC Peering Connection button.
At this point, the console will display the Create VPC Peering Connection window, which you can see in Figure 2. As you can see in this figure, there are only four options that you have to configure.
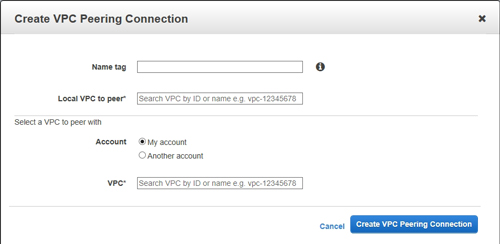 [Click on image for larger view.] Figure 2: This is the dialog box that is used to set up VPC peering.
The first option that is shown in the figure above is the Name Tag option. AWS uses the concept of tags as a way of identifying resources. Tags are not only used by VPC peering, but rather are used throughout the AWS environment.
To use the Name Tag option, simply enter a name that you want to use to identify this particular peering connection. When you do, AWS will create a key/value pair in which the key name is Name and the value is the name that you specify within the tag.
The second option that you will need to populate is the Local VPC to Peer option. This is where you specify a VPC within your own AWS account. The VPC that you choose will act as a point of origin for the peering connection.
Unfortunately, AWS does not allow you to simply select a VPC from a list. However, you can search for the desired VPC by entering its ID or by entering its name (as defined by a tag). If you look at Figure 3, for example, you can see that the Your VPCs container contains a list of all of the VPCs that exist within the account, and each of these VPCs contains a VPC ID. This ID can be used to identify the VPC when setting up a peering connection. The VPC shown in this figure hasn't been assigned a name, but if it had a name, you could use its name as an alternative to specifying the VPC ID.
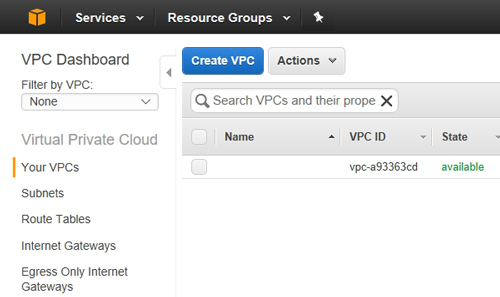 Figure 3: Each VPC has an ID and an optional name.
The next step in the configuration process is to specify the location of the VPC with which you wish to create a peering connection. As you saw in Figure 2, you can specify a VPC within your own account or within another account.
Finally, you will need to specify the VPC that you want to connect to. If you are creating a peering relationship to another VPC within your own account, then just enter the VPC's name or its ID, just as you did for the Local VPC to Peer option. If you are connecting to a VPC within another account, however, you will have to specify the account ID, as shown in Figure 4. It is worth noting that if you are connecting to a VPC that is associated with another account, you must identify the remote VPC by its ID. You cannot specify the VPC by name.
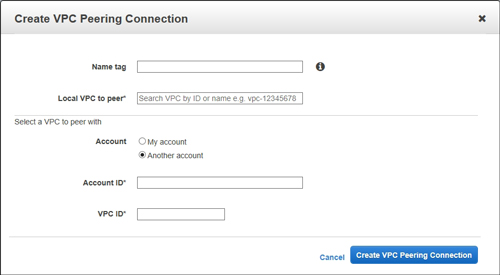 [Click on image for larger view.] Figure 4: AWS provides the option of connecting to a VPC that belongs to another AWS account.
This brings up an important point. If you attempt to establish a connection to a VPC within another AWS account, the owner of that account will receive a VPC peering connection request. This request will appear within the VPC Peering Connections screen that was shown in Figure 1. The owner of the account must accept the request in order for a peering connection to be established. Incidentally, AWS provides a Reject Request option that can be used to deny unauthorized connection requests.
As you can see, AWS makes it relatively painless to set up VPC peering. You can access AWS' VPC peering documentation here.
Related:
About the Author
Brien Posey is a 22-time Microsoft MVP with decades of IT experience. As a freelance writer, Posey has written thousands of articles and contributed to several dozen books on a wide variety of IT topics. Prior to going freelance, Posey was a CIO for a national chain of hospitals and health care facilities. He has also served as a network administrator for some of the country's largest insurance companies and for the Department of Defense at Fort Knox. In addition to his continued work in IT, Posey has spent the last several years actively training as a commercial scientist-astronaut candidate in preparation to fly on a mission to study polar mesospheric clouds from space. You can follow his spaceflight training on his Web site.