AWS Step-by-Step
Creating Resource Groups in AWS
Amazon Web Services allows admins to create logical groupings of AWS resources, and manage them using tags and tag values. Here's how to get started.
Whenever you create an object in Amazon Web Services (AWS), you are usually given the option of applying tags to the object. It's easy to accumulate a vast number of objects within AWS and tagging can make it easier to locate specific objects.
However, tagging is also useful in the creation of resource groups.
Resource groups are, as the name implies, a logical grouping of AWS resources. For example, suppose that an administrator was to create a series of virtual machines (VMs) that were all related to a specific project. The admin might choose to create a resource group containing the project's VMs, as well as related resources such as snapshots and load balancers.
AWS allows admins to add objects to a resource group through the use of tags and tag values. An administrator might, for example, choose to build a resource group for all of the objects that include a specific tag. If the administrator needed a bit more granular control, then they might create a resource group based not just on a tag, but also on the tag's value. It is worth noting, however, that even though AWS supports tagging for almost every object type, not all object types can be included in a resource group.
Creating a resource group is a relatively straightforward process. To do so, log in to the AWS console and then click on the Resource Groups link. The Resource Groups link is not located in the list of services, but rather appears in the black bar at the very top of the console. You can see what this looks like in Figure 1 below.
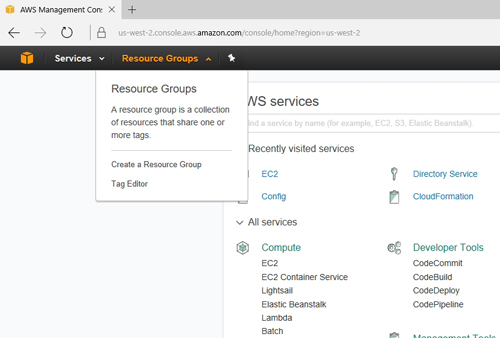 [Click on image for larger view.] Figure 1: Click on the Resource Groups link.
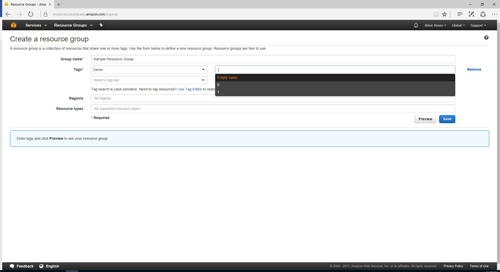
Click on the Create a Resource Group option, found on the Resource Groups drop-down list. When you do, you will be taken to the Create a Resource Group page, which you can see in Figure 2. This page requires you to enter several pieces of information.
 [Click on image for larger view.] Figure 2: This is the interface used to create a resource group.
As you would probably expect, the first step in creating a resource group is to enter a name for the group. The next step in the process is to choose a tag to associate with the resource group. If you look closely at Figure 2 above, you will notice that the Tags field contains a drop-down arrow. Clicking on this arrow reveals a list of the tags that are currently being used within your organization, and you can make your selection from the list.
The next thing that you will need to do is to select a value for your selected tag. This step is a little bit tricky, because you have three different options. If you look back at Figure 2, you will notice that just to the right of the Tags field, there is a field that says Tagged With Any Value. This is the default value for this field, and it essentially means that tag values will be ignored. In order for a tagged resource to be included in the resource group, it will need to have a matching tag, but the tag values don't matter.
The second option is to specify that the tag has an empty value. This is useful in a situation in which some tags have been assigned values and others have not, and you only want to include objects in the resource group if their specified tag does not include a corresponding value.
The third option is, of course, to enter a value. By doing so, you are effectively telling AWS that objects should only be included in the resource group if they have a matching tag and a matching tag value.
If you want to allow any value to be used with the tag, then you don't have to do anything at all. If, however, you want to specify a value or specify an empty value, then you will need to click on the value field. Doing so displays your existing tag values and the option to use an empty value, as shown in Figure 3. Incidentally, AWS does provide you with the option of specifying multiple tags for a resource group.
 [Click on image for larger view.] Figure 3: You must decide which tag values to include.
Finally, you have the option of limiting the resource group to a specific region and to specific resource types. By default, the resource group will span all regions and include all resource types, but you can set limits by clicking on the Regions or the Resource Types field and making a selection, as shown in Figure 4.
 [Click on image for larger view.] Figure 4: You can specify the regions and resource types to include in the resource group.
When you finish populating the various fields, click Save to create the resource group. You can see what the resource group looks like in Figure 5.
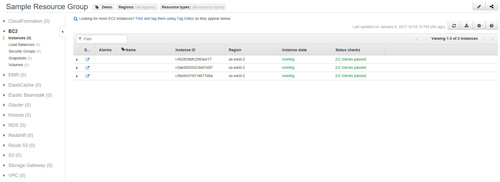 [Click on image for larger view.] Figure 5: This is what a resource group looks like.
About the Author
Brien Posey is a 22-time Microsoft MVP with decades of IT experience. As a freelance writer, Posey has written thousands of articles and contributed to several dozen books on a wide variety of IT topics. Prior to going freelance, Posey was a CIO for a national chain of hospitals and health care facilities. He has also served as a network administrator for some of the country's largest insurance companies and for the Department of Defense at Fort Knox. In addition to his continued work in IT, Posey has spent the last several years actively training as a commercial scientist-astronaut candidate in preparation to fly on a mission to study polar mesospheric clouds from space. You can follow his spaceflight training on his Web site.