AWS Step-by-Step
Reducing Your AWS Costs Through Instance Scheduling, Part 1
One way that an organization can reduce its Amazon Web Services (AWS) costs is by powering down its EC2 virtual machine (VM) instances while they are not in use. While it's true that most VMs will continue to incur hourly costs whether they are powered on or not, those costs tend to be significantly lower when an instance is powered down. That being the case, I wanted to show you how to set up a scheduler that shuts down an instance at the end of the day and then automatically powers the instance back on the next morning.
Putting the Permissions into Place
Before I show you how to schedule an EC2 instance to automatically power on and off at certain times of the day, we need to set up some permissions. We are going to be using AWS Lambda to control the EC2 instances, and so Lambda is going to need permission to turn VM instances on and off.
To get started, open the Identity and Access Management (IAM) dashboard. Now, select the Policies tab and then click Create Policy. When you arrive at the Create Policy screen, click the JSON button and then replace the default code with the code shown below:
  {
  	"Version": "2012-10-17",
  	"Statement": [
  		{
  			"Sid": "VisualEditor0",
  			"Effect": "Allow",
  			"Action": [
  				"ec2:DescribeInstances",
  				"ec2:DescribeTags",
  				"ec2:Start*",
  				"ec2:Stop*"
  			],
  			"Resource": "*"
  		},
  		{
  			"Sid": "VisualEditor1",
  			"Effect": "Allow",
  			"Action": [
  				"logs:CreateLogStream",
  				"logs:CreateLogGroup",
  				"logs:PutLogEvents"
  			],
  			"Resource": "arn:aws:logs:*:*:*"
  		}
  	]
  }
Click Next and you will be taken to the Review and Create screen. Assign a name and an optional description to the policy and then click the Create Policy button. Be sure to remember the policy name that you have used, because you are going to need it again later on. For the purposes of this article series, I am calling my policy Lambda-EC2.
Now, go back to the main IAM Dashboard screen and select the Roles tab and then click the Create Role button. At this point, the console will display the Select Trusted Entity screen. Choose the AWS Service option and then choose the Lambda option from the Service or Use Case dropdown menu.
Click Next and you will be taken to the Add Permissions screen. Select the policy that you just created from the list of policies. Being that there are so many policies to choose from, it can be helpful to use the search interface to narrow down the list of policies. Select your policy and click Next.
You will now be prompted to assign a name for your role. I'm going to call my new role EC2OnOff, but again, you can use any name that you like. Enter an optional description for the role and then click the Create Role button.
Tag Your Instance
Now that you have created a role that can be used to confer the required permissions, the next thing that you are going to need to do is to set up some tags that can be used to identify which instances should be automatically powered on and off.
Tagging is a simple process that involves assigning a key / value pair to an AWS object. In this case, we are going to use tagging as a way of identifying which instances need to be scheduled (and conversely, which should be left alone). Incidentally, it is possible to create differing schedules for various instance types. The trick to doing so is to tag the instances in a way that reflects which instance should be bound to which schedule.
To tag an instance, open the EC2 dashboard and click on the instance. When you arrive at the details screen, click on the Tags tab and then click the Manage Tags button. Now, click the Add New Tag button. Here you will be prompted to supply a key and a value for the new tag that you are creating. You can use any key / value names that you want. For the purpose of this article, I am going to create a key called Schedule and a value called BusinessHours, as shown in Figure 1. Click Save to complete the process.
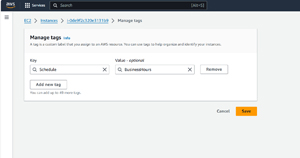 [Click on image for larger view.] Figure 1: I am creating a tag called Schedule.
Create a Lambda Function
The next step in the process is to create a pair of Lambda functions that can assist with powering your instances on and off. For those who might not be familiar with Lambda, it's an AWS platform that lets you run code and scripts without having to deal with the underlying infrastructure. To put it another way, Lambda is essentially serverless scripting platform.
To get started with creating the necessary functions, click the Create a Function button. This will cause the console to display the Create Function screen. Make sure that the Author From Scratch option is selected, and then enter a name for the function that you are creating. I am going to call my function EC2SchedulerOn, but again, you can use any name that you want. Set the Runtime option to Python 3.9.
Now, expand the Permissions section and choose the option to use an existing role. Select the role that you created earlier (I named the role EC2ONOff) and then click the Create Function button. You can see what this looks like in Figure 2.
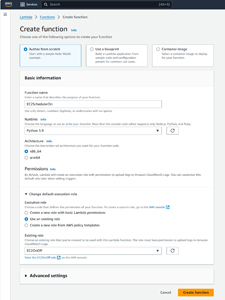 [Click on image for larger view.] Figure 2: Create a Lambda function called EC2SchedulerOn and configure it to use the EC2OnOff role.
Now, repeat the process and create an identical Lambda function called EC2ScheduleOff.
Adding Python Code
The next thing that you will need to do is to add some Python code to the functions that you have just created. The AWS documentation provides some examples of this code. However, the code blocks shown within the documentation contain hard coded references to specific VM instances. While this approach will absolutely work, the technique that I am using is based on tagging rather than on instance IDs. It involves a slight bit of additional work up front, but will make things easier in the long run because you won't have to modify the script every time you need to set up a schedule for an additional instance. You will simply need to apply the appropriate tag to the instance.
So with that said, go to the Lambda dashboard and click on the Functions tab. Next, click on the EC2SchedulerOn function. When you do, you will see that AWS has added some code to the function by default. If you don't see the code, then make sure that the lambda_function tab is selected. Delete this default code and replace it with the code shown here:
import boto3
def lambda_handler(event, context):
    ec2 = boto3.client('ec2')
    filters = [{'Name': 'tag:Schedule', 'Values': ['BusinessHours']}]
    instances = ec2.describe_instances(Filters=filters)
    for reservation in instances['Reservations']:
        for instance in reservation['Instances']:
            ec2.start_instances(InstanceIds=[instance['InstanceId']])
            print(f"Started instance: {instance['InstanceId']}")
It's worth noting that the code block shown above includes the tag name and value. As you may recall, I called the tag Schedule and I used a value of BusinessHours. If you used a different tag name or value, you will need to modify the code to reflect the names that you have used. You can see what the code looks like in Figure 3. When you are done, click the Deploy button to save your changes.
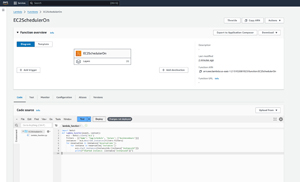 [Click on image for larger view.] Figure 3: I have added code to the function.
Next Steps
Now that we have built a Lambda function, it's a really good idea to test the function before continuing on. That way, you can make sure that the necessary permissions are in place and that the function does what it is supposed to do. I will show you how to do all of that and more in Part 2 of this series.
About the Author
Brien Posey is a 22-time Microsoft MVP with decades of IT experience. As a freelance writer, Posey has written thousands of articles and contributed to several dozen books on a wide variety of IT topics. Prior to going freelance, Posey was a CIO for a national chain of hospitals and health care facilities. He has also served as a network administrator for some of the country's largest insurance companies and for the Department of Defense at Fort Knox. In addition to his continued work in IT, Posey has spent the last several years actively training as a commercial scientist-astronaut candidate in preparation to fly on a mission to study polar mesospheric clouds from space. You can follow his spaceflight training on his Web site.