AWS Step-by-Step
Backing Up Your Data to the AWS Cloud, Part 1
The trick to backing up your on-premises data to AWS is to leverage a storage gateway that acts as a virtual tape library. Here's how to get started.
Amazon Web Services makes it possible to back up your on-premises or cloud data to its cloud, thereby allowing you to capitalize on low-cost Glacier storage. Interestingly, you don't even have to use the AWS Backup service. You can use the same third-party backup software that you are already using.
In this article series, I will show you how it works.
The trick to backing up your on-premises data to AWS is to leverage a storage gateway that acts as a virtual tape library. You can then attach your backup software to this storage gateway in the same way that you would connect to a physical tape drive. The storage gateway then routes your backups to cloud storage.
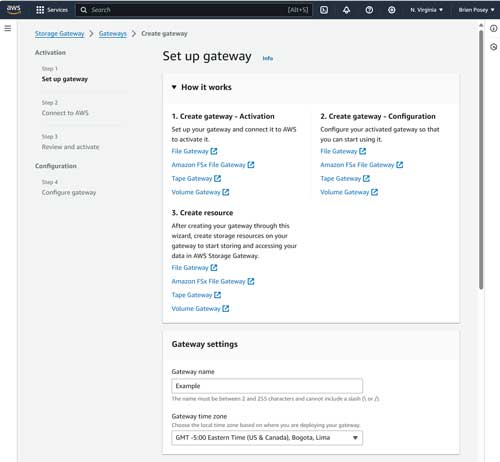
To get started, log into AWS and open the Storage Gateway service. When prompted, click on the Create Gateway button. As you can see in Figure 1, the first thing you will need to do is provide a name for the gateway that you are creating and choose the time zone that you want to associate with the gateway.
 [Click on image for larger view.]
Figure 1. Provide a name for the gateway and select its time zone.
[Click on image for larger view.]
Figure 1. Provide a name for the gateway and select its time zone.
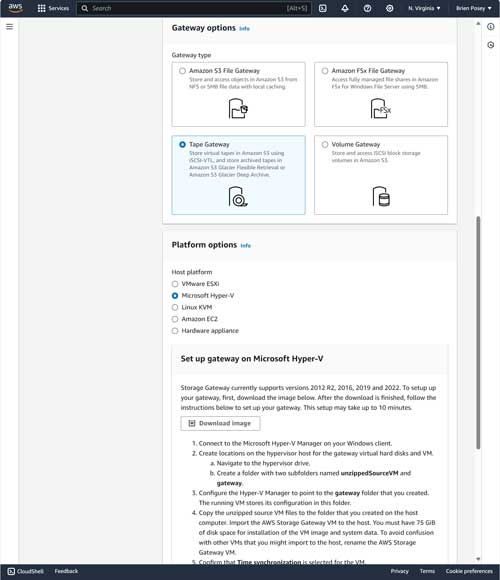
Scroll down and you will be asked to specify the type of storage gateway you want to create. Since our goal is to create a gateway that can help us write tape backups to the cloud, choose the Tape Gateway option, shown in Figure 2.
 [Click on image for larger view.]
Figure 2. Choose the Tape Gateway option.
[Click on image for larger view.]
Figure 2. Choose the Tape Gateway option.
As you look at the figure above, you will notice that the next section asks you to choose a host platform. You can host the gateway on an Amazon EC2 instance, but if you are going to be backing up on-premises resources, it may make more sense to host the gateway as a virtual machine running in your own environment. You can download images for VMware ESXi, Microsoft Hyper-V, Linux KVM or for a hardware appliance.
When you select a host option, you will see instructions pertaining specifically to the host that you have chosen. You will also be provided with a Download Image button, as shown in the figure above.
I am not going to go through a step-by-step walkthrough of the virtual machine configuration process, because it works differently on every platform. What I will tell you, however, is that I deployed the gateway host on Microsoft Hyper-V. The process essentially involved downloading and extracting a ZIP file and then importing the ZIP file's contents into Hyper-V, which caused a virtual machine to be created. You can see what the running virtual machine looks like in Figure 3.
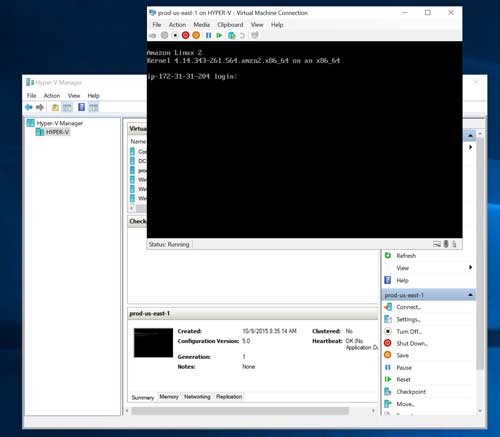 [Click on image for larger view.] Figure 3. The gateway host virtual machine is running on Microsoft Hyper-V.
Before I move on, I need to tell you something important. While writing this article, I had initially created the host as a Hyper-V virtual machine. However, since I did not have the ability to make this virtual machine available from the Internet, I decided to create an EC2 instance instead.
Amazon provides an interface that is designed to automate the creation of the necessary EC2 instance. However, there seems to be a bug in this interface that causes it not to be able to discover the subnets that are associated with your VPC. As such, I had to choose the option to manually create the instance. That was the only way that I was able to make it work.
At this point, you will need to switch back to the AWS console and select the checkbox, shown in Figure 4, confirming the gateway setup.
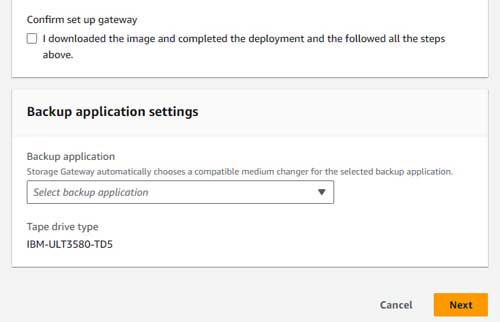 Figure 4. Select the checkbox confirming that your gateway server has been set up.
The last thing you need to do on this screen is to select the backup application that you are using. Most of the well-known backup applications are listed on the drop-down menu, but there is an "other" option for those who are running an unsupported backup application.
Click Next and you will be taken to Step 2 of the process. Here, you will need to specify the gateway host's IP address. If you look back at Figure 3, you will notice that the virtual machine's IP address is listed as a part of the log-on prompt.
While you are on this screen, you will also have to specify whether the service host is going to communicate across the public Internet, or if you have created the host within a VPC.
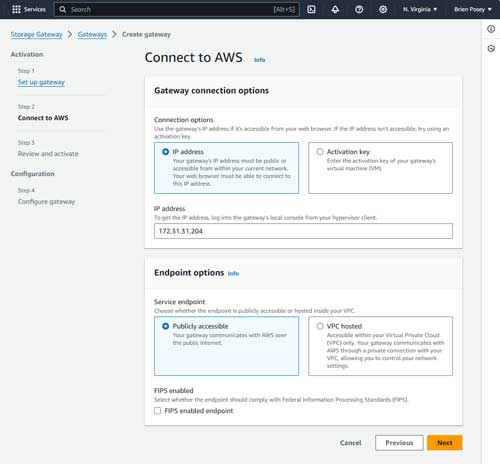 [Click on image for larger view.]
Figure 5. Choose whether or not the gateway will communicate across the public Internet.
[Click on image for larger view.]
Figure 5. Choose whether or not the gateway will communicate across the public Internet.
Click Next, and you will be taken to the Review and Activate screen. This is the point at which AWS verifies that it is able to communicate with the gateway host. The main thing that you need to do on this screen is to activate the gateway by clicking the Activate Gateway button.
At this point, AWS will take a few minutes to configure the disks that are used by the gateway host. You will need to allocate at least 165GB of storage to the cache and 150GB of storage to the upload buffer. You can see what this looks like in Figure 6.
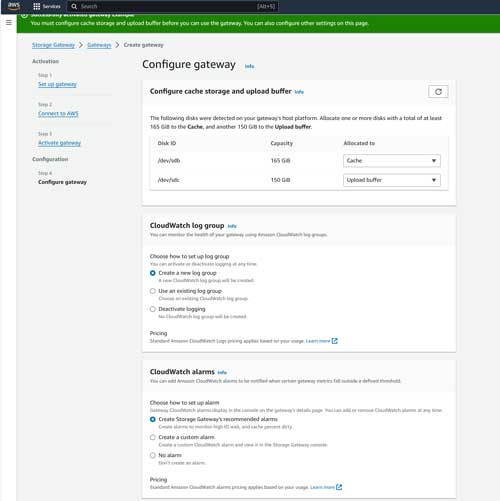 [Click on image for larger view.]
Figure 6. Configure your cache storage and upload buffer.
[Click on image for larger view.]
Figure 6. Configure your cache storage and upload buffer.
Finally, choose your preferred CloudWatch log-in and alarm configuration and click Configure.
Now that the gateway is set up, it's time to attach media to the gateway. I will walk you through the process in Part 2 here.
About the Author
Brien Posey is a 22-time Microsoft MVP with decades of IT experience. As a freelance writer, Posey has written thousands of articles and contributed to several dozen books on a wide variety of IT topics. Prior to going freelance, Posey was a CIO for a national chain of hospitals and health care facilities. He has also served as a network administrator for some of the country's largest insurance companies and for the Department of Defense at Fort Knox. In addition to his continued work in IT, Posey has spent the last several years actively training as a commercial scientist-astronaut candidate in preparation to fly on a mission to study polar mesospheric clouds from space. You can follow his spaceflight training on his Web site.