AWS Step-by-Step
How To Lock Down AWS Security Groups
Each time you create an Elastic Compute Cloud (EC2) instance, AWS will create a new security group whose job is to control access to that instance. Here's how to configure it.
One of the first things that I noticed when I began working with Amazon Web Services (AWS) several years ago was that AWS sometimes uses terminology that is different from what I had grown accustomed to as a Windows administrator. For example, Microsoft refers to virtual machines as virtual machines or VMs, while AWS refers to virtual machines as instances.
Sometimes, however, AWS uses a term that has a completely different meaning from what a Windows administrator might assume that the term means. "Security groups" make for a classic example.
In Microsoft-speak, a security group is a group whose members all receive a common set of permissions. A security group might, for example, be used to grant access to a file or folder. In the case of AWS, however, a security group is a software firewall.
Any time that you create an Elastic Compute Cloud (EC2) instance, AWS will create a new security group whose job is to control access to that instance. If you look at Figure 1, you can see a security group named Launch-Wizard-1 that corresponds to an EC2 instance. The figure also shows the default virtual private cloud (VPC) security group.
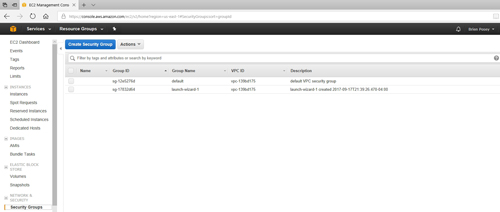 [Click on image for larger view.] Figure 1: EC2 creates a new security group for each instance that you create.
Before you can use a security group to lock down access to an instance, you need to determine which security group belongs to which instance. The easiest way to accomplish this is to go to the console's Instances screen, select an instance, and then take a look at the Description tab. As you can see in Figure 2, the Description tab lists the name of the instance's security group.
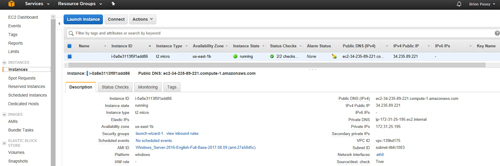 [Click on image for larger view.] Figure 2: The instance's Description tab lists the name of the instance's security group.
For any security group, you can edit the inbound rules and the outbound rules. To access these rules, go to the Security Groups container (shown in Figure 1 earlier), select the security group that you want to edit, and then choose either the Edit Inbound Rules or Edit Outbound Rules option from the Actions menu, as shown in Figure 3 below.
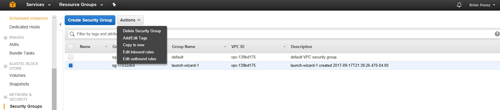 [Click on image for larger view.] Figure 3: Select either the Edit Inbound Rules or the Edit Outbound Rules option.
You can see the Edit Inbound Rules window in Figure 4. As you can see, there is one rule that is created by default. This rule allows RDP traffic over port 3389. This rule has to exist if you are to remotely manage the instance.
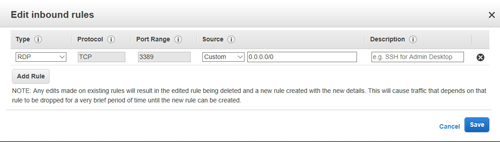 [Click on image for larger view.] Figure 4: This is the inbound rule that exists by default.
Of course, only having a rule that permits remote access is usually going to be inadequate. An instance is typically going to need to communicate with other instances or with external services, and so you will need rules to allow any required inbound traffic.
As you create additional rules, it is important to avoid setting up any rules that are overly permissive. For example, setting the rule source to 0.0.0.0/0 as is shown with the default rule will allow inbound traffic from any IP address. If you are creating a rule that will allow the VM to receive communications from an external instance or service, then the rule should reference that instance's or service's IP address specifically, rather than merely opening the port to everyone.
Some application servers (such as Web servers) do service anonymous clients. A Web server, for example, might accept traffic from everyone on port 80 or 443. Even so, it is risky to open a port to everyone. It's a better idea to place a load balancer in front of the Web server, and then let the load balancer proxy requests to the Web server. That way, external clients are never able to access the Web server directly. Instead, the security group is configured to allow inbound traffic only from the load balancer.
The Edit Outbound Rules dialog box, which you can see in Figure 5, is very similar to the Edit Inbound Rules dialog box. Although most people focus on creating the required set of inbound rules, it is almost as important to create an appropriate set of outbound rules. Outbound rules can help to protect against some forms of malware and malicious activity.
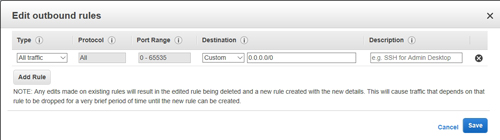 [Click on image for larger view.] Figure 5: You can create outbound rules in the same way that you create inbound rules.
One last thing to keep in mind is that although the security group is paired to an instance (or rather to a specific virtual NIC within an instance), the security group is not a part of the instance's operating system. As such, some people also configure a software firewall (such as the Windows firewall) inside of the instance for an extra measure of protection.
About the Author
Brien Posey is a 22-time Microsoft MVP with decades of IT experience. As a freelance writer, Posey has written thousands of articles and contributed to several dozen books on a wide variety of IT topics. Prior to going freelance, Posey was a CIO for a national chain of hospitals and health care facilities. He has also served as a network administrator for some of the country's largest insurance companies and for the Department of Defense at Fort Knox. In addition to his continued work in IT, Posey has spent the last several years actively training as a commercial scientist-astronaut candidate in preparation to fly on a mission to study polar mesospheric clouds from space. You can follow his spaceflight training on his Web site.