AWS Step-by-Step
Managing Mobile Security Policies for Amazon WorkMail
If you've ever managed Microsoft Exchange, then you're already familiar with the concept of mobile device mailbox policies. The difference is AWS' mobile policies tend to be simpler than Microsoft's.
As we all know, it has become extremely common for users to access their corporate e-mail accounts from mobile devices such as smartphones.
As such, most mail platforms provide administrators a way of ensuring that the mobile devices from which corporate mailboxes are accessed adhere to certain minimum security requirements. Like competing platforms, Amazon Web Services (AWS) allows administrators to use policies to manage mobile device security for Amazon WorkMail users.
If you have ever managed Microsoft Exchange Server or Office 365 Exchange Online, then you are probably familiar with the concept of mobile device mailbox policies. The mobile policies found within AWS have some similarities to Microsoft's (which are sometimes referred to as ActiveSync policies), but AWS' policies tend to be simpler than those used by Microsoft.
The first thing that that you need to understand about AWS mobile policies is that there is a single policy (which is called the default policy) that services the entire organization. Exchange Server also utilizes the concept of a default policy, but also makes it possible to create additional policies that can be applied to user mailboxes on an as-needed basis. Even though the Microsoft approach allows for a greater degree of control over policy enforcement, AWS' approach is great for consistency since the same policy applies to everyone.
To access the default mobile policy, log in to the AWS console and then choose WorkMail from the list of available services. Upon doing so, you will be taken to the WorkMail Organizations list. Click on your organization, as shown in Figure 1.
 [Click on image for larger view.] Figure 1: Click on your organization name.
When the WorkMail console opens, click the Mobile Policies option that is located on the left side of the screen. You can see what this looks like in Figure 2.
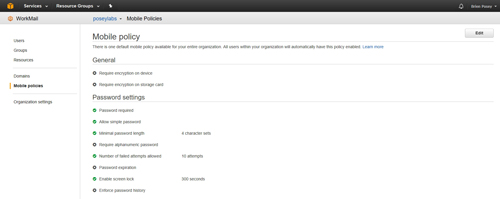 [Click on image for larger view.] Figure 2: Go to the Mobile Policies section.
As you can see in the figure above, there are 10 different policy settings that you can configure. Those policy settings that have a green check mark icon next to them are already enabled. WorkMail is configured by default to require mobile device passwords consisting of at least four characters (simple passwords are allowed). Users are allowed up to 10 failed login attempts according to the default policy settings, and the screen will be configured to lock after 300 seconds (five minutes) of idle time. These settings are, of course, configurable.
To make changes to the existing policy settings, click on the Edit button that is shown in Figure 2 above. Upon doing so, you will be taken to the Mobile Policies screen, shown in Figure 3 below.
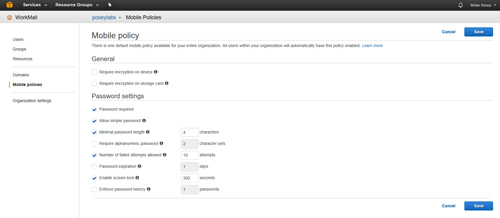 [Click on image for larger view.] Figure 3: AWS allows you to configure individual policy settings.
The Mobile Policy screen is grouped into two sections. The first section is called General and it contains the encryption-related settings. Within this section, you can use simple check boxes to enable or to disable device-level encryption and storage card encryption.
The second section is the Password Settings section. Two of the policy settings within this section can be enabled or disabled by toggling check boxes. These settings include Password Required and Allow Simple Password.
The remaining policy settings can be enabled or disabled by using check boxes, but also require a corresponding value. For example, you can use the check box to enable the Minimum Password Length setting (actually, it is enabled by default), but you also have to tell AWS what that minimum password length should be. In each case, AWS does provide some default values that you can use if you want, or you can define your own values.
These remaining policy settings include: Minimum Password Length, Require Alphanumeric Password, Number of Failed Attempts Allowed, Password Expiration, Enable Screen Lock and Enforce Password History.
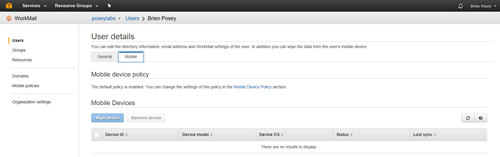
One last thing that I want to show you is how the default password is applied to all users. If you click on the Users container and then click on the name of a user, you will be taken to the User Details screen. This screen contains two tabs, General and Mobile. If you click on the Mobile tab, you will see a message stating that the default policy is enabled, as shown in Figure 4. However, there is no option to disable this policy, nor can you create or switch to a different policy.
 [Click on image for larger view.] Figure 4: The default policy automatically applies to each user.
So what can you do if you really need to apply different policy settings to different groups of users? Take a look back at Figure 1. Even though this screen is designed to allow you to create different organizations, you could conceivably use it to segment your organization and apply different mobile device policy settings to each organization that you create.
Related:
About the Author
Brien Posey is a 22-time Microsoft MVP with decades of IT experience. As a freelance writer, Posey has written thousands of articles and contributed to several dozen books on a wide variety of IT topics. Prior to going freelance, Posey was a CIO for a national chain of hospitals and health care facilities. He has also served as a network administrator for some of the country's largest insurance companies and for the Department of Defense at Fort Knox. In addition to his continued work in IT, Posey has spent the last several years actively training as a commercial scientist-astronaut candidate in preparation to fly on a mission to study polar mesospheric clouds from space. You can follow his spaceflight training on his Web site.