AWS Step-by-Step
Getting Started with Amazon EC2 Containers, Part 2
In this installment, Brien shows you what an AWS container looks like once it's up and running, and how to manage it.
In Part 1 of this series, I showed you how to create a really simple container using the Amazon Web Services (AWS) Elastic Compute Cloud (EC2).
Because of space limitations, however, I was unable to talk about what happens after the container is created. Once you click the button to create the container, you are taken to a screen that is similar to the one that is shown in Figure 1 below.
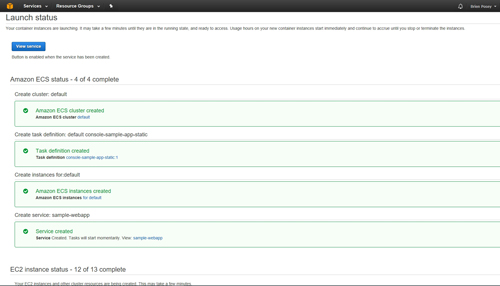 [Click on image for larger view.] Figure 1: This is what it looks like when you create a container.
As you can see in the figure, there are a number of automated tasks that AWS performs during the container creation process. Although it is easy to ignore this screen because it does not require you to do anything, there are two important things that I want to point out.
First, the EC2 Instance Status at the bottom of the screen. Although everything would appear to be normal in the screen capture, I found that at least in my case, this screen gets stuck on Step 12 of 13. The console makes it appear as though the task is still in progress, even though it has completed.
The other thing that I want to point out about the figure is the test at the top of the screen. It indicates that usage hours start immediately and continue to accrue unless you stop or terminate the container.
To view the running container, all you have to do is to click the View Service button that is shown in Figure 1. Of course, this button is only available to you immediately after creating a container. Normally, you would access your container by going to the Services screen and clicking on the EC2 Container Service. Doing so takes you to the screen shown in Figure 2.
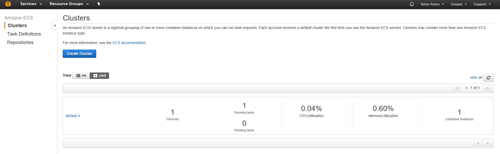 [Click on image for larger view.] Figure 2: This is what it looks like when you launch the EC2 Container Service.
When you click on the EC2 Container Service option on the list of AWS services, you are taken to the Clusters screen. This screen gives you a dashboard view of the cluster that you have created. Remember, your container is really just a special type of EC2 instance that is running on top of a cluster.
The dashboard view displays the cluster name (in this case, it is called Default), as well as the number of container instances, services and tasks that are running on the cluster. You can also see the cluster's CPU utilization and memory utilization.
Some of the terminology used on this screen can be a bit confusing if you are new to EC2 containers, but the way that AWS does things is pretty straightforward once you get used to it. Specifically, there may be some confusion as to the difference between services, instances and tasks.
A task, which is also known as a task definition, defines the container parameters for your application. You might have noticed in Figure 2 above that the console contains a Task Definitions tab. Clicking on this tab displays containerized applications (or tasks) and their status, as shown in Figure 3.
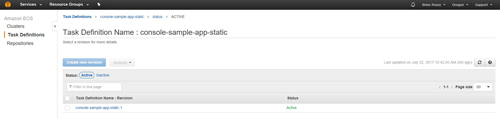 [Click on image for larger view.] Figure 3: The Task Definitions tab displays your containerized applications.
As you can see in Figure 3, the containerized application is hyperlinked. If you click on this link, you will be taken to a screen similar to the one shown in Figure 4 below. This screen allows you to create task revisions. You can also use this screen to take a look at container definition parameters such as the number of CPU units and the memory limit.
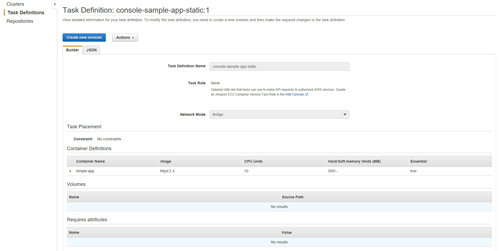 [Click on image for larger view.] Figure 4: You can take a look at the attributes for a specific task.
The screen shown in Figure 2 earlier also makes mention of container instances. A container instance is just an EC2 instance that is acting as a container. A container can be scaled by creating additional instances. If you want to see the instances that make up a containerized application, then click on the cluster link that is shown in Figure 2, and then go to the EC2 instances tab. As you can see in Figure 5, this tab gives you the option of scaling the container up or down by adjusting the number of container instances.
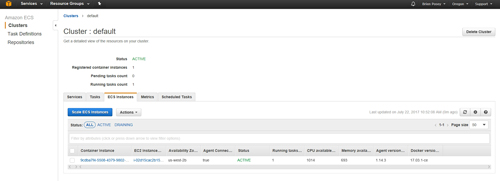 [Click on image for larger view.] Figure 5: You can scale a container by changing the number of container instances.
The AWS EC2 container interface takes a little bit of getting used to. It is absolutely nothing like working with the Docker command environment. Even so, AWS has done a good job of making containers easy to use and accessible to those without significant container experience.
About the Author
Brien Posey is a 22-time Microsoft MVP with decades of IT experience. As a freelance writer, Posey has written thousands of articles and contributed to several dozen books on a wide variety of IT topics. Prior to going freelance, Posey was a CIO for a national chain of hospitals and health care facilities. He has also served as a network administrator for some of the country's largest insurance companies and for the Department of Defense at Fort Knox. In addition to his continued work in IT, Posey has spent the last several years actively training as a commercial scientist-astronaut candidate in preparation to fly on a mission to study polar mesospheric clouds from space. You can follow his spaceflight training on his Web site.