AWS Step-by-Step
Setting Up AWS WorkSpaces
The biggest barrier to deploying virtual desktops has always been the infrastructure costs. Luckily, AWS offers a solution for those who want to use virtual desktops but don't have the budget for it.
Over the last couple of years, an increasing number of organizations have begun replacing their physical desktops with virtual desktops. Although virtual desktop infrastructure (VDI) was once considered to be cost-prohibitive, technology has improved to the point that VDI has become practical, with costs that, according to some estimates, are on par with that of physical desktops.
Of course, the biggest barrier to deploying virtual desktops is the infrastructure costs. Typically, VDI deployments require hypervisors, connection brokers, management servers...the list goes on.
For those who want to use virtual desktops but who do not have the budget for the required infrastructure, running virtual desktops in the Amazon Web Services (AWS) cloud may be an option. AWS makes cloud-based virtual desktops available through Amazon WorkSpaces.
You can access WorkSpaces by logging in to AWS and clicking on the WorkSpaces link, located in the Desktop and App Streaming section. Upon doing so, you will be taken to the screen shown in Figure 1.
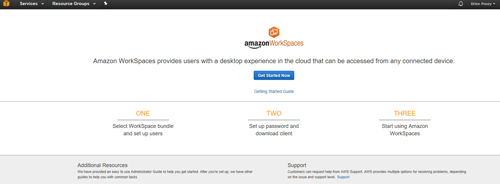 [Click on image for larger view.] Figure 1: Setting up WorkSpaces is a three-step process.
As you can see in the figure above, AWS refers to setting up WorkSpaces as a three-step process. The steps consist of selecting a WorkSpace bundle and setting up users, setting up a password and downloading the client, and using WorkSpaces. You can begin the setup process by clicking on the Get Started Now button.
At this point, AWS will take you to a screen that presents you with the option of either performing a quick setup or an advanced setup. The main difference between these two options is that the advanced setup option can be used to link the virtual desktops to your on-premises Active Directory environment or to the Amazon Virtual Private Cloud. On the other hand, the Quick Setup option is intended for use by those who need to quickly provision virtual desktops for a small group of people or for a single user. For the purposes of this column, I will examine the Quick Setup option.
Click the Launch button next to the Quick Setup option, and you will be taken to a screen that prompts you to choose the type of virtual desktop that you want to create. Right now, AWS lets you select between installing either Windows 7 or Windows 10 as the desktop operating system. You can also opt to include Microsoft Office 2016 on the virtual desktop. Regardless of which virtual desktop bundle you choose, AWS will install Internet Explorer 11, Firefox (the version is not specified) and 7-Zip. You can also install your own software onto virtual desktops.
Selecting a virtual desktop bundle involves more than just choosing an operating system and deciding whether or not you want to include Office 2016. You will also need to choose the virtual desktop's hardware platform. Hardware choices are classified as Value, Standard, Performance and Graphics. Your selection determines the number of virtual CPUs and the amount of memory and storage that are allocated to the virtual desktop. A virtual desktop that is classified as Value with Windows 7, for example, includes one virtual CPU, 2GB of memory and 10GB of storage. On the other hand, a virtual desktop that is classified as Graphics with Windows 7 contains eight virtual CPUs, 15GB of memory and 100GB of storage.
Pricing for virtual desktops varies based on region, hardware selection and software selection. In the US East region, for example, Value-class virtual desktops (with an OS license) cost either $25 per month or $7.25 per month, plus $0.22 per hour. AWS tacks on an extra $15 per month if you want Office. In contrast, Performance-class machines cost $60 per month or $13.00 per month, plus $0.57 per hour. Graphics-class machines are not offered at flat rate monthly pricing, but are available for $22 per month, plus $1.75 per hour. You can find the full pricing information here.
In addition to selecting the virtual desktop bundle that you want to use, you will also need to provide some user details. Remember, the Quick Setup option does not link the virtual desktops to your Active Directory, so you will need to provide the username, e-mail address and first and last name of each user who will be receiving a virtual desktop. You can see what this looks like in Figure 2.
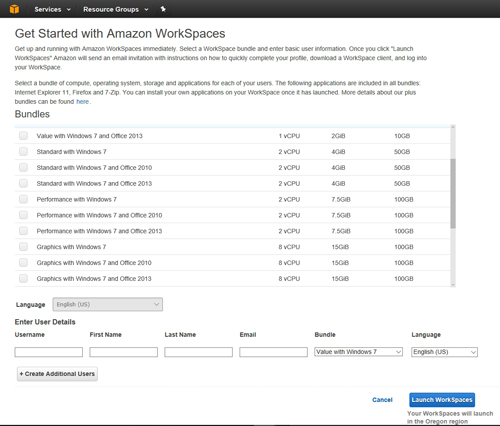 [Click on image for larger view.] Figure 2: Choose the WorkSpace bundle that you want to use and specify the details for your users.
When you are done, take a moment to be sure that your WorkSpaces are being created in the correct region. Finally, click the Launch WorkSpaces button to create the virtual desktops.
About the Author
Brien Posey is a 22-time Microsoft MVP with decades of IT experience. As a freelance writer, Posey has written thousands of articles and contributed to several dozen books on a wide variety of IT topics. Prior to going freelance, Posey was a CIO for a national chain of hospitals and health care facilities. He has also served as a network administrator for some of the country's largest insurance companies and for the Department of Defense at Fort Knox. In addition to his continued work in IT, Posey has spent the last several years actively training as a commercial scientist-astronaut candidate in preparation to fly on a mission to study polar mesospheric clouds from space. You can follow his spaceflight training on his Web site.