AWS Step-by-Step
Consolidating AWS Accounts into an 'Organization'
The new AWS Organizations feature lets IT wrangle multiple AWS accounts into a single, centralized structure. Here's a step-by-step guide.
Although it may be tempting for IT pros to think of the Amazon Web Services (AWS) cloud as being an extension of their own datacenter, with resources and services that are under the IT department's direct control, reality often paints a different picture.
In the real world, AWS usage often occurs organically, at least at first. Individual departments within the organization might, for example, decide to leverage AWS resources for a particular project. While this type of AWS usage does have its place, it can also create problems. After all, using AWS in the previously described manner results in the creation of multiple, disjointed accounts. This can be especially problematic if the organization is subject to regulatory standards.
Fortunately, AWS provides a way to bring together all of the AWS accounts that are used throughout an organization under a centralized structure called -- wait for it -- an "Organization." Launched in February, AWS Organizations provide policy-based management for multiple accounts.
Creating an Organization is a simple process. Log in to the AWS console and go to the home screen. For whatever reason, AWS does not include the option to create an Organization on the list of AWS services. Instead, you will find the option to create an Organization in the Helpful Tips section, located just to the right of the list of services. You can see what this looks like in Figure 1.
 [Click on image for larger view.] Figure 1: The option to create an Organization is located in the Helpful Tips section.
To create an Organization, click the Start Now link located beneath the Create an Organization option. When you do, the console will display the AWS Organizations screen, which you can see in Figure 2. As you can see in this figure, creating an Organization is a three-step process -- create accounts, organize accounts, apply policies.
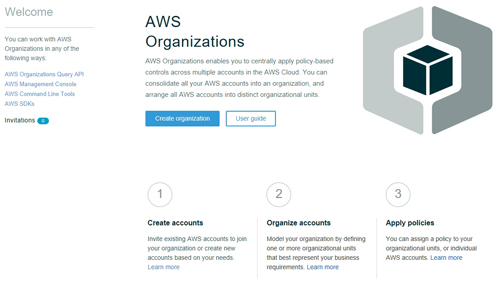 [Click on image for larger view.] Figure 2: Creating an AWS Organization is a three-step process.
Click the Create Organization button, and you will be taken to the Create New Organization screen. This screen gives you two choices. The first option is to enable all features. This option lets you implement policy-based controls, hierarchical management and consolidated billing. The other option allows only for consolidated billing. Make your selection, and then click on the Create Organization button.
At this point, you will be taken to the AWS Organizations screen. Your account is automatically added to the Organization, as shown in Figure 3. Although not shown in the figure, this screen also includes columns that display the account ID and the date that the account was added to the Organization.
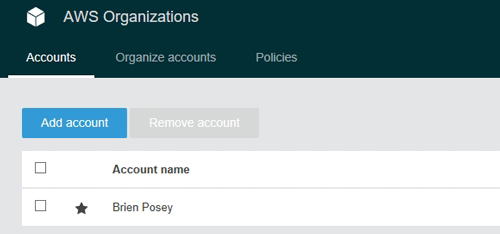 Figure 3: Your account is automatically added to the Organization.
As you look at Figure 3 above, you will notice that the screen contains an Add Account button that you can use to add other accounts to the Organization that you just created. If you click on the Add Account button, you will be taken to the screen that is shown in Figure 4 below.
 [Click on image for larger view.] Figure 4: You can create a new account or add an existing account.
As you can see, AWS gives you the option of either adding an existing account or creating a new account. This is great, because it means that IT can consolidate the AWS accounts that are currently being used throughout the Organization, and can also take care of provisioning any new AWS accounts that might be needed in the future.
The account consolidation process is handled by way of an invitation. Each AWS account is an independent entity, so IT can't just seize an account that they do not own. Instead, IT must invite the account owner to join the account to the Organization. To create an invitation, click the Invite Account button that was shown in Figure 4.
As you can see in Figure 5, the invitation process is really simple. You need only to specify the account ID or the e-mail address that is associated with the account that you wish to add to the Organization. The interface also contains a Notes section that you can use to send a message to the account owner. For example, you might use the Notes section to explain who you are and why you are inviting the recipient to join an AWS Organization.
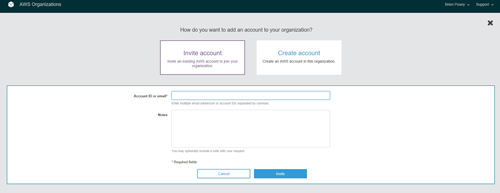 [Click on image for larger view.] Figure 5: You can invite an account owner to join your Organization by specifying the account ID or the e-mail address that is associated with the account.
Upon clicking the Invite button, the invitation will be sent. It is then up to the recipient to choose whether or not to accept the invitation.
About the Author
Brien Posey is a 22-time Microsoft MVP with decades of IT experience. As a freelance writer, Posey has written thousands of articles and contributed to several dozen books on a wide variety of IT topics. Prior to going freelance, Posey was a CIO for a national chain of hospitals and health care facilities. He has also served as a network administrator for some of the country's largest insurance companies and for the Department of Defense at Fort Knox. In addition to his continued work in IT, Posey has spent the last several years actively training as a commercial scientist-astronaut candidate in preparation to fly on a mission to study polar mesospheric clouds from space. You can follow his spaceflight training on his Web site.