AWS Step-by-Step
Connecting to a Linux Instance in AWS Using PuTTY
Logging in to a Linux instance is significantly different from logging in to a Windows instance. Brien walks you through the steps using the PuTTY utility.
A few months ago, I wrote a column in which I described how to log in to a Windows-based instance in Amazon Web Services (AWS). Normally, I wouldn't write about something as basic as logging in to an instance, but for those who might be new to AWS, the process is far from being intuitive.
In this article, I want to do something similar and explain how you can log in to a Linux instance. There are two reasons why I am covering this. First, the process is significantly different from that of logging in to a Windows instance. Second, I walked you through the process of creating a WordPress site in a recent column, and most WordPress instances are Linux-based.
The first thing that you need to know about accessing a Linux instance is that there are several different methods that you can use. For the purposes of this article, we will use a utility called PuTTY. PuTTY is a client that you can use for establishing SSH sessions. You can access the download page here. Even though PuTTY is intended for use with Linux instances, there is a Windows version of PuTTY available for download.
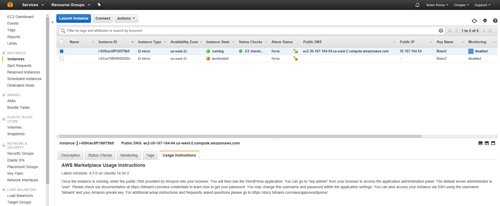
In order to connect to an instance from the PuTTY client, you will need a few pieces of information such as the instance ID, the name of the private key that you specified when you created the instance, and the instance's public DNS name. You can access all of this information through the Elastic Compute Cloud (EC2) console, as shown in Figure 1 below.
 [Click on image for larger view.] Figure 1: Gather the required information from the EC2 console.
After installing PuTTY, the next step in the process is to put your private key into a format that PuTTY can use. To do so, you will have to use a utility called PuTTYgen. This utility is included with PuTTY, and should already be installed on your system.
Open PuTTYgen, and then choose the SSH-2 RSA option to specify the type of key that you want to generate. Next, click the Load button and then select your private key file (you will need to choose the All Files option in order to get the utility to display .PEM files). Now, click the Save Private Key button, shown in Figure 2. Don't worry about the message indicating that a pass phrase is not being used. Just specify a name for the private key file that is being created.
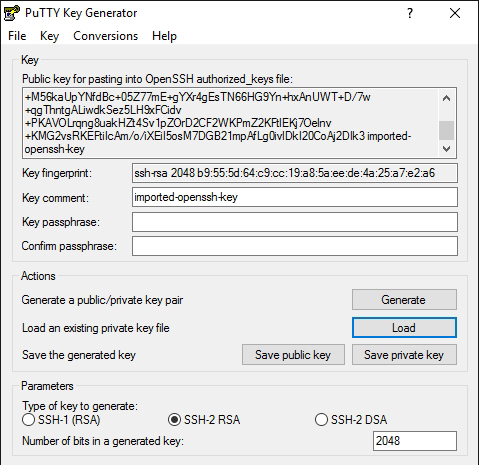 Figure 2: Click the Save Private Key button.
Now, go ahead and launch PuTTY. The first thing that you will need to enter is the host name. This can be a little bit tricky because the host name varies depending on the type of Linux instance. The host name consists of a user name, the @ symbol, and the public DNS name for the instance. As you saw in Figure 1, you can get the public DNS name from the EC2 console. However, the user name will vary. Here are the most common user names:
- Amazon Linux: ec2-user
- RHEL: ec2-user or root
- Ubuntu: ubuntu or root
- Centos: centos
- Fedora: ec2-user
- SUSE: ec2-user or root
Although this list will cover most situations, it doesn't cover all situations. If your Linux instance was created through the AWS Marketplace (as was the case for the WordPress site that I created a few weeks ago in this column), then this list probably won't work. In that type of situation, you can click on the instance within the EC2 console, and then select the Usage Instructions tab at the bottom of the screen. As you can see in Figure 3, this tab displays the user name (in this case its bitnami).
 [Click on image for larger view.] Figure 3: When all else fails, check the usage instructions.
Enter the host name into PuTTY, as shown in Figure 4. Now, navigate through the PuTTY console tree to Connection | SSH | Auth. Click the Browse button, select the private key file that you just created, and then click Open. You can see what this looks like in Figure 5.
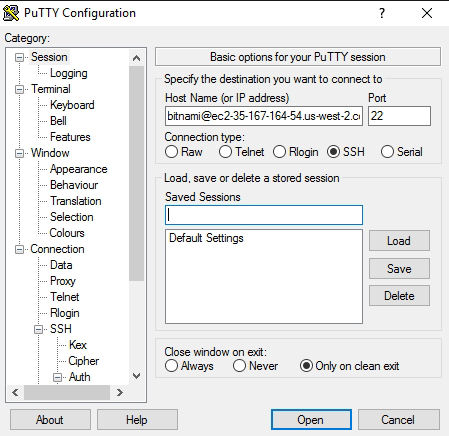 Figure 4: You must enter the host name in user@DNS format.
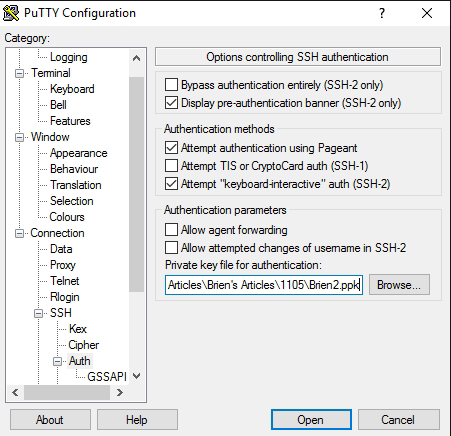 Figure 5: You will need to specify the .PPK file that you just created.
Click Open to launch the session. If this is the first time that you have connected to the instance, you will see a warning message indicating that the key is not cached. Ignore the warning and click Yes. You should now be logged in to the instance, as shown in Figure 6 below.
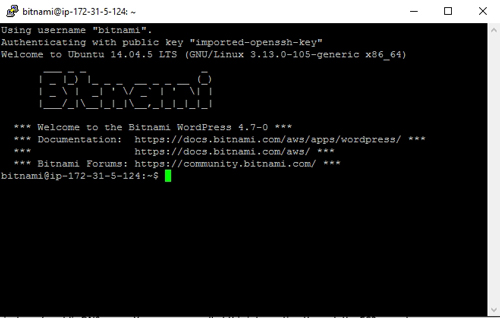 [Click on image for larger view.] Figure 6: Clicking Open logs you in to the instance.
About the Author
Brien Posey is a 22-time Microsoft MVP with decades of IT experience. As a freelance writer, Posey has written thousands of articles and contributed to several dozen books on a wide variety of IT topics. Prior to going freelance, Posey was a CIO for a national chain of hospitals and health care facilities. He has also served as a network administrator for some of the country's largest insurance companies and for the Department of Defense at Fort Knox. In addition to his continued work in IT, Posey has spent the last several years actively training as a commercial scientist-astronaut candidate in preparation to fly on a mission to study polar mesospheric clouds from space. You can follow his spaceflight training on his Web site.