AWS Step-by-Step
Using AWS for Enterprise Document Storage: Part 1
The Amazon Web Services (AWS) cloud platform includes a vast number of different storage options. With offerings such as Simple Storage Service (S3), Glacier and Elastic Block Store (EBS), it seems that there is a storage solution for almost every task.
But what do you do if you simply want to upload some documents to the AWS cloud and make those documents available to end users? One option is to set up an Elastic Compute Cloud (EC2) instance and configure it to act as a file server. However, while this option will get the job done, it may not always be the best approach. Depending on your requirements and your existing infrastructure, this approach could result in higher costs and an increased management burden.
A simpler -- and possibly less expensive -- alternative is to use WorkDocs. WorkDocs is AWS' enterprise storage and sharing service. Although it is tempting to think of WorkDocs as a cloud-based file server, I tend to think of it as more of a content management system. In fact, WorkDocs reminds me of SharePoint document libraries.
How do I differentiate between a file server and a content management system? Well, I tend to think of a file server as being an open-ended repository for storing files. In contrast, content management systems such as WorkDocs support a limited number of file types and are specifically designed to enable document collaboration.
AWS makes it pretty easy to get started with WorkDocs. Even so, I am not going to be able to cover the full procedure in a single column. I will show you how to get started in this installment, taking you as far as setting up the Active Directory (AD) environment. I will wrap things up in the second part by showing you how to implement and access WorkDocs.
Begin by logging into the AWS console, and then click on the WorkDocs link on the AWS Services screen. Some of the AWS documentation treats WorkDocs as a storage service, but the AWS home screen currently lists WorkDocs within the Business Productivity section. When you arrive at the WorkDocs screen, click on the Get Started Now button.
The Get Started with WorkDocs screen contains a Standard Setup option and a Quick Start option, which you can see in Figure 1. The Quick Start option allows you to be up and running in less than 10 minutes, but the Standard Setup option provides a greater degree of flexibility. Personally, I like the Standard Setup because it allows you to tie the WorkDocs site into your on-premises directory. For the purposes of this column, I will be using the Standard Setup.
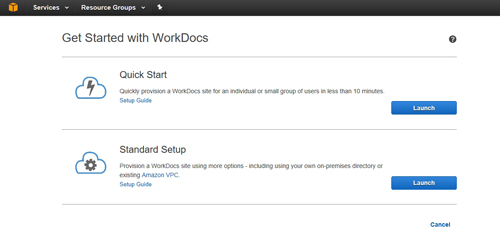 [Click on image for larger view.] Figure 1: You can perform a Quick Start or a Standard Setup.
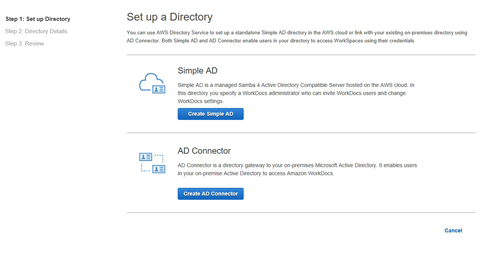
Go ahead and click the Launch button, and you will be taken to the Set Up a Directory screen, which you can see in Figure 2. As you can see in this figure, there are three steps to establishing the directory environment. The first step is to set up a directory.
 [Click on image for larger view.] Figure 2: Setting up WorkDocs is a three-step process.
The screen shown above gives you two options for setting up a directory. The first option is to create a Simple AD. This isn't a true Active Directory environment, because the directory is not hosted on Windows domain controllers. Instead, Simple AD is the name of a Samba service that emulates (and is compatible with) Active Directory.
The other option is to create an AD Connector. This option is appropriate if you already have an on-premises Active Directory environment that you want to use for authentication into WorkDocs.
You will need to choose the option that is most appropriate for your own environment, and the remaining steps in the process will vary depending on which option you choose. For the purposes of this article, I am going to go with the Create Simple AD option.
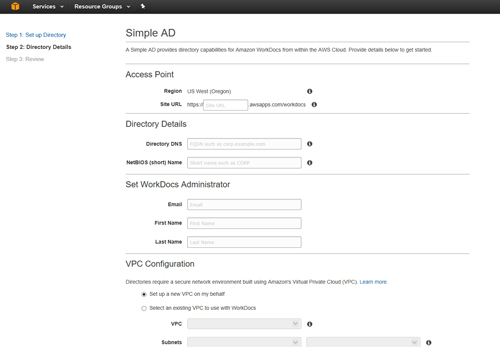
Upon clicking the Create Simple AD button, you will be taken to Step 2 of the process, which is to provide some directory details. You can see what this looks like in Figure 3.
 [Click on image for larger view.] Figure 3: You must provide some directory details.
As you can see in the above figure, setting up Simple AD is an easy process. You will need to provide an access point URL and a directory DNS server, and you will need to specify the WorkDocs administrator. In addition, Simple AD requires a network environment that is built on the Amazon Virtual Private Cloud (VPC). You can opt to have the setup process create a new VPC on your behalf, or you can link to an existing VPC.
When you are done, click Continue and you will be taken to a summary screen outlining the options that you have chosen. Take a moment to review your configuration information and then click Create Directory.
Now that the directory has been created, it is time to move forward with deploying WorkDocs. I will show you the remainder of the process in Part 2 here.
About the Author
Brien Posey is a 22-time Microsoft MVP with decades of IT experience. As a freelance writer, Posey has written thousands of articles and contributed to several dozen books on a wide variety of IT topics. Prior to going freelance, Posey was a CIO for a national chain of hospitals and health care facilities. He has also served as a network administrator for some of the country's largest insurance companies and for the Department of Defense at Fort Knox. In addition to his continued work in IT, Posey has spent the last several years actively training as a commercial scientist-astronaut candidate in preparation to fly on a mission to study polar mesospheric clouds from space. You can follow his spaceflight training on his Web site.