AWS Step-by-Step
How To Use AWS Storage Buckets
One of the primary storage structures in Amazon Simple Storage Service (S3) is the bucket. As its name implies, a bucket is simply a container that can store things. You can store documents, photos or pretty much any other type of file in a bucket.
When it comes to creating a bucket, there are two things that are important to know. First, each bucket has to have a unique name across all of Amazon S3. In other words, you can't use a bucket name that has already been used by another tenant in the Amazon Web Services (AWS) cloud. One way of avoiding duplicate bucket names is to append your account name to the bucket name.
The other thing that is important to know about bucket creation is that creating a bucket using your root AWS account is a security risk. It is much better to use an IAM account instead.
To create a bucket, go to the console screen and click on S3. When prompted, click on the option to create a bucket. Now, enter a bucket name, select the region in which to create the bucket and click Create. The bucket will now be created. You can see what the bucket looks like in Figure 1.
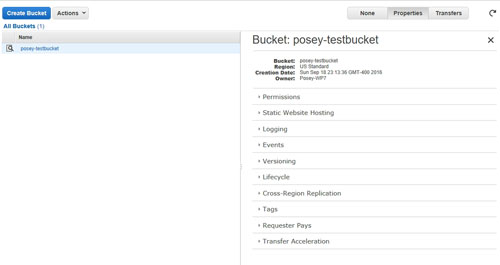 [Click on image for larger view.] Figure 1: This is what a bucket looks like.
Once the bucket has been created, one of the first things that you should do is to secure the bucket by applying user permissions. If you look at Figure 1, you will notice that the column on the right contains several tabs. If, for whatever reason, the interface does not display the tabs automatically, you can access the tabs by clicking on the Properties button.
Click on the Permissions tab, and you will see the permissions that are currently assigned to the bucket, as shown in Figure 2 below.
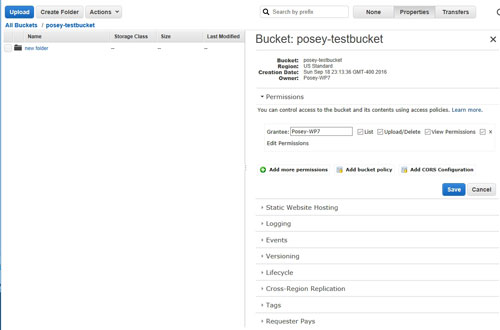 [Click on image for larger view.] Figure 2: The Permissions tab shows the permissions that apply to the bucket.
As you can see in Figure 2, permissions are controlled through the use of four check-boxes -- List, Upload/Delete, View Permissions and Edit Permissions. You can grant permissions to additional users by clicking on the Add More Permissions link, selecting a user and then setting the appropriate permissions for that user.
You have probably noticed that these permissions are high level. They apply to the bucket as a whole, not to individual files and folders within the bucket. The reason for this is that AWS assumes that a user who has access to a bucket should have access to everything in the bucket. There is no GUI control that lets you grant or block access to individual files and folders inside of a bucket. If you need granular access control, then the solution is to create multiple buckets. AWS allows you to create up to 100 buckets per account.
If you need a greater degree of control over bucket-level security, then you can create bucket policies. Bucket policies are JSON files that configure bucket-level security. These files allow for a greater degree of control than what is possible from the GUI. For example, you can create conditional access, restrict bucket access by IP address or grant access to an external AWS account.
I will cover bucket policies in detail in a future column but, for now, you can find several policy examples here. In case you are wondering, you can apply a bucket policy by clicking on the Add Bucket Policy link shown in Figure 2, and then pasting the policy file contents into the space provided.
AWS makes it easy to add content to a bucket. If you look at the previous figure, you will notice that there is an Upload button and a Create Folder button in the upper-left portion of the interface. As you would expect, you can use the Create Folder button to create folders, like the one shown in Figure 2.
When you click the Upload button, AWS displays the Upload Selected Files and Folders dialog box, shown in Figure 3. The normal way of uploading files and folders is to click on the Add Files button and then select the files that you want to upload. Files can be up to 5TB in size. Similarly, you can remove files by clicking on the Remove Selected Files button.
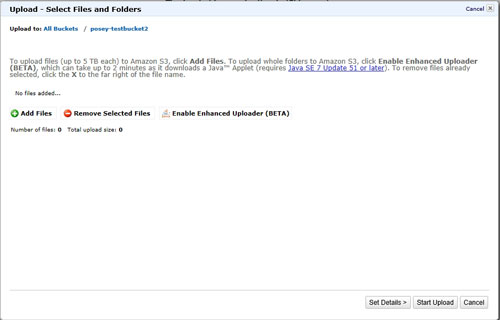 [Click on image for larger view.] Figure 3: You can use the Upload Select Files and Folders window to upload data to the bucket.
AWS also provides an option to enable an enhanced uploader. This enhanced uploader makes the upload process a little bit cleaner, but requires Java (SE 7 Update 51 or later) in order to work.
Related:
About the Author
Brien Posey is a 22-time Microsoft MVP with decades of IT experience. As a freelance writer, Posey has written thousands of articles and contributed to several dozen books on a wide variety of IT topics. Prior to going freelance, Posey was a CIO for a national chain of hospitals and health care facilities. He has also served as a network administrator for some of the country's largest insurance companies and for the Department of Defense at Fort Knox. In addition to his continued work in IT, Posey has spent the last several years actively training as a commercial scientist-astronaut candidate in preparation to fly on a mission to study polar mesospheric clouds from space. You can follow his spaceflight training on his Web site.