AWS Step-by-Step
Deploying a Cloud-Based Active Directory Using AWS
Rather than manually provision an Active Directory environment, you can use AWS' automated setup process.
Organizations that host resources in their own datacenters often use the Microsoft Active Directory for authentication and access control. Of course, directory requirements do not go away when resources are created in, or outsourced to, a public cloud.
Fortunately, Amazon makes it relatively easy to deploy an Active Directory environment in Amazon Web Services (AWS).
When it comes to creating a cloud-based Active Directory environment, you could simply create a couple of Windows Server instances and then deploy the Active Directory domain services. However, AWS provides a shortcut. Rather than having to manually provision a cloud-based Active Directory, you can use an automated Active Directory setup process. Doing so causes AWS to create two domain controllers and a DNS server. The domain controllers are placed in separate subnets for the sake of redundancy.
To create a cloud-based directory, log into the AWS console and then click on the Directory Service link, located in the Security & Identity Tools section. Now, click on the Get Started Now link, shown in Figure 1.
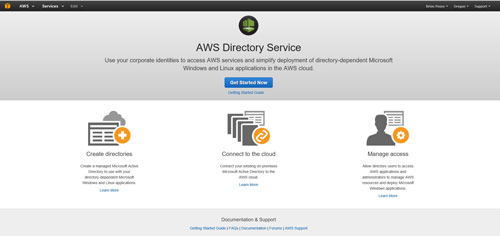 [Click on image for larger view.] Figure 1: Click on the Create Directories link.
The next screen asks you to choose the type of directory that you want to create. The first option is to create a Microsoft Active Directory. This is the option that I will be focusing on in this column.
The second option is to create a simple Active Directory. A simple Active Directory isn't a true Active Directory environment. Instead, it is a Samba-based directory that is mostly compatible with the Microsoft Active Directory. The Simple Active Directory is functionally similar to a Microsoft LDAP environment. It includes basic Active Directory functionality, but is lacking some of the more advanced capabilities. According to AWS, the Simple Active Directory is best suited to organizations that have fewer than 5,000 users.
The last option on the list is the AD Connector option, which you can see in Figure 2. You can use this option if you already have an Active Directory environment in your own datacenter and you want to extend that directory to the cloud. I will be covering this type of Active Directory extension in a future column. The remainder of this article assumes that you want to create a new Microsoft Active Directory environment.
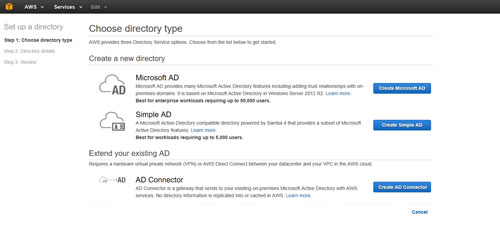 [Click on image for larger view.] Figure 2: Click on the Create Microsoft AD option.
Click on the Create Microsoft AD button, and you will be prompted to provide some directory details and some virtual private cloud (VPC) details. Before you begin, it is a good idea to double check to make sure that the Directory Type is set to Microsoft AD, as shown in Figure 3.
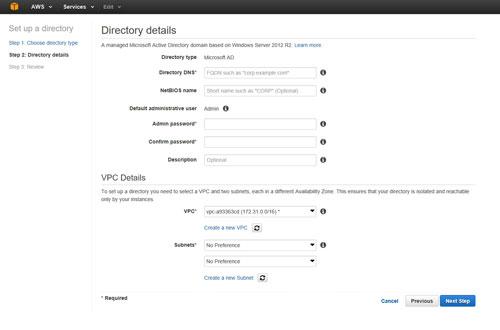 [Click on image for larger view.] Figure 3: Make sure that the Directory Type is set to Microsoft AD.
The first thing that you will need to do on this screen is to enter a fully qualified domain name for your Active Directory DNS server. Remember that this name must include your domain, and must not duplicate the name of any existing DNS servers. For example, I use the domain name PoseyDemo.com for lab environments, so I might use DNS.PoseyDemo.com as the name of the DNS server. Keep in mind that the name that you use does not need to be publicly resolvable.
Next, you have the option of entering a NetBIOS name for your DNS server. I recommend leaving this blank, because by doing so, the NetBIOS name will be set to match the first part of the DNS name. For instance, if my DNS server were named DNS.PoseyDemo.com, then my NetBIOS name would become DNS.
The next thing that you will have to do is to provide and confirm an administrative password. The administrator's username is automatically set to Admin. The password has to be between eight and 64 characters and must contain three of four character types, which include upper-case letters, lower-case letters, numbers and symbols. The password cannot contain the word "admin."
The last step in the process is to define a VPC and its subnets. As you can see in Figure 3 above, you can get away with using the default VPC name and telling AWS that you have no subnet preference. The interface also contains links for creating a new VPC or a new subnet should you need it.
Click Next Step, and you will be taken to a screen that confirms your setup options. This screen also displays a warning indicating that charges begin to accrue as soon as your directory is active (unless you are eligible for a free trial). Take a moment to review the information on the screen, and then click the Create Microsoft AD button, as shown in Figure 4.
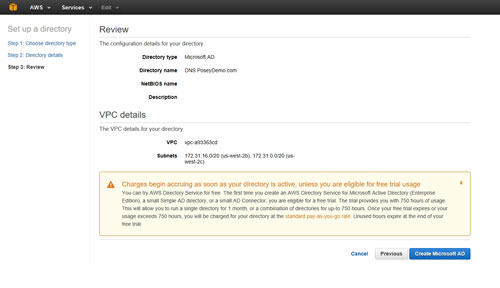 [Click on image for larger view.] Figure 4: Click the Create Microsoft AD button to create an Active Directory.
As you can see, AWS makes it simple to create a cloud-based Microsoft Active Directory. I will discuss extending an existing Active Directory to the cloud in a future column.
About the Author
Brien Posey is a 22-time Microsoft MVP with decades of IT experience. As a freelance writer, Posey has written thousands of articles and contributed to several dozen books on a wide variety of IT topics. Prior to going freelance, Posey was a CIO for a national chain of hospitals and health care facilities. He has also served as a network administrator for some of the country's largest insurance companies and for the Department of Defense at Fort Knox. In addition to his continued work in IT, Posey has spent the last several years actively training as a commercial scientist-astronaut candidate in preparation to fly on a mission to study polar mesospheric clouds from space. You can follow his spaceflight training on his Web site.