AWS Step-by-Step
Getting Started with AWS Verified Access, Part 2: Up and Running
Let's finish up the setup process for your secure external access through AWS.
In the previous blog post, I began walking you through the process of setting up a Verified Access Instance. Now I want to continue the discussion by showing you the rest of the setup process.
Creating Verified Access Groups
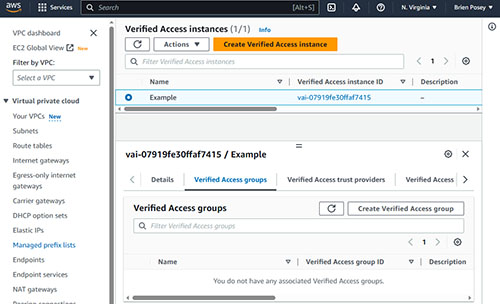
The first thing that you may want to do is to set up one or more Verified Access groups. A Verified Access group is just a collection of Verified Access instances that all have similar requirements. Begin by going to the Verified Access Instances screen and clicking on the Verified Access instance that you previously created. When you do, you will see a series of tabs appear beneath the instance. Click on the Verified Access Groups tab, shown in
Figure 1.
 [Click on image for larger view.]
Figure 1. Select the Verified Access Groups tab
[Click on image for larger view.]
Figure 1. Select the Verified Access Groups tab
Click the Create Verified Access group button and you will be taken to a screen that prompts you to enter a name and a description for the group that you are creating. You will also need to select a Verified Access instance to associate with the group. Finally, you have the option of applying a policy definition to the group. Policy definitions are beyond the scope of this article, but you can read more about them here. The important thing to know is that if you create a policy definition, it will apply to all group members. It's also worth noting that you cannot create a Verified Access group until you have attached a trust policy to the instance. I covered trust policies in the previous blog post in this series.
Verified Access Instance Logging
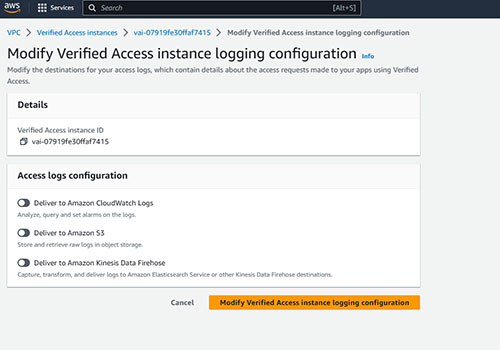
In addition to the basic configuration options that I have already discussed, Amazon gives you the option of logging the access requests that are sent to your applications. To do so, you need only to choose where you want to store the logging data and then provide some basic connectivity information. Amazon lets you write the access logs to CloudWatch, S3 or to Amazon Kinesis Data Firehose.
To enable logging, select the Verified Access Instance Logging Configuration tab and then click the Modify Verified Access Instance Logging Configuration button. This will take you to the screen shown in Figure 2. As you can see in the figure, you need only to enable the access log mechanism that you want to use. You will need to provide a bit of additional information after enabling a logging configuration. For example, if you choose the option to deliver the logging data to Amazon S3, then you will need to tell AWS which S3 bucket you want to use.
 [Click on image for larger view.]
Figure 2. Choose where you want to send the logging data.
[Click on image for larger view.]
Figure 2. Choose where you want to send the logging data.
Integrations
One of the newer options associated with setting up Verified Access is that Amazon allows you to associate an AWS Web Application Firewall (WAF) with a Verified Access Endpoint. This helps to protect the endpoint that you have created against potentially malicious requests.
To add a Web Application Firewall, select the Integrations tab and then click on the Create Web ACL button. When you do, you will be taken to the first of five screens that walk you through the setup process.
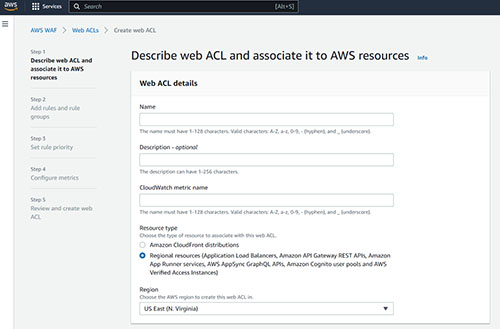
The first of these screens, which you can see in Figure 3, prompts you to provide a name for the Web ACL that you are creating, as well as a Cloudwatch metric name. Make sure that the resource is set correctly (the default value is usually OK), verify your region, and click Next.
Figure 3
 [Click on image for larger view.]
Figure 3. You will need to provide a name and a Cloudwatch metric name for the Web ACL that you are creating.
[Click on image for larger view.]
Figure 3. You will need to provide a name and a Cloudwatch metric name for the Web ACL that you are creating.
At this point, you will be taken to a screen that prompts you to add some rules and rule groups. You can create your own rules for dealing with inbound traffic, or you can use a managed rule group instead. A managed rule group is essentially just a preconfigured list of rules and there are several that you can choose from.
Regardless of whether you create your own rules or use a managed rule group, there is one option on this screen that is important to pay attention to. AWS is configured by default to allow any request that does not match any rules. From a security perspective it's usually better to create rules that specifically define the requests that you want to allow, and block everything else.
Click Next, and you will be taken to the Set Rule Priority screen. This screen allows you to rearrange your rules (if necessary) based on priority. Higher priority rules take precedence over lower priority rules.
Click Next, and you will be taken to the Configure Metrics screen. You don't necessarily have to enable sampling for requests, but doing so makes it so that your rules or rule groups can send monitoring data to Cloudwatch, thereby allowing you to keep an eye on Web requests and on how your rules are handling those requests.
When you are done, click Next and you will be taken to the Review and Create Web ACL screen. This screen provides summary information for the configuration that you are about to implement. Assuming that everything looks good, click the Create Web ACL button to complete the process.
About the Author
Brien Posey is a 22-time Microsoft MVP with decades of IT experience. As a freelance writer, Posey has written thousands of articles and contributed to several dozen books on a wide variety of IT topics. Prior to going freelance, Posey was a CIO for a national chain of hospitals and health care facilities. He has also served as a network administrator for some of the country's largest insurance companies and for the Department of Defense at Fort Knox. In addition to his continued work in IT, Posey has spent the last several years actively training as a commercial scientist-astronaut candidate in preparation to fly on a mission to study polar mesospheric clouds from space. You can follow his spaceflight training on his Web site.