AWS Step-by-Step
Backing Up Your Data to the AWS Cloud, Part 2
How to get the tape storage gateway backup-ready.
In my previous article, I walked you through the process of setting up a tape storage gateway. Now, I want to show you a few things that you'll need to do to make the gateway ready to use.
Creating Tapes
Just as a physical tape drive requires tapes to function, so too does the tape gateway. The difference is that rather than using physical tapes, the tape gateway uses logical tapes that actually point back to Glacier storage.
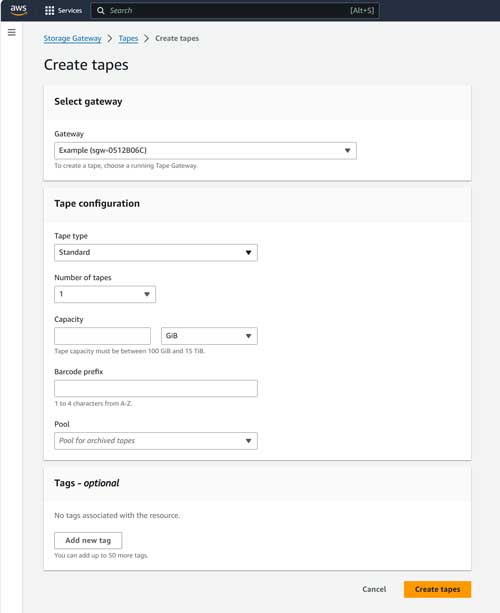
Creating tapes is actually an easy process. To do so, go to the Storage Gateway screen and click the Create Tapes button. When prompted, select your tape gateway, as shown in Figure 1.
 [Click on image for larger view.]
Figure 1. This is the screen that is used to create tapes.
[Click on image for larger view.]
Figure 1. This is the screen that is used to create tapes.
The next thing you will have to do is to specify the type of tape that you want to create. You can opt for a standard tape, or you can create WORM tapes, which are a read-only media type.
Next, you will need to specify the number of tapes that you want to create and the tape size. Tapes must be at least 100GB in size, but they can be as large as 15TB.
AWS also gives you an option to add a barcode prefix to the tapes that you are creating. The barcode prefix is completely optional, but if you do decide to create a prefix, it must be between one and four characters in length, consisting only of letters.
Finally, the last step in the process is to specify the pool within which the tapes will be created. By default, tapes can be created in Glacier Deep Archive or in Glacier Flexible Retrieval. Amazon does give you the ability (through the main storage gateway screen) to create your own custom pools. However, even these custom pools rely on Glacier storage.
The main reason for creating a custom pool would be that doing so allows you to create a retention lock.
Connecting Your Backup Server
Another thing you will have to do before you can begin writing backups to the tapes that you have created is to connect your backup server to the tape gateway. The method used for doing so is going to vary a little bit based on your operating system. For the purposes of this article, I am going to show you how to make the connection using Windows Server.
To get started, open Server Manager and then choose the iSCSI Initiator option from the Tools menu. When prompted, click Yes to enable the iSCSI service.
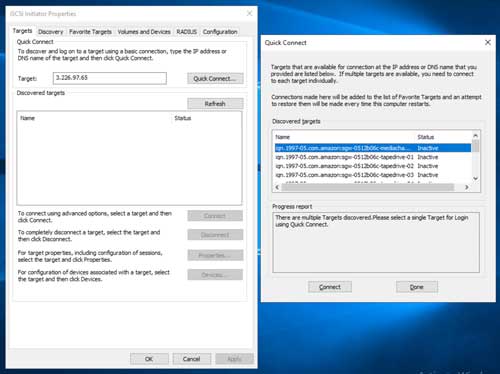
When the iSCSI Initiator Properties sheet appears, go to the Targets tab and then enter your storage gateway's IP address into the Target field and press Enter. When you do, Windows should display a long list of targets that you can connect to, as shown in Figure 2.
 [Click on image for larger view.]
Figure 2. Windows displays a long list of available targets.
[Click on image for larger view.]
Figure 2. Windows displays a long list of available targets.
Each one of the targets that are discovered represents a tape drive. Select the targets one by one, and click the Connect button to connect to each target. It is worth noting that if your storage gateway is running on an EC2 instance, you will not be able to connect to it over the public Internet. You might, however, be able to use a VPN as a workaround.
If you have trouble connecting to the tape gateway, make sure that ports 80 and 3260 are open. You should also make sure that you have not already connected another system to the gateway, as it can only be connected to one system at a time.
Once the connections have been made, open Device Manager and verify that Windows has successfully detected your tape drives. If the tape drives are connected but not listed within the Device Manager, then you will likely need to install some new device drivers.
At this point in the process, everything is ready to go. You can now open your backup software and connect to the newly deployed tape drives.
About the Author
Brien Posey is a 22-time Microsoft MVP with decades of IT experience. As a freelance writer, Posey has written thousands of articles and contributed to several dozen books on a wide variety of IT topics. Prior to going freelance, Posey was a CIO for a national chain of hospitals and health care facilities. He has also served as a network administrator for some of the country's largest insurance companies and for the Department of Defense at Fort Knox. In addition to his continued work in IT, Posey has spent the last several years actively training as a commercial scientist-astronaut candidate in preparation to fly on a mission to study polar mesospheric clouds from space. You can follow his spaceflight training on his Web site.