AWS Step-by-Step
Manually Join an EC2 Instance to an AWS Managed Microsoft Active Directory
Let's walk through the process, which can be a bit confusing, even for the most hardened AWS expert.
When you create a Windows-based EC2 instance, there is a configuration option that you can use to automatically join the new instance to an Active Directory domain. Even so, I have found that this option often fails to work properly and so it becomes necessary to manually join the instance to the managed Active Directory environment. While there is nothing difficult about manually joining the instance to a managed domain, the process is not entirely intuitive either. In this article, I will show you how it works.
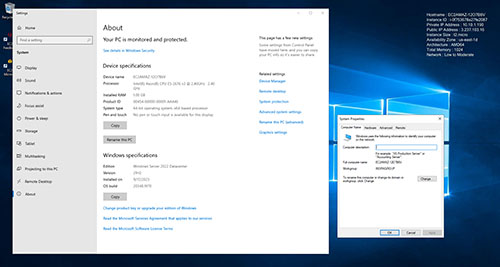
The first thing that you should do upon creating the instance is to log in and check to see whether or not the instance has been domain joined. To do so, go to Settings, click on About, and then click on the Rename This PC (Advanced) link, shown in Figure 1. As you can see in the figure, this instance has not been domain joined.
 [Click on image for larger view.]
Figure 1. This instance has not been domain joined.
[Click on image for larger view.]
Figure 1. This instance has not been domain joined.
Before you can join the instance to the Active Directory domain, you need to get the IP address of the DNS server that's associated with the forest. One thing to keep in mind is that when you create an AWS Managed Microsoft Active Directory environment, you are required to provide two separate subnets. As such, you will need to find the IP address of the DNS server that is in the same subnet as the instance that you are attempting to domain join.
If you look back at the previous figure, you can see the instance's IP address in the upper right corner of the screen. If this information is missing, you can get the IP address by opening a Command Prompt windows and entering the IPCONFIG command. Once you know the instance's IP address, you can use it to figure out which subnet the instance resides in.
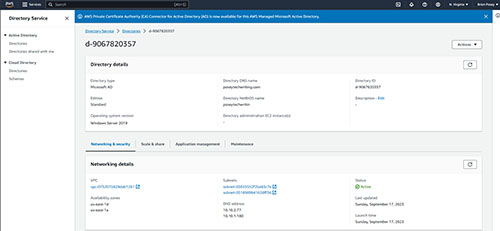
Now, open the Directory Service, and click on your directory. The resulting screen should display the directory's DNS addresses within the Networking Details section, as shown in Figure 2.
 [Click on image for larger view.]
Figure 2. The Directory Service console lists the DNS addresses.
[Click on image for larger view.]
Figure 2. The Directory Service console lists the DNS addresses.
As you can see in the figure, this directory is using 10.10.2.77 and 10.10.1.180 as its DNS server addresses. Since the virtual machine instance has an IP address of 10.10.1.190 it is in the same subnet as the 10.10.1.180 DNS server, so that is the DNS server that will need to be used.
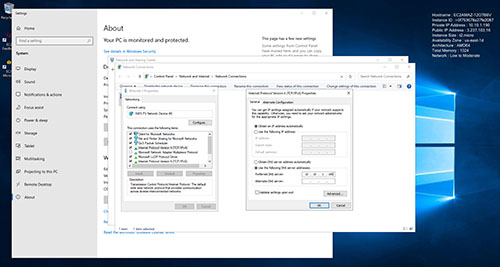
Now that you know which DNS server to use, go back to the virtual machine instance and open the Windows Control Panel by entering Control at the Windows Run prompt. When the Control Panel opens, click on Network and Internet, followed by Network and Sharing Center. Next, click on Change Adapter Settings. Right click on the network adapter and select the Properties command from the shortcut menu. When the network properties sheet appears, select Internet Protocol Version 4 (TCP/IPv4) and click Properties. Enter the DNS server's IP address as shown in Figure 3, and click OK.
 [Click on image for larger view.]
Figure 3. Enter the DNS server's IP address.
[Click on image for larger view.]
Figure 3. Enter the DNS server's IP address.
Changing the DNS server gives the instance the ability to resolve the domain name, thereby allowing it to locate the domain controllers. Now, you should be able to join the instance to the domain. To do so, go to Settings, select the About tab, and click on Rename This PC (Advanced). These are the same settings that were shown in Figure 1.
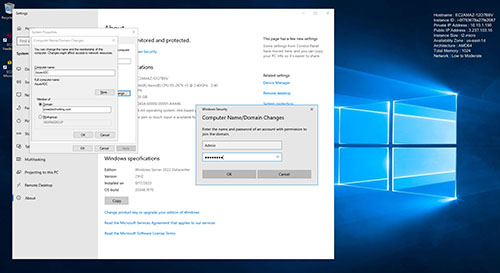
Click the Change button, and then optionally enter a new computer name. Select the domain option and then enter the domain name. You must include the domain extension (such as .COM) or the domain join will fail.
Click OK and you will be prompted to supply a username and password for the domain. There are two important things that you need to know about this process. First, AWS does things a little bit differently from what you might be used to. As such, the username is Admin, not Administrator. Second, the password is the password that is associated with the Active Directory, not the password that AWS assigns to the instance. You can see what this process looks like in Figure 4.
 [Click on image for larger view.]
Figure 3. Enter the domain's username and password.
[Click on image for larger view.]
Figure 3. Enter the domain's username and password.
Now, just click OK and the instance will be domain joined. You will need to reboot the instance to complete the process.
About the Author
Brien Posey is a 22-time Microsoft MVP with decades of IT experience. As a freelance writer, Posey has written thousands of articles and contributed to several dozen books on a wide variety of IT topics. Prior to going freelance, Posey was a CIO for a national chain of hospitals and health care facilities. He has also served as a network administrator for some of the country's largest insurance companies and for the Department of Defense at Fort Knox. In addition to his continued work in IT, Posey has spent the last several years actively training as a commercial scientist-astronaut candidate in preparation to fly on a mission to study polar mesospheric clouds from space. You can follow his spaceflight training on his Web site.