AWS Step-by-Step
Connecting to Your EC2 Instances Without a Public IP Address, Part 2: Private Subnets
Next, let's dive into the sometimes messy world of connecting to an instance that's found on a private subnet.
In the first post in this series, I showed you how to deploy an EC2 instance connect endpoint that can be used for establishing a remote connection to an EC2 instance, even if that instance does not have a public IP address. Now, I want to continue the discussion by showing you what's involved in establishing connectivity to an instance residing on a private subnet.
Before I get into the connectivity process, there are a few limitations that you need to be aware of. First, the technique that I am about to show you does not work with IPv6 connections. It is also worth noting that for the purposes of this series, I am not using client IP preservation. If you do decide to use client IP preservation then it is important to note that there are several instance types that do not support this feature. These instance types include: C1, CC1, CC2, CG1, CG2, CR1, G1, G2, HI1, HS1, M1, M2, M3 and T1.
So with that said, the first thing that you will need to do in order to test your instance connect endpoint is to create an instance. If you look at Figure 1, you can see that for the sake of simplicity, I am creating an instance within the same VPC and in the same subnet as my instance connect endpoint. However, I am setting the instance up so that it will not be provisioned with a public IP address.
 [Click on image for larger view.] Figure 1. This instance does not have a public IP address.
As in any other situation, the method used for connecting to a Windows instance is different from that of a Linux instance. For the sake of demonstration, I will be establishing an RDP session to a Windows instance. You can find instructions for connecting to a Linux instance here.
If you download the RDP file and attempt to connect to the instance in the usual way, you will receive an error message because the instance lacks a public IP address. The trick to making the connection work is that before you connect to the instance, you will need to create a private tunnel to the VPC. Unfortunately, this can only be accomplished at the command line. Additionally, you are going to need to create some IAM policies to allow a designated user to create the tunnel.
Unfortunately, I can't tell you exactly what text needs to be included in the IAM policies, because it is going to be different for each organization. You can however, find some sample policies here.
Keep in mind that you can't use the example IAM policy without making some changes to it. The example policy, for example, uses a remote port number of 22, which is only valid for SSH connections. Windows instances use port 3389. Likewise, you will probably need to adjust the private IP address range and the max tunnel duration. Perhaps most importantly, you will have to specify the ARN for the instance that you want to connect to. The ARN is the Amazon Resource Name. You can find instructions for finding an object's ARN here.
Once you have created the necessary IAM policies, then the next thing that you will need to do is to retrieve the Instance ID for the EC2 instance that you want to connect to. You can find the instance ID in the EC2 console on the list of instances, as shown in Figure 2.
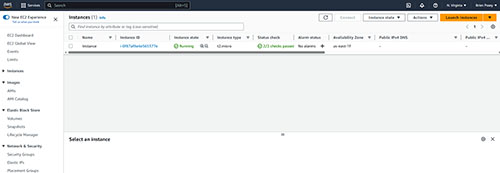 [Click on image for larger view.] Figure 2. The EC2 console lists the instance ID for each instance.
Now, open the AWS Cloud Shell and create the tunnel by entering this command:
aws ec2-instance-connect open-tunnel \

  --instance-id  i-0123456789example \

  --remote-port  3389 \

  --local-port  any-port
You will of course need to substitute the instance ID listed here with the instance ID corresponding to the instance that you want to connect to. You will also need to replace Any-Port with a local port number of your choosing.
The last step in the process is to download and edit an RDP file for the instance. When the Remote Desktop Connection opens, you will need to select the General tab and then locate the Computer field. This field should list a non-public IP address. Append a colon to this IP address and then enter the local port number that you used in the aws ec2-instance-connect command. You can see an example of this in Figure 3. You should now be able to connect to the instance.
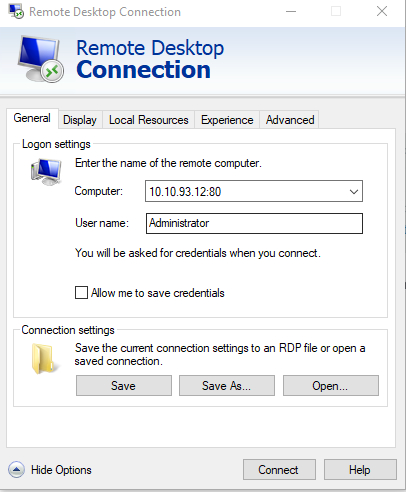 [Click on image for larger view.] Figure 3. You will need to append a port number to the IP address.
Hopefully you have been able to connect to the EC2 instance. If not though, check the instance's security group to make sure that it allows inbound traffic from the instance connect endpoint. There may be other security group rules that you need to enable, depending on whether or not you have enabled IP preservation. You can find a list of the security group rule requirements here.
About the Author
Brien Posey is a 22-time Microsoft MVP with decades of IT experience. As a freelance writer, Posey has written thousands of articles and contributed to several dozen books on a wide variety of IT topics. Prior to going freelance, Posey was a CIO for a national chain of hospitals and health care facilities. He has also served as a network administrator for some of the country's largest insurance companies and for the Department of Defense at Fort Knox. In addition to his continued work in IT, Posey has spent the last several years actively training as a commercial scientist-astronaut candidate in preparation to fly on a mission to study polar mesospheric clouds from space. You can follow his spaceflight training on his Web site.