AWS Step-by-Step
Using AWS Cloud Map To Keep Track of Your Cloud Resources, Part 2
Now that you've got the basics of AWS cloud namespaces down, it's time to set up AWS Cloud Map. Here's how.
In the first article in this series, I introduced you to AWS Cloud Map and discussed some of the basic concepts associated with AWS cloud namespaces. In this article, I want to continue the discussion by showing you how to set up AWS Cloud Map. For the purposes of this article, I have created an EC2 instance to use for demonstration.
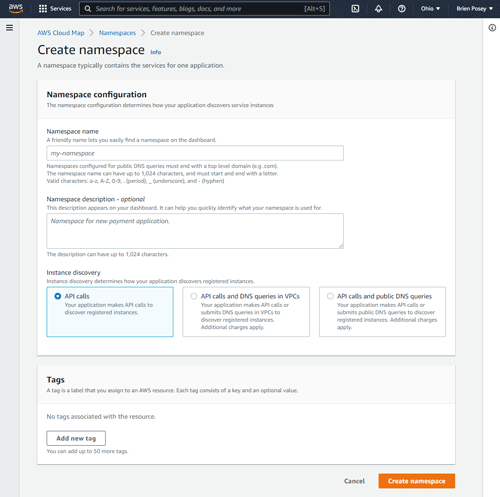
You can get started by launching the AWS Cloud Map service and then clicking the Create Namespace button. This will take you to the Create Namespace screen, shown in Figure 1.
 [Click on image for larger view.]
As you can see in the figure, this screen is relatively simple. You will need to enter a namespace name. In most cases, this is just a friendly name for the resources that you are monitoring. The exception is that if you are going to be using public DNS queries; then, the namespace name must align with the domain name.
Next, you have an option to enter a namespace description. A description is not required, but it is a good idea to create one.
Finally, you are going to have to choose your instance discovery method. For the purposes of this article, I am going to use the "API Calls and DNS Queries in VPCs" option. Incidentally, choosing this option causes the console to reveal a couple of additional options. The first of these options is a simple drop-down where you can select the VPC that you want to monitor. The other option asks you to specify a TTL value. The default TTL is 15 seconds, and that should be fine for most situations.
When you are done, click the Create Namespace button to create the namespace. This process can take five minutes or so to complete.
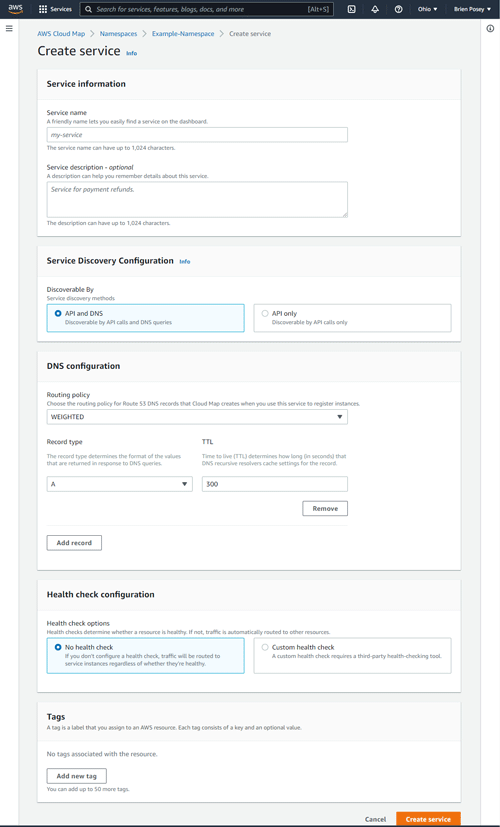
Once your namespace has been created, the next step in the process is to create a service. To do so, click on the namespace that you have just created and then click on the Create Service button. This takes you to the Create Service screen, which you can see in Figure 2.
 [Click on image for larger view.]
A service is simply a mechanism to monitor a workload service within your AWS deployment. The first thing that you will need to do is to enter a service name (which is just a friendly name) and an optional description.
Next, you will need to choose whether you want to discover the service using API calls only or if you want to use a combination of API and DNS queries. If you choose the API and DNS option (as I am), then you will also need to populate the DNS configuration options. Specifically, this means specifying the routing policy, DNS record type, and a TTL value for the DNS records associated with your service.
Finally, you will need to choose the type of health check you want to perform on the service. You can opt to do a custom health check, or you can just skip the health check. If you skip the health check, then AWS Cloud Map will only look at whether or not the instance exists, not at whether or not an instance is healthy.
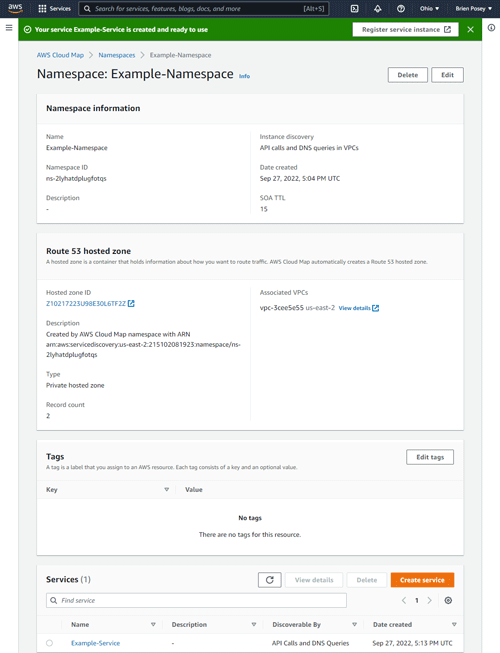
When you are done, click on the Create Service button to create the service. When the service creation process finishes, you will see a summary screen similar to the one shown in Figure 3.
 [Click on image for larger view.]
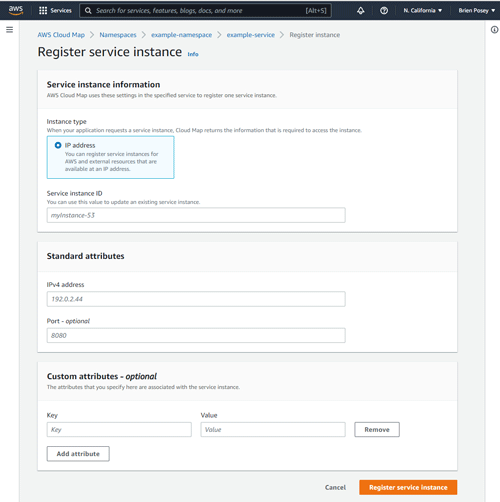
Next, you need to register one or more service instances. Click on your service and then click on the Register Service Instance button. At this point, you will need to enter a service instance ID and an IP address associated with the service. You can see what this looks like in Figure 4.
 [Click on image for larger view.]
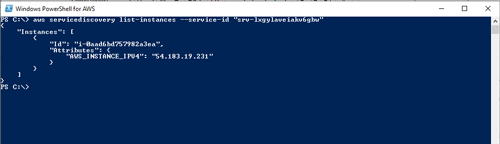
At this point, AWS Cloud Map is set up and you can use PowerShell to verify that it is working properly. The command that you will need to use is:
aws servicediscovery list-instances --service-id "<your service ID>"
Although the command above is relatively simple, there are two important things that you need to know about it. First, PowerShell must be set to the same region where your namespace resides. Otherwise you will get an error.
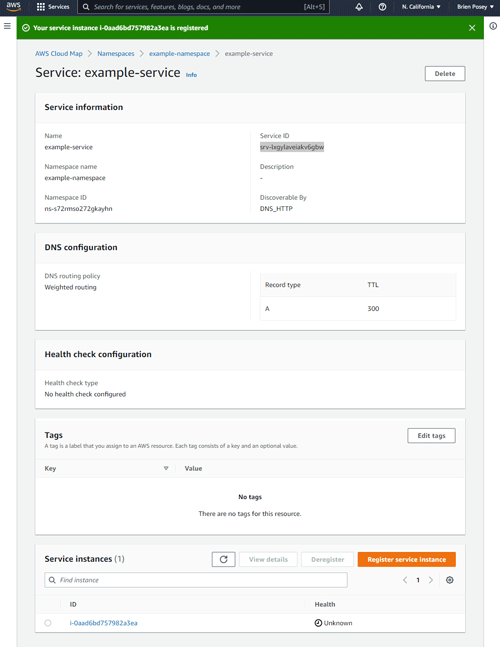
Second, the command requires you to enter a service ID. This ID is not the name that you used when you created the service, but rather a name AWS assigned to the service. If you click on the service then you can see the service ID listed. In Figure 5 for example, the service ID is: srv-lxgylaveiakv6gbw
 [Click on image for larger view.]
Figure 6 shows what the command looks like when it is used to reveal a list of instances.
 [Click on image for larger view.]
About the Author
Brien Posey is a 22-time Microsoft MVP with decades of IT experience. As a freelance writer, Posey has written thousands of articles and contributed to several dozen books on a wide variety of IT topics. Prior to going freelance, Posey was a CIO for a national chain of hospitals and health care facilities. He has also served as a network administrator for some of the country's largest insurance companies and for the Department of Defense at Fort Knox. In addition to his continued work in IT, Posey has spent the last several years actively training as a commercial scientist-astronaut candidate in preparation to fly on a mission to study polar mesospheric clouds from space. You can follow his spaceflight training on his Web site.