AWS Step-by-Step
Monitoring the Status of Your Amazon EC2 Instances
While automatic status checks are default in AWS, the actions to take in response to failed status checks are not. Fix this problem by creating a "status check alarm."
In recent years, it has become increasingly common for organizations to run mission-critical workloads within the public cloud. When doing so, however, it is important to have a way to monitor those workloads to ensure that they are healthy.
Thankfully, Amazon Elastic Compute Cloud (EC2) is designed to perform automated status checks on your instances. These status checks are enabled by default and cannot be disabled. They can, however, be leveraged for health-monitoring purposes.
Amazon Web Services (AWS) status checks are simple, but effective. The basic idea is that AWS performs a series of system status checks and instance status checks each minute. Each of these status checks independently returns a pass or fail message. If all of the status checks are successful, then the instance is assumed to be healthy, and the instance's status is set to OK. Otherwise, the instance is reported as being impaired.
So what kinds of health checks does EC2 actually perform? At the system level, the status checks monitor network connectivity, power and physical host-level hardware and software. There are also checks that occur at the instance level. These checks monitor for any failed system-level status checks, incorrect network or startup configurations, memory depletion, and file system corruption. There are also a number of situation or operating system checks that occur. For instance, there are checks that occur when an instance is rebooted.
AWS makes it possible to view these status checks through the console, but unless you are troubleshooting a specific problem, it probably is not going to be practical to manually monitor the status of each of your instances. It's much more effective to automate the process. Of course, the status checks are already automated. What admins probably aren't, but should be, automating is the action that is taken in response to failed status checks.
One way involves creating a "status check alarm." By doing so, you can make it so that EC2 will send an e-mail message to the appropriate recipient in the event that problems occur that EC2 is not able to automatically resolve. So let's take a look at how to set up a status check alarm.
Begin the process by opening the Amazon EC2 console and logging in. Next, click on Instances within the navigation pane, and then click on the instance for which you would like to configure a status check alarm. Now, go to the Status Checks tab, located at the bottom of the screen (incidentally, you can check the results of the most recent status checks by looking at this tab). As you can see in Figure 1, the system reachability and instance reachability checks have all passed for the current instance.
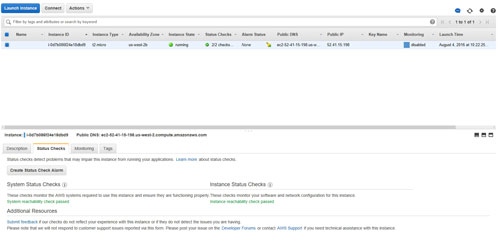 [Click on image for larger view.] Figure 1: You can see the instance check results within the Status Checks tab.
Take one more look to make sure that the correct instance is selected, and then click on the Create Status Check Alarm button, shown in the figure above. This will cause the interface to display the Create Alarm dialog box, shown in Figure 2.
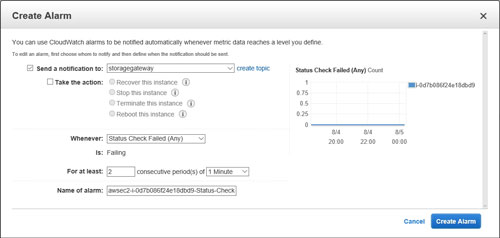 [Click on image for larger view.] Figure 2: You can use the Create Alarm dialog box to configure a status alarm.
The first thing that you will probably notice in the figure above is that the Send a Notification to option is set to Storage Gateway. This is obviously incorrect, so click on the Create Topic link. This will give you the chance to manually enter a topic name and an e-mail address for the recipient that should receive alarms. You can see what this looks like in Figure 3.
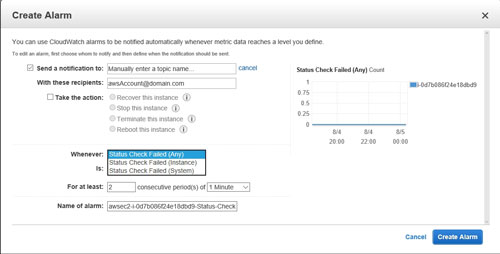 [Click on image for larger view.] Figure 3: The Create Alarm dialog box allows for a degree of customization.
An alarm isn't just designed to send an e-mail address. It can also attempt to remediate the situation. If you want to attempt automated remediation, select the Take the Action checkbox, and then choose the actions that you want to take. Your options are Recover This Instance, Stop This Instance, Terminate This Instance and Reboot This Instance.
Next, you will need to tell AWS when the alarm should be activated. By default, the alarm is activated when a status check fails for at least two consecutive periods of one minute, but you can customize this behavior. For example, you can tie the alarm to a system check failures or to instance check failures (the default option checks both). You can also adjust the threshold periods, and you can assign a custom name for the alarm.
As you can see, AWS makes it easy to create a status check alarm. If you need more help, you can access the full documentation here.
About the Author
Brien Posey is a 22-time Microsoft MVP with decades of IT experience. As a freelance writer, Posey has written thousands of articles and contributed to several dozen books on a wide variety of IT topics. Prior to going freelance, Posey was a CIO for a national chain of hospitals and health care facilities. He has also served as a network administrator for some of the country's largest insurance companies and for the Department of Defense at Fort Knox. In addition to his continued work in IT, Posey has spent the last several years actively training as a commercial scientist-astronaut candidate in preparation to fly on a mission to study polar mesospheric clouds from space. You can follow his spaceflight training on his Web site.