AWS Step-by-Step
How To Attach Extra Storage to an EC2 Instance
In the world of physical servers, it is somewhat rare for a server to be equipped with only a single hard drive -- and yet, default Amazon Web Services (AWS) instances usually only contain a single virtual hard disk.
Fortunately, there is a way to attach additional virtual hard disks to an AWS instance. The key to doing so is to leverage Amazon Elastic Block Storage (EBS).
EBS is block storage that can be attached to an AWS instance and used as a virtual hard disk. An EBS volume can be up to 16TB in size.
It is worth noting that an EBS disk can only be attached to a single instance at a time, which means that you can't use EBS storage as a Windows cluster shared volume (at least not directly, but there is a potential workaround). You can, however, connect multiple EBS disks to a single AWS instance. In fact, it is relatively common to use EBS disks to construct virtual RAID arrays, which can be used to improve storage performance in AWS instances.
You can create an EBS-based storage volume by logging into the AWS console and navigating to Elastic Block Store | Volumes. When you do, you are likely to see that some EBS volumes already exist, as shown in Figure 1. The reason for this is AWS instances use EBS volumes as virtual hard disks. Therefore, when you create an instance, an EBS volume is also created.
 [Click on image for larger view.] Figure 1: You may find that some EBS volumes already exist.
Because AWS instances use EBS volumes by default, it means that an EBS volume can be used as a boot volume. More importantly, it means that an EBS volume and its contents can be retained long after a virtual machine has been retired and de-provisioned.
Creating an EBS volume is a relatively simple process. If you look back at Figure 1, you will notice a Create Volume button. Clicking on this button causes the AWS console to display the Create Volume window. This window, which you can see in Figure 2, asks for a few pieces of information.
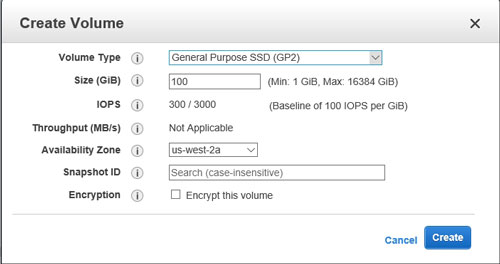 Figure 2: The Create Volume dialog box allows you to configure several settings.
The first thing that you will have to specify is the volume type. This is where you specify the type of underlying physical storage that you want to use. In Figure 2, for instance, the volume is based on solid-state storage.
The next piece of information that you must provide is the size of the volume that you want to create. The volume size can be between 1GB and 16TB.
You will also have to specify the availability zone for the volume that you are creating. This setting essentially determines where in the world the volume will physically reside.
The second-to-last setting is the snapshot ID. You won't have to worry about providing a snapshot ID unless you want to create the volume based on an existing snapshot.
The last setting on this dialog box is the Encryption setting. As you can see in Figure 2, this setting allows you to use a simple checkbox to encrypt the volume.
Click the Create button and the volume will be created. You can see the new volume alongside the previously existing volume in Figure 3.
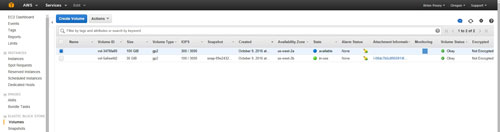 [Click on image for larger view.] Figure 3: The new volume has been created.
You will notice in Figure 3 that the volume's state is set to Available. This means that the volume is not yet associated with an instance. To link the volume to an instance, right-click on the volume and choose the Attach Volume command from the shortcut menu. Doing so will cause the Attached Volume dialog box to be displayed. This dialog box requires you to provide an instance ID for the instance. You can only attach a volume to an instance that exists in the same availability zone as the volume. You will also have to provide a device ID for the volume. Click the Attach button to attach the volume to the instance, as shown in Figure 4.
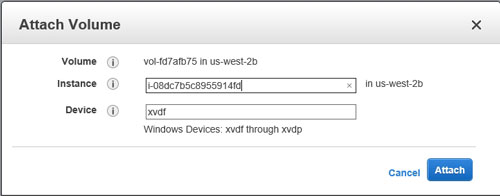 Figure 4: You will need to provide an instance ID and a device ID.
At this point, the new volume should be attached to the instance. You will have to prepare the volume for use, but this is a function of the operating system. The steps used for preparing the volume vary depending upon the operating system that is running on the instance. In a Windows Server virtual machine, for example, you could use the Disk Management Console to prepare the volume, as shown in Figure 5.
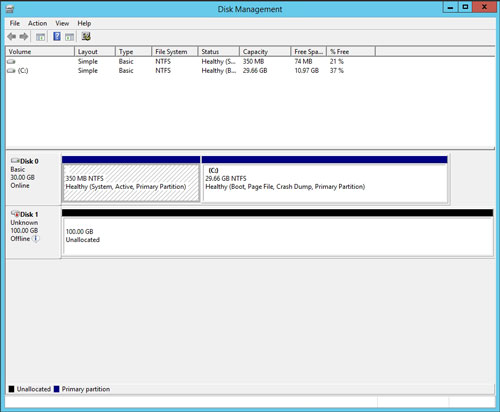 [Click on image for larger view.] Figure 5: The volume is exposed through the Disk Management Console.
As you can see, AWS makes it relatively easy to add a volume to an AWS instance. By doing so, it becomes possible to improve storage performance and/or capacity for the instance.
About the Author
Brien Posey is a 22-time Microsoft MVP with decades of IT experience. As a freelance writer, Posey has written thousands of articles and contributed to several dozen books on a wide variety of IT topics. Prior to going freelance, Posey was a CIO for a national chain of hospitals and health care facilities. He has also served as a network administrator for some of the country's largest insurance companies and for the Department of Defense at Fort Knox. In addition to his continued work in IT, Posey has spent the last several years actively training as a commercial scientist-astronaut candidate in preparation to fly on a mission to study polar mesospheric clouds from space. You can follow his spaceflight training on his Web site.