AWS Step-by-Step
Using IPAM to Manage IP Addresses in AWS, Part 2: Refinement
Manage IP addresses within your AWS infrastructure to optimize costs and avert potential network conflicts.
In my previous article, I showed you how to set up Amazon VPC IP Address Manager. In this article, I want to show you some of the finer points of using this tool.
Find Your Public IP Address
Usage
One of the most useful things that you can do with the Amazon VPC IP Address Manager is to find out which of your AWS resources are using public IP addresses. After all, Amazon charges for public IP address use and so tracking down IP address waste can save you money.
To see a list of the IP addresses that have been allocated across your organization, open the Amazon VPC IP Address Manager console and then click on the Public IP Insights tab, which you can see in Figure 1.
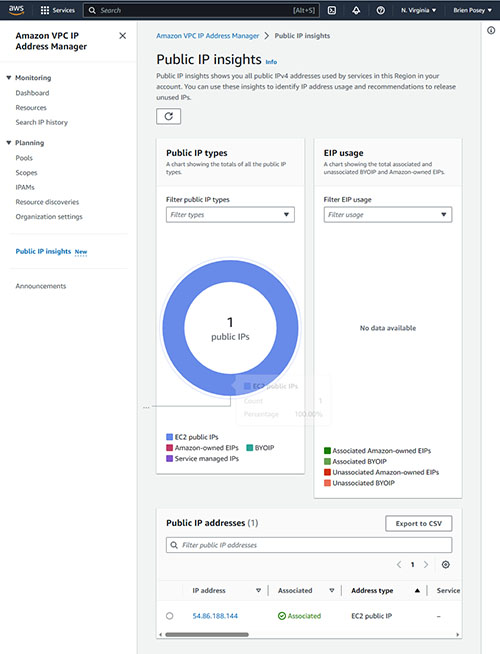 [Click on image for larger view.] Figure 1. The Public IP Insights tool shows the public IP addresses that are currently being used.
As you can see in the figure, this tool shows you how many public IP addresses are being used and also provides a list of those addresses. In this case, for example, I have one address that I am using, and it is associated with an EC2 instance. Clicking on the address will take you to a details page that provides extensive information about the resource that is using the address. There is also an Export to CSV button that you can use to export the entire address list to a CSV file.
Find Overlapping CIDRs
Another useful task that you can perform with the Amazon VPC IP Address Manager console is to find overlapping CIDR blocks. If overlapping CIDR blocks exist, then it's possible to end up with an IP address conflict as you create resources within your VPCs. If you click on the console's Resources tab, you will see a list of all the VPCs that exist in your organization. For each one, you can see the VPC's compliance state and whether or not it has overlapping CIDRs. This chart also shows you the CIDR block and the number of IPs that have been allocated from that block. You can even see the region where the CIDR block was created and the owner. In my case for example, I am using a lab account and there are quite a few overlapping CIDR blocks, as shown in
Figure 2. If this were a production environment then this is something that would need to be cleaned up.
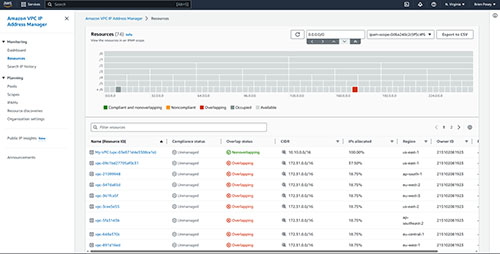 [Click on image for larger view.] Figure 2. The Resources tab can report on overlapping CIDRs.
Manage IP Address Use
[Click on image for larger view.] Figure 2. The Resources tab can report on overlapping CIDRs.
Manage IP Address Use
The Amazon VPC IP Address Manager is more than just a reporting tool. It can actually help you to manage IP address use throughout your organization. You can create an IPAM pool containing one or more CIDRs and then you can create VPC containing CIDR blocks from the pool. I recommend
reading the documentation prior to using the tool to manage IP address use in a production environment. However, I will provide you with a brief walkthrough so that you can see how the process works.
To get started, select the Pools tab and then click the Create Pool button. This will take you to the Create IPAM Pool screen, shown in Figure 3. For the sake of this demonstration, select the private IPAM scope, provide a name for the pool that you are creating, set the source type to IPAM Scope and then set the Address Family to IPv4.
Figure 3
<IPAM 2-3.jpg>
This is the screen used to create a new IPAM pool.
 [Click on image for larger view.] Figure 3. This is the screen used to create a new IPAM pool.
Now, click the Input a CIDR button and enter the CIDR that you want to use. For the purposes of this article, I will use 10.0.0.0/24. When you are done, click the Create Pool button.
Now that you have created a top level pool, you will need to create a regional pool. Once again, go to the Create IPAM Pool screen, but this time, choose the IPAM Pool option instead of the IPAM Scope option. When prompted, select the pool that you created earlier as the source pool. You will also need to set the locale to your current region.
Scroll down to the CIDRs to Provision section and then click on the available space. You should see the CIDR bar turn green, as shown in Figure 4. When you are done, click Create Pool.
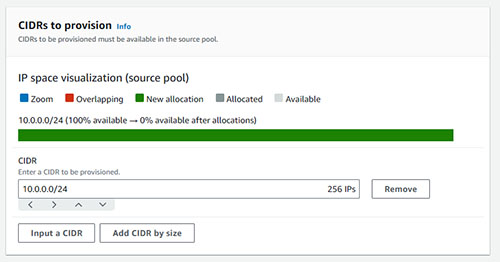 [Click on image for larger view.] Figure 4. Click the IP Space Visualization and make sure it turns green.
When the pool creation process completes, open the VPC service and click the Create VPC button. When the Create VPC screen appears, set the IPv4 CIDR Block option to IPAM Allocated IPv4 CIDR Block and then select your IPAM pool from the drop down. You will also need to select a netmask from the Netmask drop down, as shown in Figure 5. Click the Create VPC button to complete the process.
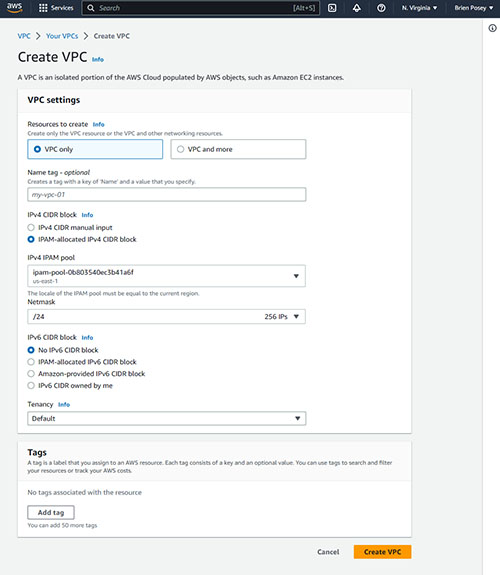 [Click on image for larger view.] Figure 5. You can configure the new VPC to use the IPAM allocated CIDR block.
About the Author
Brien Posey is a 22-time Microsoft MVP with decades of IT experience. As a freelance writer, Posey has written thousands of articles and contributed to several dozen books on a wide variety of IT topics. Prior to going freelance, Posey was a CIO for a national chain of hospitals and health care facilities. He has also served as a network administrator for some of the country's largest insurance companies and for the Department of Defense at Fort Knox. In addition to his continued work in IT, Posey has spent the last several years actively training as a commercial scientist-astronaut candidate in preparation to fly on a mission to study polar mesospheric clouds from space. You can follow his spaceflight training on his Web site.