AWS Step-by-Step
Using IPAM to Manage IP Addresses in AWS, Part 1
Here's how to get the Amazon VPC IP Address Manager up and running in your environment.
When using the AWS cloud, it's important to keep track of IP address usage. After all, Amazon charges you for the public IP addresses that you use, so a forgotten address allocation can unnecessary cost your organization money.
In spite of its importance, keeping track of your organization's IP address use can be surprisingly difficult. The frequency with which cloud resources are created or deleted can make it tough to keep up with IP address use. Additionally, each AWS region uses IP addresses independently of other regions, meaning that organizations must be sure to monitor their IP address usage within each individual AWS region.
Thankfully, Amazon has created a tool called the Amazon VPC IP Address Manager, or IPAM for short. This tool is designed to simplify the task of managing IP address use across the entire AWS cloud. While it is possible to create multiple IPAMs with varying management scopes, I am going to be walking you through the process of creating a single IPAM that works across an entire organization. Before I get started however, there are two things that you need to know.
CIDR Blocks
Although the Amazon VPC IP Address Manager is indeed designed to manage IP addresses across your organization, the tool often refers to CIDRs rather than to IP addresses. CIDR stands for Classless Inter-Domain Routing, and was created as a way of overcoming the inefficiencies and wastefulness associated with traditional Class A, B, and C address ranges. As such, a CIDR block is essentially just a collection of IP addresses that are tied to a specific subnet. You can read more about CIDR blocks here.
Permissions
Before you can create an IPAM, you will need to decide what permissions you want to use for your IPAM environment. There are three options. The first option (which seems to be Amazon's preferred option) is to integrate IPAM with accounts in an AWS organization. This option requires you to delegate an organization member account as an IPAM administrator. You can find instructions for doing so here.
The second option is to integrate IPAM with an account from outside of your organization. This is not typically something that you would want to do, but it is an option if you have a compelling reason for doing so. You can find the configuration instructions here.
The third option is to use IPAM with a single account. When you choose this option, AWS will handle the permissions automatically by automatically creating a service linked role. You can find the documentation for this option here.
For the purposes of this article, I am going to assume that IPAM is being used with a single account. So with that said, let's go ahead and create an IPAM.
To get started, log into AWS and then type IP Address Manager into the AWS search box and then choose the Amazon VPC IP Address Manager option from the list of features.
Click the Create IPAM button and you will be taken to the Create IPAM wizard, shown in Figure 1. The first thing that you will have to do on this screen is to grant IPAM the permissions that it needs in order to perform the required data replication. To do so, just select the Allow Data Replication checkbox. You cannot perform any additional configuration until you grant the required permission.
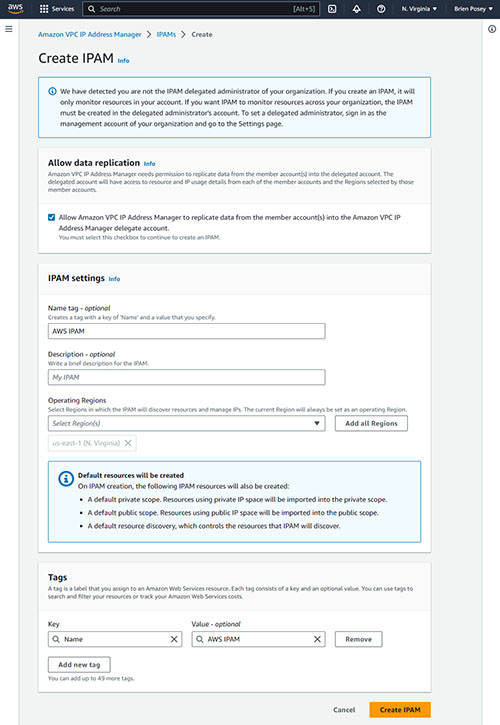 [Click on image for larger view.] Figure 1. You must allow IPAM to replicate data across accounts.
The next thing that you will need to do is to provide a name for the IPAM that you are creating. Technically, this is an optional step, but providing a name can be helpful in the event that you need to create additional IPAMs in the future. It's also a good idea to provide a description of the IPAM that you are creating, though this is not required.
The last task required for creating an IPAM is to choose the regions in which you want to allow your IPAM to operate. While you can manually select the regions that you wish to allow, there is also an Add All Regions button that you can click in order to allow IPAM to work in all of your AWS regions.
When you are done, click on the Create IPAM button. The creation process takes place almost instantly.
Now that you have created an IPAM, it's time to begin using it to manage IP address use within your organization. I will show you some of the finer points of using this tool in Part 2 of this article series.
About the Author
Brien Posey is a 22-time Microsoft MVP with decades of IT experience. As a freelance writer, Posey has written thousands of articles and contributed to several dozen books on a wide variety of IT topics. Prior to going freelance, Posey was a CIO for a national chain of hospitals and health care facilities. He has also served as a network administrator for some of the country's largest insurance companies and for the Department of Defense at Fort Knox. In addition to his continued work in IT, Posey has spent the last several years actively training as a commercial scientist-astronaut candidate in preparation to fly on a mission to study polar mesospheric clouds from space. You can follow his spaceflight training on his Web site.