AWS Step-by-Step
Connecting to Your EC2 Instances Without a Public IP Address, Part 1
With just a bit of work, connect to private subnet instances using AWS.
One of the most basic requirements for connecting to an EC2 instance using RDP or SSH has always been that the instance needs a public IP address. The problem with this, of course, is that a public IP address causes your instance to be exposed to the Internet. If you would rather not equip your instances with a public IP, but do not want to give up the ability to remotely connect to those instances, you can deploy an Instance Connect Endpoint.
An instance connect endpoint is essentially a gateway that allows you to remotely connect to instances residing on private subnets. In this blog post series, I will walk you through the process of deploying an instance connect endpoint. You can find Amazon's full documentation here.
To get started, log into AWS using an account with the necessary permissions and then open the AWS VPC console. When the console opens, select the Endpoints tab, found on the left side of the screen. Now, click the Create Endpoint button. This will take you to the Create Endpoint screen, which you can see in Figure 1.
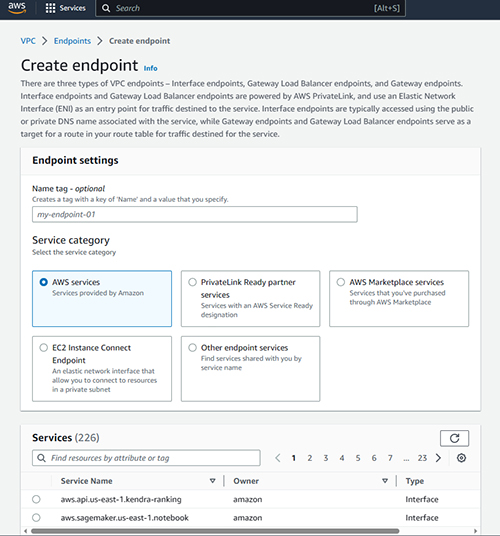 [Click on image for larger view.] Figure 1. This is the screen used to create a new endpoint.
The first thing that you should do is to assign your endpoint a name. Unlike many other AWS resources, assigning a name (which Amazon calls a name tag) is optional. Even so, it's a good idea to pick a descriptive name that conveys the endpoint's purpose.
The next thing that you will need to do is to select the service category. Amazon allows you to create a few different types of endpoints, so you will have to specify the type of endpoint that you want to deploy. Since the goal is to provide access to EC2 instances without using public IP addresses, choose the EC2 Instance Connect Endpoint option.
The next step in the process is to choose the VPC on which to create your endpoint. If your AWS deployment contains multiple VPCs, you can pick any VPC that you like. The catch, however, is that whichever VPC you choose, it will to be equipped with a route to the VPC containing the EC2 instances that you want to provide access to. As such, you can simplify things by creating the endpoint on the same VPC where your instances reside.
The VPC portion of the interface includes an Additional Settings section, which when expended, displays a Preserve Client IP checkbox. When this checkbox is selected, your client's IP address will be used when connecting to EC2 instances. This means that the instance's security group has to allow inbound traffic from your IP address. The easier, albeit slightly less secure option, is to avoid enabling the Preserve Client IP option. This will make it so that you can connect to any IP address so long as it is routable from the VPC.
Incidentally, you will also need to choose the security group with which to associate the endpoint that you are creating, as shown in Figure 2. If you skip this step, then the endpoint will be automatically associated with the default security group.
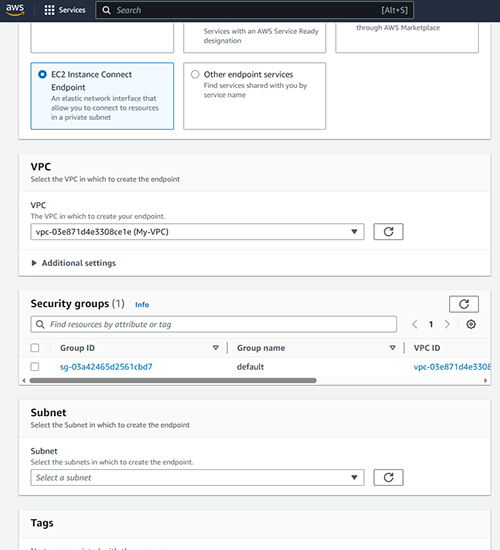 [Click on image for larger view.] Figure 2. Choose the security group that you want to use for the endpoint that you are creating.
The last step in the process is to choose the subnet within which to create the endpoint. You can also optionally apply any additional tags that you want to assign to the endpoint that you are creating. When you are done, click the Create Endpoint button to create the endpoint. The Endpoints screen will immediately display the newly created endpoint, but as you can see in Figure 3, there is a provisioning process that takes some time to complete (reflected by the Pending status).
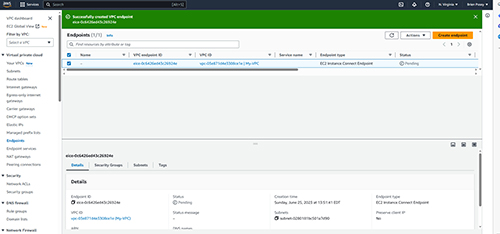 [Click on image for larger view.] Figure 3. The new endpoint is created immediately, but it takes some time for AWS to provision the endpoint.
Now that I have shown you how to create an endpoint, it's time to use the endpoint to connect to an EC2 instance without the aid of a public IP address. I will show you how this works in the next part of this series.
About the Author
Brien Posey is a 22-time Microsoft MVP with decades of IT experience. As a freelance writer, Posey has written thousands of articles and contributed to several dozen books on a wide variety of IT topics. Prior to going freelance, Posey was a CIO for a national chain of hospitals and health care facilities. He has also served as a network administrator for some of the country's largest insurance companies and for the Department of Defense at Fort Knox. In addition to his continued work in IT, Posey has spent the last several years actively training as a commercial scientist-astronaut candidate in preparation to fly on a mission to study polar mesospheric clouds from space. You can follow his spaceflight training on his Web site.