AWS Step-by-Step
Getting Started with Amazon EC2 Containers, Part 1
AWS lets users create and manage containers through a graphical console -- perfect for those unused to working with containers or the Docker command-line environment.
Containers have become all the rage over the last few years.
While you can certainly create an on-premises container infrastructure based on Linux or Windows, it is also possible to run containerized applications on Amazon Web Services' Elastic Compute Cloud (EC2).
In fact, EC2 is a great starting point for anyone who might have been curious about containers, but has thus far avoided them. The reason for this is that AWS allows containers to be created and managed through a graphical console, thereby eliminating the complexity of the Docker command-line environment.
In this article, I will show you how to deploy a simple containerized application on EC2 using the EC2 Container Service, or ECS.
Begin the process by logging in to the AWS console, and then choose EC2 Container Service from the list of available services (it's in the Compute section). At this point, you will be taken to the Amazon EC2 Container Service dashboard.
Rather than using the options presented at the bottom of the dashboard window, click the big blue Get Started button instead. You should now see a screen that asks you to select the option that you want to configure. Choose the option to deploy a sample application onto an Amazon ECS cluster, and clear the other checkbox, as shown in Figure 1.
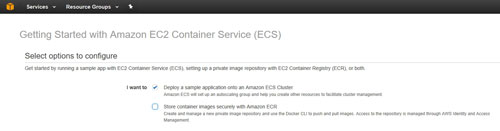 [Click on image for larger view.] Figure 1: Choose the option to deploy a sample application onto an Amazon ECS cluster.
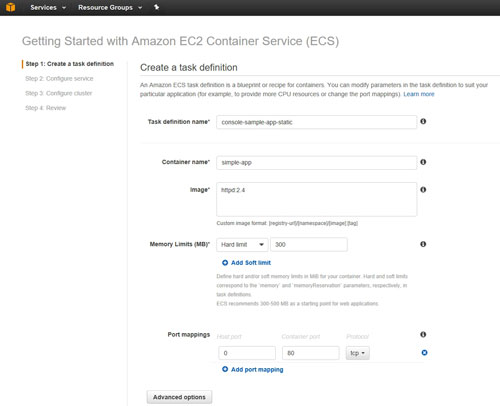
Click Continue, and you will be taken to the Create a Task Definition screen. Under normal circumstances, you would be required to populate all of the fields that are displayed on the screen. In this case, however, AWS has pre-populated the fields in an effort to teach you how to create a containerized application, as shown in Figure 2.
 [Click on image for larger view.] Figure 2: AWS has pre-populated the various fields.
The first thing that you will have to enter is a task definition name. This is just a friendly name used to identify the task that you are creating. You will also have to enter a container name. As you can see in the figure above, the container name (simple-app) is pre-populated, as is the name of the container image (httpd:2.4).
This screen also contains options for configuring the container's memory usage and port mappings. The sample application is set to use 300MB of memory and TCP port 80.
Click Next, and you will be taken to the Configure Service screen, which you can see in Figure 3. This screen asks you to provide a service name and the number of tasks that you want to use. Think of a task as a copy of the containerized application. Thus, two tasks would correspond to two instances of the application. The service's job is to make sure that the correct number of tasks are running.
Incidentally, this screen also gives you the option of load balancing the application, but load balancing isn't necessary in this case because we are just deploying a sample Web app in an effort to get a feel for how containers work.
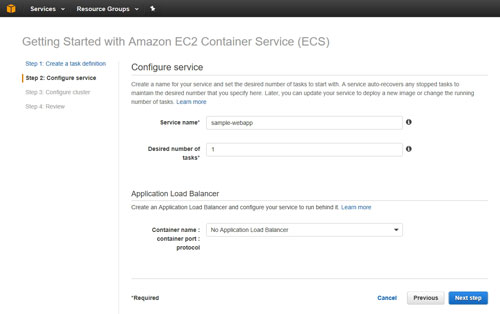 [Click on image for larger view.] Figure 3: Enter a service name and specify the number of tasks that you want to link to the service.
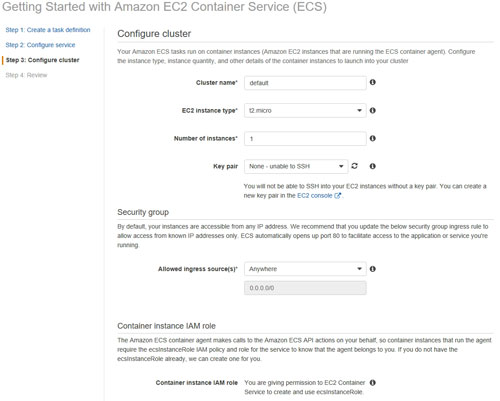
Click Next Step, and you will be prompted to set up a cluster on which to run your container. A cluster is really nothing more than a collection of EC2 instances that work together to run the containers that you are creating. As you can see in Figure 4, you will need to provide a name for the cluster that you are creating, select an instance type and specify the number of instances that you want to use.
The interesting thing about the demo configuration is that this particular cluster will be based around a single EC2 instance. As such, the argument could be made that this isn't a "true cluster." It's more like running a container on a standalone PC.
 [Click on image for larger view.] Figure 4: This is the screen that you will use to configure the container cluster.
You will also need to provide a key pair if you want to be able to SSH into the EC2 instance. Use the drop-down list to select a previously existing key pair. As an alternative, you can go to the EC2 console and create a new key pair.
Another thing that you will have to do before continuing is to specify an allowed ingress source. By default, the container instance will be accessible from any IP address, but AWS recommends changing the rule to allow access only from authorized IP addresses.
Now, click the Review and Launch button, and you will see a container summary. If everything looks good, click on the Launch Instance & Run Service button.
As you can see, AWS makes it really easy to create a sample container. In Part 2 here, I will show you what the container looks like once it is up and running, and how to manage the container.
About the Author
Brien Posey is a 22-time Microsoft MVP with decades of IT experience. As a freelance writer, Posey has written thousands of articles and contributed to several dozen books on a wide variety of IT topics. Prior to going freelance, Posey was a CIO for a national chain of hospitals and health care facilities. He has also served as a network administrator for some of the country's largest insurance companies and for the Department of Defense at Fort Knox. In addition to his continued work in IT, Posey has spent the last several years actively training as a commercial scientist-astronaut candidate in preparation to fly on a mission to study polar mesospheric clouds from space. You can follow his spaceflight training on his Web site.