AWS Step-by-Step
Getting Started with AWS Elastic Beanstalk
Amazon Web Services makes it easy to implement dynamically scalable applications in the cloud. Here's an overview.
There are a lot of things that the cloud does really well, but the one thing that it probably does better than anything else is functioning as an application platform. The reason for this is that the cloud supports massive scalability and is therefore well-positioned to be able to deal with application demand spikes.
While all of this sounds good in theory, the real question is how best to implement dynamically scalable applications in the cloud. In the case of Amazon Web Services (AWS), the answer is to use Elastic Beanstalk.
Even if you have zero experience with application scaling, AWS makes it really easy to get started with Elastic Beanstalk. If you already have a scalable application, then you can upload it to Elastic Beanstalk with minimal effort. If, on the other hand, you just want to see how the technology works, then AWS has sample code that you can use.
To get started, log in to the AWS console and choose Elastic Beanstalk from the list of available services (it's in the Compute section). Upon doing so, you will be taken to the Elastic Beanstalk screen, which you can see in Figure 1.
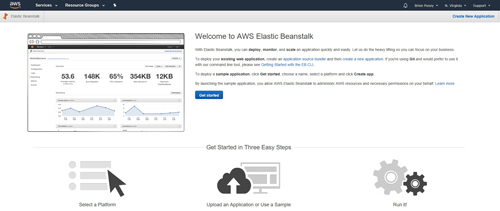 [Click on image for larger view.] Figure 1: You can get started with Elastic Beanstalk in three steps.
As you can see, there are technically three steps to getting started with Elastic Beanstalk: selecting a platform, uploading an application and running the application. Notice that Figure 1 specifically calls out the option to use a sample application. To begin, click the Get Started button shown in the figure above.
Although AWS describes the process of getting started with Elastic Beanstalk as consisting of three steps, it is really more like one step. As you can see in Figure 2, the entire process can be completed through a single screen. Just provide an application name, choose a platform and upload your code.
In this case, I will call my application Demo. I am partial to Microsoft platforms, so I am going to go with the .NET (Windows/IIS) platform, and I am going to use the sample application since I don't have any real code to upload. Now, all I have to do is to click the Create Application button, which you can see below.
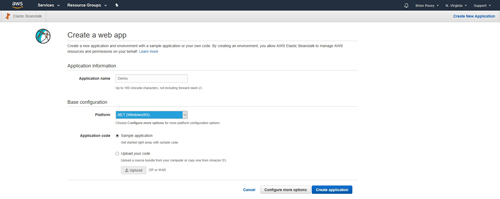 [Click on image for larger view.] Figure 2: Setting up an application for use in Elastic Beanstalk is a simple process.
It takes several minutes for your application to be configured, but the process is completely automatic. When the process completes, you will see a screen that is similar to the one that is shown in Figure 3.
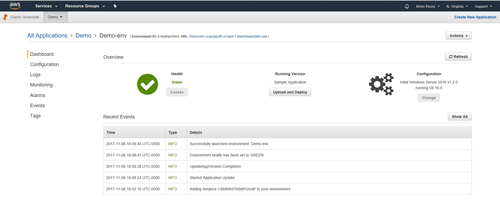 [Click on image for larger view.] Figure 3: This is what it looks like when application setup completes.
As you can see, the screen shows the recent events related to the deployment process. It also shows the application health, which in this case is healthy (green). Most of the interaction with the application is done using the tabs on the left side of the screen. The screen capture shown in Figure 3 above is the Dashboard screen, but there are several other useful screens, including Configuration, Logs, Monitoring, Alarms, Events and Tags.
Of these screens, the one that will probably be of the most interest is Configuration. The Configuration tab is where you go to manage your application. As you can see in Figure 4, the Configuration screen lets you manage application scaling instances, notifications, software configuration, updates and deployments, and health.
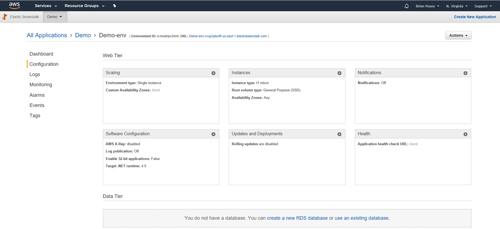 [Click on image for larger view.] Figure 4: The Configuration tab lets you manage the Web application tier.
As you look at Figure 4, you will notice that each item contains a gear-shaped icon that you can click on to modify the individual configuration settings. If you click on the configuration icon for Scaling, for instance, you are taken to a screen like the one shown in Figure 5 below that lets you choose the environment type and availability zones.
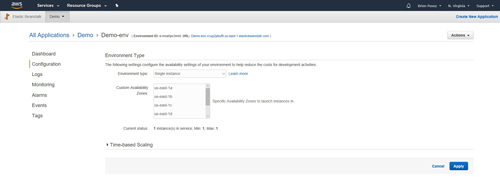 [Click on image for larger view.] Figure 5: This is where you configure the environment type and availability zones.
The one thing that is not available through the various tabs is low-level control of the application. If you need to restart the application servers, delete the environment or perform any similar low-level tasks, you will need to go back to the application's home screen (see Figures 3 and 4) and click the Actions button. As you can see in Figure 6, the available actions include things such as Rebuild Environment and Terminate Environment.
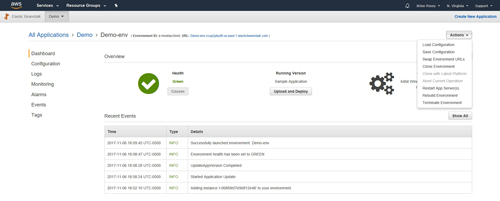 [Click on image for larger view.] Figure 6: The Actions menu contains options for low-level management of the application.
About the Author
Brien Posey is a 22-time Microsoft MVP with decades of IT experience. As a freelance writer, Posey has written thousands of articles and contributed to several dozen books on a wide variety of IT topics. Prior to going freelance, Posey was a CIO for a national chain of hospitals and health care facilities. He has also served as a network administrator for some of the country's largest insurance companies and for the Department of Defense at Fort Knox. In addition to his continued work in IT, Posey has spent the last several years actively training as a commercial scientist-astronaut candidate in preparation to fly on a mission to study polar mesospheric clouds from space. You can follow his spaceflight training on his Web site.