AWS Step-by-Step
Deploying a Web Application Firewall on AWS
Although it is sometimes tempting to think of a firewall as a mechanism for blocking unused TCP and UDP ports, there are other types of firewalls that can be used to protect resources at other layers of the network stack.
One such protective mechanism is a Web application firewall (WAF), which is designed to monitor traffic destined for a Web front-end and filter out anything malicious.
Being that Amazon Web Services (AWS) is such a popular platform for hosting Web applications, it is hardly surprising that AWS provides its customers with WAF capabilities.
To set up a WAF, log in to the AWS portal and then choose WAF & Shield from the list of available services. The WAF and Shield option is located in the Security, Identity & Compliance section.
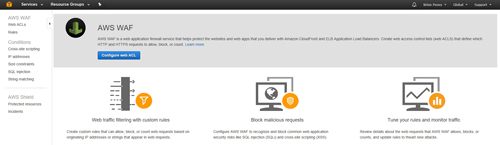
Upon making your selection, you will be taken to the AWS WAF and AWS Shield screen, shown in Figure 1. Click the Go to AWS WAF button to get started.
 [Click on image for larger view.] Figure 1: Click on the Go to AWS WAF button.
You will now be taken to a screen that is similar to the one shown in Figure 2 below. This screen explains that AWS WAF is a service that can protect the Web sites and Web applications that you host on AWS. The screen also goes on to explain that you will need to set up a Web access control list (ACL) that sets the rules for which Web requests you want to block and which you want to allow.
To get started, click on the Configure Web ACL button.
 [Click on image for larger view.] Figure 2: Click the Configure Web ACL button.
At this point, you will be taken to a concept overview screen. This screen, which you can see in Figure 3, admittedly looks a little bit intimidating at first glance. However, you don't actually have to do anything on this screen other than clicking Next. The screen merely exists for the purposes of familiarizing you with the basic structure used by the WAF.
The WAF uses ACLs to determine whether or not to block requests. These ACLs are made up of a series of rules and each rule is made up of conditions. A condition might, for example, be configured to detect a suspicious IP address.
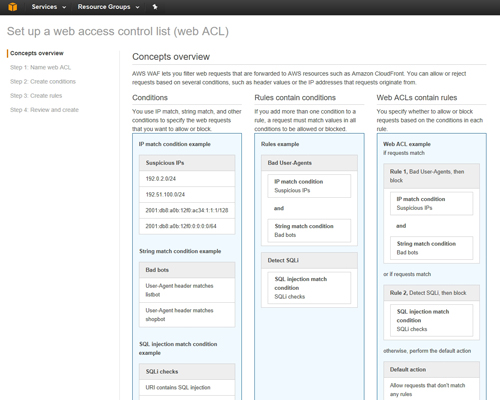 [Click on image for larger view.] Figure 3: This screen outlines the key concepts that you will need to be familiar with.
Click Next, and you will be taken to the Name Web ACL screen. This screen asks you to provide a name for the ACL that you are creating. Because the WAF uses Amazon CloudWatch, you will also need to provide a name to be used for CloudWatch metrics, although this field is filled in automatically.
Finally, you will have to specify the AWS region that you want to use and any AWS resources that you want to associate with the ACL that you are creating. You can see what this screen looks like in Figure 4.
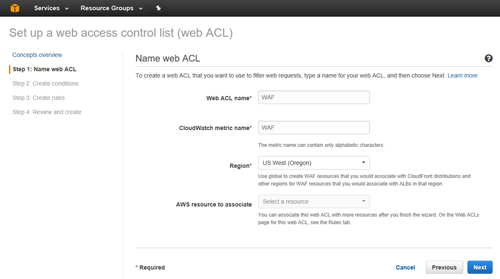 [Click on image for larger view.] Figure 4: This is the Name Web ACL screen.
Click Next, and you will be taken to the Create Condition screen. Although creating a condition is a simple process, I recommend spending some time exploring the available options because you are able to create a variety of conditions.
Creating a condition involves clicking the Create Condition button that is associated with a specific condition type. For example, if you wanted to create an IP address match condition, then you would locate the IP Match Condition section and click on the Create Condition button, as shown in Figure 5.
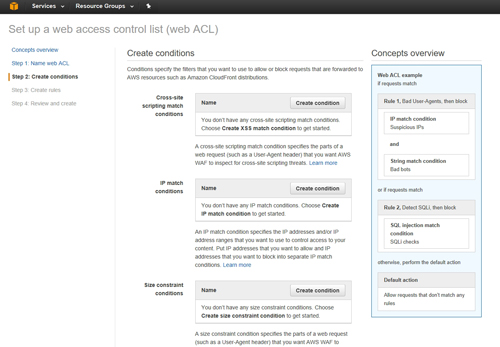 [Click on image for larger view.] Figure 5: Choose a condition type and click the Create Condition button.
As you create conditions, you will be prompted to enter information that is relevant to that specific condition. For example, if you create an IP match condition, then you will need to enter the IP address that you want to watch for.
Click Next and you will be taken to the Create Rules screen. Creating a rule is a simple process. It basically involves selecting a condition that you have defined, and then specifying what happens if that condition is met.
You also have the option of creating a default action that either allows or blocks requests that do not match any of the rules that you create. As such, a rule can establish criteria for gaining access to the Web resource, or it can be used to determine which types of requests should be blocked.
When you are done creating rules, click the Review and Create button. Upon doing so, you will be taken to a screen that gives you the opportunity to review the rules and actions that you have defined. Assuming that everything on the screen is correct, click Confirm and Create to create the Web ACL.
About the Author
Brien Posey is a 22-time Microsoft MVP with decades of IT experience. As a freelance writer, Posey has written thousands of articles and contributed to several dozen books on a wide variety of IT topics. Prior to going freelance, Posey was a CIO for a national chain of hospitals and health care facilities. He has also served as a network administrator for some of the country's largest insurance companies and for the Department of Defense at Fort Knox. In addition to his continued work in IT, Posey has spent the last several years actively training as a commercial scientist-astronaut candidate in preparation to fly on a mission to study polar mesospheric clouds from space. You can follow his spaceflight training on his Web site.