AWS Step-by-Step
How To Add Data to an AWS Instance
While there isn't a right or wrong way to copy files to an AWS instance, some methods are easier and more secure than others. Brien's technique of choice involves the RDP client.
Last week, someone asked me a seemingly basic, but important question about Amazon Web Services (AWS). The e-mail message started out by saying that nobody creates an AWS instance just for the sake of having an instance. Instead, the instance is typically used to host an application or to store data.
The question, therefore, was how to install an application or copy data to an AWS Windows Server instance.
In either situation, you will need to be able to copy files to your AWS instance. If you need to store data on the instance, then you may need to copy existing data to the instance. If you are planning to install an application to the instance, then you will likely need to copy the application binaries to the instance. In either case, you will need a way of getting your files into the instance.
There isn't really a right or wrong method of copying files to an AWS instance. However, some methods are easier or more secure than others. For example, you might in some cases be able to use the instance's Web browser to download data or application binaries from an Internet source, but accessing a Web browser from within a server console isn't a great idea from a security standpoint. Similarly, I have heard unconfirmed stories of someone configuring an AWS instance to act as an FTP server so that the person could upload files to the server. This approach would probably work, but might not be the most efficient method of copying files to an AWS instance.
Although these methods will conceivably work, there is one particular technique that has always worked really well for me. The trick is to use your RDP client to expose a local drive to the AWS instance. That way, you can copy files from the local drive into the instance.
Before I show you how this technique works, I need to point out that I have only tried this using a Windows instance. It is also worth noting that I am using the native RDP client that comes with Windows 10.
So with that said, here is how the technique works. When you create an AWS instance, the AWS console gives you the option to download an RDP file that can be used to connect to the instance that you just created. Although this file will indeed allow you to connect to the instance, it provides very few options when doing so.
To show you what I mean, take a look at Figure 1. I double-clicked on the RDP file, and that caused Windows to open the RDP file using the native RDP client. If I expand the Remote Desktop Connection dialog box, the RDP client gives me the option of accessing my local computer's clipboard and printer, but that's all. There is no option for accessing a local drive.
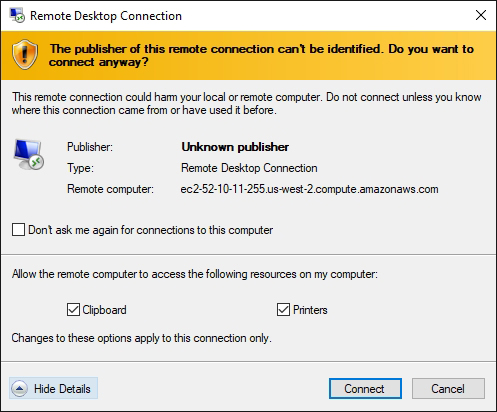 Figure 1: The Remote Desktop Connection dialog box provides very limited options.
As you look at the figure above, you will notice that the window lists the remote computer. You should write down the Remote Computer's fully qualified domain name, as listed in your Remote Desktop Connection dialog box. Now, open your computer's RDP client directly (without using the RDP file). Type your AWS instance's fully qualified domain name into the Computer field, as shown in Figure 2.
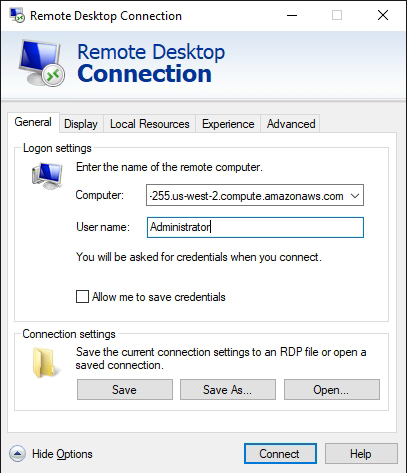 Figure 2: Enter the instance's fully qualified domain name into the Computer field.
One of the things that I'm sure you noticed about the figure above is that because I accessed the RDP client directly rather than use the RDP file that was downloaded from AWS, there are a lot more options available (I had to click Show Options to reveal these options). In fact, the dialog box contains a Local Resources tab, which you can use to specify the resources that should be made available within the RDP session. You can see what this tab looks like in Figure 3 below.
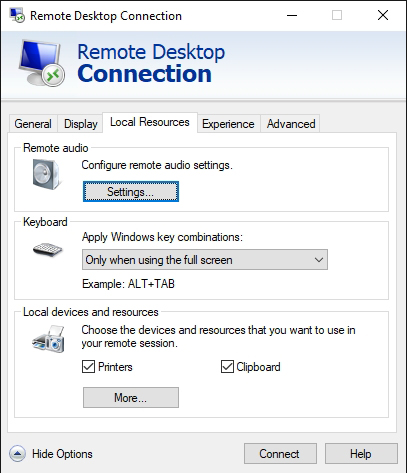 Figure 3: The Local Resources tab provides access to local computer resources.
The Local Resources tab does not immediately display an option to make local drives available within an RDP session, but clicking the More button found at the bottom of the dialog box reveals this option, as shown in Figure 4. Select the drive that you want to make available and click OK, followed by Connect.
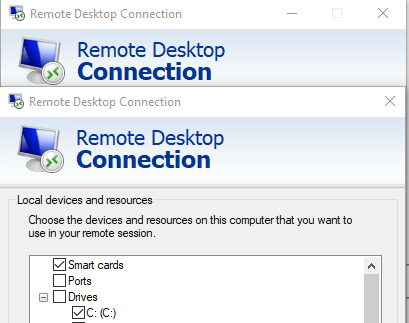 Figure 4: Choose the drive that you want to make available.
Now, log in to the computer and open File Explorer. Upon doing so, you will see the local drives that you have made available, as well as the instance's own storage. You can see an example of this in Figure 5 below.
 [Click on image for larger view.] Figure 5: A local drive has been exposed through an AWS instance.
About the Author
Brien Posey is a 22-time Microsoft MVP with decades of IT experience. As a freelance writer, Posey has written thousands of articles and contributed to several dozen books on a wide variety of IT topics. Prior to going freelance, Posey was a CIO for a national chain of hospitals and health care facilities. He has also served as a network administrator for some of the country's largest insurance companies and for the Department of Defense at Fort Knox. In addition to his continued work in IT, Posey has spent the last several years actively training as a commercial scientist-astronaut candidate in preparation to fly on a mission to study polar mesospheric clouds from space. You can follow his spaceflight training on his Web site.